Инструкция для M-AUDIO Keystation 49 - New

(скачивание инструкции бесплатно)
Формат файла: PDF
Доступность: Бесплатно как и все руководства на сайте. Без регистрации и SMS.
Дополнительно: Чтение инструкции онлайн
background image


12 


Funciones avanzadas 


Además de determinar el cambio de octava, los botones de octava “+” y “-” mencionados anteriormente en la 
sección “Botones de octava” también pueden usarse para controlar una de las 6 funciones MIDI disponibles. 


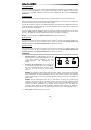
Las 6 primeras teclas negras se usan para seleccionar la función de los botones de octava. Algunas de las 
funciones asignadas a estas teclas no admiten valores inferiores a 0. Si usa los botones de octava para 
controlar dichas funciones, se iluminarán los indicadores situados sobre ambos botones, con independencia 
del ajuste actual de la función. 


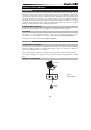
Selección de una función alternative: 

1.


Pulse el botón Advanced Functions para acceder al modo de programación. 

2.


Pulse la tecla negra correspondiente a la función deseada. Una vez seleccionada la función el 
teclado abandonará el modo de programación y sus teclas funcionarán de nuevo con normalidad. 


Cambio de octava: Los botones de octava “+” y “-” 


Otro método para cambiar el rango de octavas del teclado consiste en usar las teclas etiquetadas como 
“Octava +” y “Octava-”. Después de pulsar el botón Advanced Functions y haber entrado en modo de 
programación, pulsando estas teclas podrá cambiar el rango de octavas una o más octavas hacia arriba o 
abajo (una octava por pulsación). El ajuste de rango de octavas predeterminado es “0”. Éste es también el 
ajuste que encontrará cada vez que ponga el teclado en funcionamiento Cuando los indicadores situados 
sobre los botones de octava están ambos iluminados ello significa que el teclado usa el ajuste 
predeterminado (“0”). 


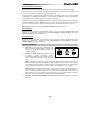
Para asignar los botones “+” y “-” al control del rango de octavas: 

1.


Pulse el botón Advanced Functions para acceder al modo de programación. 

2.


Pulse la tecla negra que representa “OCTAVE”. El teclado abandonará el modo de programación en 
cuanto pulse OCTAVE. 


También existe otro método para cambiar rápidamente el rango de octavas que puede ser útil si usa los 
botones de octava para controlar otra función. Haga lo siguiente: 

1.


Pulse el botón Advanced Functions para acceder al modo de programación. 

2.


Pulse la tecla negra representa “OCTAVA +”, desplazando el rango de octava hacia arriba (si la 
pulsa dos veces, lo desplazará dos octavas, y así sucesivamente). 
Pulse la tecla negra representa “OCTAVA -”, desplazando el rango de octava hacia abajo; si la 
pulsa dos veces lo desplazará octavas, etc.). Pulse la tecla negra que representa la "OCTAVA 0" 
para reiniciar el desplazamiento de octavas a 0.  

3.


Cuando haya elegido su desplazamiento de octavas, pulse “ENTER” para seleccionar su octava y 
salga del modo de edición. Al seleccionar Cancel o Advanced se cancela la selección y se sale del 
modo Advanced. 


Transposición 


En algunos casos resulta práctico subir o bajar el tono del teclado en un determinado número de semitonos, 
más que en octavas completas. Por ejemplo, puede que esté tocando una canción con un cantante que 
tiene dificultades con las notas más altas. En este caso, baje el tono en uno o dos semitones usando la 
función MIDI llamada “Transpose”. Para hacerlo, use la función MIDI llamada “Transpose” (Transposición). 


La transposición funciona de la misma manera que el desplazamiento de octavas arriba explicado, excepto 
que el desplazamiento puede ser de hasta +/- 12 semitonos. Al igual que sucede con el desplazamiento de 
octava, existen dos métodos para transportar el tono del teclado. Puede usar los botones de octava “+” y “-”, 
o las teclas negras “TRANSPOSE -,” “TRANSPOSE 0” y “TRANSPOSE +,” respectivamente.  


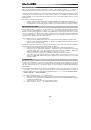
Asignación de los botones “+” y “-” a la función de transposición: 

1.


Pulse el botón Advanced Functions para acceder al modo de programación. 

2.


Pulse la tecla negra representa “TRANSPOSE”. El teclado abandonará el modo de programación 
en cuanto pulse “TRANSPOSE”. 

3.


Pulse la tecla “+” para escuchar como sube el tono del teclado. 

4.


Pulse “+” y “-” al mismo tiempo para cancelar la transposición. 

1
2
3
4
5
6
7
8
9
10
11
12
13
14
15
16
17
18
19
20
21
22
23
24
25
26
27
28
29
30
31
32
33
34
35
36
37
38
39
40
Оглавление инструкции
  • Страница 1 из 41
    User Guide English ( 2 – 8 ) Guía del usuario Español ( 9 – 15 ) Guide d'utilisation Français ( 16 – 22 ) Guida per l'uso Italiano ( 23 – 29 ) Benutzerhandbuch Deutsch ( 30 – 37 ) Appendix English ( 39 )
  • Страница 2 из 41
    User Guide (English) Introduction Congratulations on purchasing the M-Audio Keystation 49 keyboard. The 49 key velocity-sensitive USB keyboard is designed to easily integrate with your PC or Macintosh computer. Keystation 49 offers semiweighted keys that give you the feel of a piano in a compact
  • Страница 3 из 41
    Recommended Installation Ableton Live Lite: We've included Ableton Live Lite with your Keystation so you can get started making music with professional software right out of the box. Select the Ableton Live Lite software, open the "setup" application or .exe (Windows) or .mpkg file (Mac OS X), and
  • Страница 4 из 41
    Advanced Functions Button The Advanced Functions button is used to access all the advanced functions of the keyboard. When the Advanced Functions button is pressed, the keyboard goes into “Edit Mode.” In Edit Mode, the keys on the keyboard are used for selecting functions and entering data. The LED
  • Страница 5 из 41
    Advanced Functions In addition to setting an octave shift, the two octave “+” and “-” buttons discussed earlier in the manual under the section “Octave Buttons” can also be used to control one of six MIDI functions. The first 6 black keys are used to select the function of the octave buttons. Some
  • Страница 6 из 41
    MIDI Channel MIDI data from the keyboard can be sent on any of 16 MIDI Channels. However, certain MIDI devices and MIDI software applications require the keyboard to send data on a specified channel. If this is the case, you can change the channel the data is sent using the following method: 1.
  • Страница 7 из 41
    Volume Slider Assignment To assign the Volume Slider to an effect: 1. Press the Advanced Functions button to engage Edit Mode. 2. Press the black key representing “FADER.” 3. Use the Numerical Data Entry keys to enter the number of the effect you want to assign to the Volume Slider. Alternatively,
  • Страница 8 из 41
    Troubleshooting General Here are answers to common questions you may have, using your Keystation keyboard: Problem 1: My M-Audio hardware suddenly stopped working after having performed fine since installation. Solution 1: Switch off the unit and let it sit for 10 seconds. Then restart your
  • Страница 9 из 41
    Guía del usuario (Español) Introducción Felicitaciones por la compra de su teclado M-Audio Keystation 49. Este teclado USB sensible a la velocidad de 49 teclas está diseñado para integrarse fácilmente con su PC o computadora Macintosh. El Keystation 49 ofrece teclas semicontrapesadas que le dan la
  • Страница 10 из 41
    Instalación recomendada Ableton Live Lite: Hemos incluido Ableton Live Lite con su Keystation de modo que puede comenzar a hacer música con software profesional en cuanto lo saca de la caja. Seleccione el software Ableton Live Lite, abra la aplicación "setup" (instalación) o .exe (Windows) o el
  • Страница 11 из 41
    Rueda de modulación La rueda de modulación se usa normalmente para modular el sonido que está tocando. Este tipo de controlador en tiempo real se incorporó originalmente en los teclados electrónicos para ofrecer al instrumentista opciones como las de agregar vibrato, tal como lo hace un músico al
  • Страница 12 из 41
    Funciones avanzadas Además de determinar el cambio de octava, los botones de octava “+” y “-” mencionados anteriormente en la sección “Botones de octava” también pueden usarse para controlar una de las 6 funciones MIDI disponibles. Las 6 primeras teclas negras se usan para seleccionar la función de
  • Страница 13 из 41
    Canal Los datos MIDI del teclado pueden enviarse a través de cualquiera de los 16 canales MIDI. Sin embargo, ciertos dispositivos y programas MIDI requieren que los datos sean enviados por un canal específico. En este caso, cambie el canal a través del cual el teclado envía los datos siguiendo este
  • Страница 14 из 41
    Método de selección rápida: 1. Pulse el botón Advanced Functions. 2. Pulse la tecla negra que representan “BANCO LSB” y “BANCO MSB” respectivamente. 3. Pulse sucesivamente las teclas “3,” “2,” “ENTER.” Al igual que ocurre con los cambios de programa, si los botones de octava “+” y “-” están
  • Страница 15 из 41
    Botones direccionales y controles de transporte Los botones direccionales y los botones de transporte usan los protocolos Mackie Control o HUI para controlar ciertas funciones del software que los soporta. Para seleccionar el protocolo a usar por estos botones para comunicarse con su software: 1.
  • Страница 16 из 41
    Guide d'utilisation (Français) Présentation Nous vous félicitons d’avoir fait l'acquisition du clavier Keystation 49 de M-Audio, un clavier USB dynamique de 49 touches conçu pour une intégration facile avec votre ordinateur PC ou Macintosh. Keystation 49 offre des touches semi-lourdes qui vous
  • Страница 17 из 41
    Installation recommandée Ableton Live Lite : Nous avons inclus l’application Ableton Live Lite avec le Keystation afin que vous puissiez commencer à créer de la musique avec un DAW logiciel de qualité professionnelle aussitôt que vous le sortez de la boîte. Sélectionnez le logiciel Ableton Live
  • Страница 18 из 41
    Molette de modulation La molette de modulation est généralement utilisée pour moduler le son que vous jouez. Ce type de contrôleur en temps réel a d’abord été implanté sur les claviers électroniques pour offrir au musicien des options telles que l’ajout de vibrato, qui permet d’imiter le travail
  • Страница 19 из 41
    Quand les boutons d’octaves sont utilisés pour commander ces fonctions, les deux témoins lumineux situés audessus restent allumés, peu importe la configuration actuelle de cette fonction. Pour sélectionner une fonction alternative : 1. 2. Appuyez sur le bouton «Advanced Functions» pour mettre votre
  • Страница 20 из 41
    Par exemple, si un périphérique précise que vous devez envoyer les données sur le canal 10, appuyez sur le bouton «Advanced Functions» et sur la sélectionner le canal 10. Le canal peut aussi être assigné aux boutons d’octaves “+” et “-”. Une fois assigné, le fait d’appuyer sur “+” ou “-”
  • Страница 21 из 41
    Vous pouvez aussi utiliser les boutons “+” et “-” pour changer la valeur. 1. Appuyez sur la touche Advanced Functions pour activer le mode Edit. 2. Appuyez sur la touche noire représentant « FADER ». 3. Utilisez les touches « + » et « - » pour modifier la valeur. 4. Appuyez sur la touche ENTER. 5.
  • Страница 22 из 41
    Dépannage General Voici les solutions aux problèmes les plus fréquents, lors de l’utilisation d’un clavier Keystation : Problème 1 : Mon matériel M-Audio a soudainement cessé de fonctionner après un fonctionnement sans problème depuis l’installation. Solution 1 : Eteignez-le et laissez-le reposer
  • Страница 23 из 41
    Guida per l'uso (Italiano) Introduzione Congratulazioni per aver acquistato la tastiera Keystation 49 di M-Audio. Questa tastiera USB a 49 tasti sensibili alla velocità è stata concepita per integrarsi facilmente con il vostro PC o Macintosh. Il Keystation 49 presenta tasti semi-pesati che offrono
  • Страница 24 из 41
    Installazione consigliata Ableton Live Lite: abbiamo incluso l'Ableton Live Lite con l'Keystation in modo che possiate iniziare immediatamente a fare musica con software professionale. Selezionare il software Ableton Live Lite, aprire l'applicazione "setup" o il file .exe (Windows) o .mpkg (Mac OS
  • Страница 25 из 41
    Il pulsante Advanced Functions Il pulsante Advanced Functions viene utilizzato per accedere a tutte le funzioni avanzate della tastiera. Una volta premuto, la tastiera passa in “modalità di programmazione”. Durante questa modalità, i tasti possono essere utilizzati per selezionare funzioni e
  • Страница 26 из 41
    Funzioni avanzate Oltre che per l’impostazione dello spostamento di ottava, i due pulsanti di ottava “+” e “-” illustrati in precedenza alla sezione “Pulsanti di ottava” servono per controllare una delle 6 funzioni MIDI disponibili. I primi 6 tasti vengono utilizzati per selezionare la funzione dei
  • Страница 27 из 41
    Canale I dati MIDI provenienti dalla tastiera possono essere inviati a uno qualsiasi dei 16 canali MIDI. Tuttavia, determinate periferiche MIDI e programmi MIDI richiedono che la tastiera invii i dati su un canale specifico. In questo caso, è possibile cambiare il canale di invio dei dati mediante
  • Страница 28 из 41
    Slider Volume Per assegnare lo slider Volume a un effetto: 1. Premere il pulsante Advanced Functions per portare la tastiera nella modalità di programmazione. 2. Premere il tasto nero “FADER.” 3. Usare i tasti di immissione dei dati numerici per immettere il numero dell’effetto che si desidera
  • Страница 29 из 41
    Risoluzione dei problemi Generali Di seguito sono riportate risposte relative a problemi comuni che si possono riscontrare nell’uso delle tastiere Keystation: Problema 1: l’hardware M-Audio smette improvvisamente di funzionare dopo un normale funzionamento successivo all’installazione. Soluzione 1:
  • Страница 30 из 41
    Benutzerhandbuch (Deutsch) Einleitung Herzlichen Glückwunsch zum Kauf des M-Audio Keystation 49 Keyboard. Dieses USB-Keyboard mit 49 anschlagdynamischen Tasten wurde designt, um eine möglichst einfache Integration mit Ihrem PC oder Macintosh-Computer zu ermöglichen. Keystation 49 ist mit
  • Страница 31 из 41
    Empfohlene Installation Ableton Live Lite: Wir liefern Keystation mit Ableton Live Lite aus, damit Sie Ihre Musikproduktion gleich mit professioneller Software beginnen können. Öffnen Sie die Ableton Live Lite Software, öffnen die Anwendung "Setup" oder .exe (Windows) bzw. die .mpkg-Datei (Mac OS
  • Страница 32 из 41
    Lautstärke-Slider Über den Lautstärke-Slider werden normalerweise MIDI-Befehle zur Regelung der Tonlautstärke gesendet. Sie können dem Slider allerdings auch für andere Kontrollfunktionen wie Pan (Balance), Attack, Reverb, Chorus, uvm. programmieren. Weitere Informationen hierzu entnehmen Sie bitte
  • Страница 33 из 41
    Erweiterte Funktionen Die beiden Up & Down-Tasten für die Veränderung der Oktavlage (siehe Abschnitt “Oktavtasten”) können zusätzlich für die Steuerung der MIDI-Funktionen genutzt werden. Über Die ersten 6 schwarzen Tasten können sie die gewünschte Spezialfunktion für die Octave Up & DownTasten
  • Страница 34 из 41
    Kanal Mit Keystation verfügen Sie über 16 MIDI-Kanäle für das Senden von MIDI-Daten. Bitte beachten Sie jedoch, dass einige MIDI-Geräte und MIDI-Anwendungen die MIDI-Daten des Keyboards nur über einen bestimmten Kanal empfangen können. In diesem Fall können Sie den Sendekanal wie folgt einstellen:
  • Страница 35 из 41
    Direktauswahl: 1. Drücken Sie die Funktionstaste, um den Edit-Modus zu aktivieren. 2. Drücken Sie die schwarze Taste entspricht “BANK LSB” bzw. “BANK MSB”. 3. Drücken Sie nacheinander die Tasten “3”, “2”, und “ENTER” ein. Wenn Sie den Bank Change über die Octave Up & Down-Tasten veranlassen, ändert
  • Страница 36 из 41
    Richtungstasten und Transportsteuerungen Die Richtungstasten und Transport-Tasten verwenden die Protokolle von Mackie Control oder HUI, um bestimmte Funktionen in Softwares zu steuern, die diese unterstützen. Um auszuwählen, welches Protokoll diese Tasten verwenden, um mit der Software zu
  • Страница 37 из 41
    MIDI-Funktionen Die Keystation-Keyboards wurden so konstruiert, dass die MIDI-Verarbeitung mit ihrem Computer so einfach wie möglich wird. Nichtsdestotrotz können unter Umständen Schwierigkeiten mit den MIDI-Funktionen auftreten. Oft liegt der Fehler in diesen Fällen nicht am Keyboard, sondern am
  • Страница 38 из 41
    Wheel and Fader User Assignments 00 Bank Select 01 Modulation 02 Breath Control 03 Controller 3 04 Foot Control 05 Porta Time 06 Data Entry 07 Channel Volume 08 Balance 09 Controller 9 10 Pan 11 Expression 12 Effects Controller 1 13 Effects Controller 2 14 Controller 14 15 Controller 15 16 Gen
  • Страница 39 из 41
    Appendix (English) Technical Specifications Power USB-bus-powered Size (width x depth x height) 7.7" x 3" x 31.9" 195 mm x 75 mm x 810 mm Weight 4.6 lbs. 2.1 kg Specifications are subject to change without notice. Trademarks and Licenses M-Audio is a trademark of inMusic Brands, Inc., registered in
  • Страница 40 из 41
    m-audio.com Manual Version 1.1
  • Страница 41 из 41