31
Empfohlene Installation
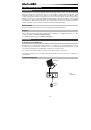
Ableton Live Lite:
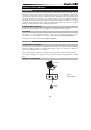
Wir liefern Keystation mit Ableton Live Lite aus, damit Sie Ihre Musikproduktion gleich
mit professioneller Software beginnen können. Öffnen Sie die Ableton Live Lite Software, öffnen die
Anwendung "Setup" oder
.exe
(Windows) bzw. die
.mpkg
-Datei (Mac OS X) und befolgen die Anweisungen
auf dem Bildschirm, um die Software zu installieren. Besuchen Sie außerdem
ableton.com
, um
festzustellen, ob Software-Updates verfügbar sind.
Erste Schritte
Nach der Installation der Gerätetreiber müssen Sie Ihre MIDI-Software für Keystation konfigurieren. Bitte
beachten Sie, dass Sie nach der Treiberinstallation bei Tastendruck noch keinen Sound hören werden, da
über Keystation lediglich MIDI-Daten übertragen werden. MIDI-Daten beinhalten Informationen zur Art und
Weise der Wiedergabe. Für die tatsächliche Soundwiedergabe müssen Sie Ihre Audiosoftware entsprechend
konfigurieren. Im folgenden Abschnitt geben wir Ihnen ausführliche Hinweise zu den Konfigurationsoptionen,
die Sie in Ihrer Audiosoftware vornehmen müssen. Im Abschnitt “MIDI-Geräte” Ihrer Audioanwendung sollte
Keystation unter der Bezeichnung “USB Audio Device” (Windows XP, Windows Vista, Windows 7) bzw. unter
der Bezeichnung “Keystation 49” (sonstige Betriebssysteme) ausgewiesen sein. Genauere Hinweise zur
Konfiguration entnehmen Sie bitte dem Benutzerhandbuch Ihrer Audioanwendung.
Funktionen
Oberseite
Keyboard
Die meisten weißen und schwarzen Tasten auf der Keystation sind beschriftet. Wenn Sie sich im Menü
Erweitert befinden, können Sie durch Drücken einer der beschrifteten Tasten Sonderfunktionen aktivieren
und so den MIDI-Kanal einstellen, transponieren und Programmwechsel senden.
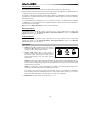
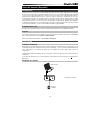
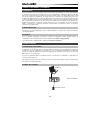
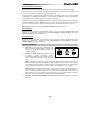
Oktavtasten
Wenn Sie die Oktaventaste "+" einmal drücken, erlischt die LED oberhalb der Oktaventaste "-", was anzeigt,
dass die Oktave der Tastatur nun nach oben verschoben wurde. Bei erneutem Drücken der Octave Up-Taste
(“+”) werden die Noten zwei Oktaven höher gesetzt, usw. Mit den Octave Up & Down-Tasten können Sie das
Keyboard insgesamt 3 Oktaven nach oben oder unten transponieren.
Um die Oktave nach unten zu verschieben, drücken Sie die Oktaventaste "-". Sie werden feststellen, dass
die LED oberhalb der Oktave "+" erlischt. Wenn nur die LED über der Octave Down-Taste (“-”) leuchtet,
werden alle Noten eine Oktave niedriger wiedergegeben. Wenn nur die LED über der Octave Up-Taste (“+”)
leuchtet, werden alle Noten eine Oktave höher wiedergegeben. Die LEDs der Oktaventasten "+" und "-"
ändern die Farbe, wenn Sie mehr als eine Oktave nach oben oder nach unten springen.
Über gleichzeitiges Drücken der Octave Up & Down-Tasten setzen Sie das Keyboard auf die urprüngliche
Oktavlage zurück. In diesem Falle leuchten beide LEDs.
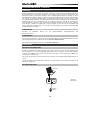
Pitchrad
Mit dem Pitchrad können Sie die Tonhöhe einzelner Noten während des Spielens verändern. So können Sie
Sounds erzeugen, die normalerweise nicht mit Keyboard-Klängen assoziiert werden — zum Beispiel
Gitarrenriffs. In welchem Umfang Sie die Tonhöhe verändern können, hängt von Ihrer Soundquelle ab.
Normalerweise wird der Bereich von zwei Halbtönen beansprucht; potentiell sind jedoch Tonerweiterungen
bis zu zwei Oktaven höher oder niedriger möglich.
Modulationsrad
Mit dem Modulationsrad können Sie den Klang während des Spielens in Echtzeit modulieren. Diese Funktion
wurde ursprünglich für elektronische Keyboardinstrumente entwickelt, um den Performern die Möglichkeit der
Einführung von akustischen Effekten wie zum Beispiel Vibratos zu geben. Das Modulationsrad ist absolut
MIDI-fähig.