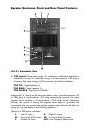
Инструкция для M-AUDIO LX4 2.1 System

(скачивание инструкции бесплатно)
Формат файла: PDF
Доступность: Бесплатно как и все руководства на сайте. Без регистрации и SMS.
Дополнительно: Чтение инструкции онлайн
background image

2. Sub Volume:

Use the Sub Volume to set the Subwoofer output sound

pressure level relative to other output channels as required. Once the
subwoofer to satellite balance is achieved, use the Master Volume to control
overall listening levels.

3. Power / Protect. LED:

When the power switch is switched to ON, the

LED will glow “Green.” When the Protection circuitry of the power
amplifiers has turned on because of any abnormal conditions, including
overdriving the speakers into heavy clipping for too long, the LED will glow
“Orange” and the output level will reduce by 12dB.

4. Master Volume:

Use the Master Volume to set the output sound

pressure of all channels from the LX4 system to proper level as required.
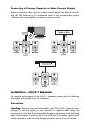
5. Speaker Outputs:

(5) spring-type Speaker Output terminals for

connecting (5) Channel Amplifier Outputs to all speaker channels, as follows:

L:

Use Speaker wire included in the LX4-2.1 package to connect the

L channel amplifier output to the Left Speaker.

R:

Use Speaker wire included in the LX4-2.1 package to connect the

R channel amplifier output to the Right Speaker.

SL:

Use Speaker wire included in the optional LX4-3.0 package to connect

the Surround Left channel amplifier output to the Surround Left Speaker.

SR:

Use Speaker wire included in the optional LX4-3.0 package to connect

the Surround Right channel amplifier output to the Surround Right Speaker.

C:

Use Speaker wire included in the optional LX4-3.0 package to connect

the Center channel amplifier output to the Center Speaker.

6. Product Label:

This label contains the model and serial number information.

7. Power Receptacle:

Accepts a detachable 3-circuit line cord in order to

apply AC power to the entire LX4 system.

8. Power Switch:

This switch turns the LX4 system on and off.The “On” position

is indicated by a white dot.

9. Fuse Holder:

Holds the external main fuse.

10. Voltage-select Switch:

Provides 2 selections,115VAC (120VAC) and 230VAC.

This switch should be set to match the “house supply” (receptacle) voltage of the
country or location in which the speaker is used.The 115VAC (120VAC) setting is
correct for the USA,while the 230V setting is correct for most of the UK and Europe.

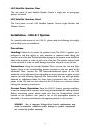
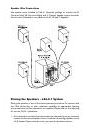
LX4-2.1 Subwoofer, Front

The front panel of the Subwoofer houses the Subwoofer driver and
Sub-Frequency Port.

5

1
2
3
4
5
6
7
8
9
10
11
12
13
14
15
Оглавление инструкции
  • Страница 1 из 16
    Studiophile LX4 System version: LX4-050504 User Guide Introduction . . . . . . . . . . . . . . . . . . . . . . . . . . . . . . . . . . . . . . . . . . . . . . .2 What’s in the Box? . . . . . . . . . . . . . . . . . . . . . . . . . . . . . . . . . . . . . . . . . .2 Studiophile LX4 Surround System
  • Страница 2 из 16
    Introduction Thank you for choosing the Studiophile Series LX4-2.1 / 5.1 studio nearfield monitor speakers. M-Audio is well known for digital audio interface technology, digital converters, audio preamps and mixers. Now, born from extensive research and development, the Studiophile LX4-2.1 System
  • Страница 3 из 16
    Studiophile LX4 Surround System Features 1. Satellite Woofer - the Satellite Speaker’s woofer units are 4 inches in diameter with a magnetically shielded mineral-filled polypropylene cone, hightemperature voice coil and damped closed cell foam surround. It is designed to deliver balanced mid- and
  • Страница 4 из 16
    Speaker Enclosure Front and Rear Panel Features LX4-2.1 Subwoofer, Rear 1. TRS Inputs: These jacks accept 1/4” connections with either balanced or unbalanced wiring. For balanced wiring, a three-conductor TRS plug is necessary.The input wiring of a TRS connector should be as follows: TRS TIP -
  • Страница 5 из 16
    2. Sub Volume: Use the Sub Volume to set the Subwoofer output sound pressure level relative to other output channels as required. Once the subwoofer to satellite balance is achieved, use the Master Volume to control overall listening levels. 3. Power / Protect. LED: When the power switch is
  • Страница 6 из 16
    LX4 Satellite Speaker, Rear The rear panel of each Satellite Speaker houses a single pair of spring-type speaker terminals. LX4 Satellite Speaker, Front The front panel of each LX4 Satellite Speaker houses single Woofer and Tweeter drivers. Installation - LX4-2.1 System For optimal performance of
  • Страница 7 из 16
    Speaker Wire Connections Use speaker wires included in LX5-2.1 package to connect the Left and Right Speaker output terminals, found on the Subwoofer’s rear panel, to the Left and Right Speakers. TRS Balanced/Unbalanced Connections Assure that the LX4’s power switch is turned to the off position
  • Страница 8 из 16
    Connecting to Preamp, Computer or Game Console Outputs Before connecting, make sure the output device’s power has been turned off. Plug the TRS balanced or TS unbalanced cable to the corresponding output connectors of a pre-amplifier, computer or game console. Installation - LX4-5.1 Expander For
  • Страница 9 из 16
    Speaker Wire Connections Use speaker wires included in LX4-5.1 Expander package to connect the SL (Surround Left), SR (Surround Right) and C (Center) Speaker output terminals, found on the Subwoofer’s rear panel, to the SL, SR and C Speakers. Placing the Speakers - LX4-2.1 System Placing the
  • Страница 10 из 16
    2. The two Left and Right speaker units and the listener should basically align to form a regular, or equilateral triangle. Refer to the following diagram. 3. Position the monitors so that the tops of the woofers are level with your ears in a normal listening environment. Refer to the following
  • Страница 11 из 16
    Placing the Speakers - LX4-5.1 Expander Placing the speakers is one of the most important procedures in order to monitor sound accurately. To monitor with the LX4s performing to their maximum capability, an appropriate listening environment and correct placement are required. Please refer to the
  • Страница 12 из 16
    Technical Support & Contact Information For additonal help, contact M-Audio Technical Support by telephone (626-445-8495, 9-5 PST M-F), by fax (626-445-7564) or by e-mail (techsupt@m-audio.com). If you have any questions, comments or suggestions about this or any M-Audio product, we invite you to
  • Страница 13 из 16
    Warranty Terms M-Audio warrants products to be free from defects in materials and workmanship, under normal use and provided that the product is owned by the original, registered user. Visit www.m-audio.com/warranty for terms and limitations applying to your specific product. Warranty Registration
  • Страница 14 из 16
    Appendix A - Technical Specifications Type: 3-way studio reference with subwoofer (2.1 System), expandable to 5.1 Subwoofer Driver: 8 inch diameter, specially-developed curved-profile pulp cone, high-temperature voice coil and damped closed cell foam surround designed for sub-frequency pressure
  • Страница 15 из 16
    Appendix B - Block Diagram 15
  • Страница 16 из 16