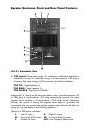
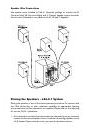
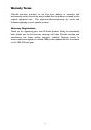
LX4 Satellite Speaker, Rear
The rear panel of each Satellite Speaker houses a single pair of spring-type
speaker terminals.
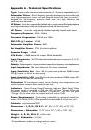
LX4 Satellite Speaker, Front
The front panel of each LX4 Satellite Speaker houses single Woofer and
Tweeter drivers.
Installation - LX4-2.1 System
For optimal performance of the LX4-2.1, please read the following thoroughly
and carefully prior to installation.
Precautions
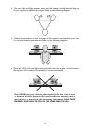
Handling:
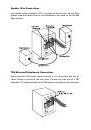
Please do not touch the speaker cones.The LX4-2.1 speaker set is
packaged in the box tightly, so your attention is required when taking the
monitors out of the box.To avoid possible damage to the speaker units, hold both
sides of the monitor in order to pull it out of the box.The speaker cones should
not be touched in order to avoid damage even after they are out of the box.
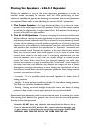
Connections:
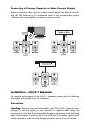
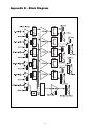
Using the included Speaker Wires, connect the Left and Right
Speaker inputs to the corresponding speaker terminals on the rear panel of the
subwoofer. Then, connect the TRS balanced/unbalanced inputs of the LX4
subwoofer unit to the desired corresponding pre-amp, computer or game console
outputs (see the following diagrams). We recommend that you use high-quality
balanced or unbalanced cables for these input connections. Also, turn off the
power of the LX4 and turn the volume of the LX4 down to a minimum before
making the necessary connections.
Correct Power Operation:
Since the LX4-2.1 System contains amplifiers,
it must be connected to a power outlet using the detachable AC cable provided.
Before connecting power, please make sure that the Voltage-Select Switch
located on the speaker’s rear panel is set to the appropriate position, as
described in the rear-panel features list appearing earlier in this manual.
WARNING! - Use of improper Voltage-Select Switch combinations may
result in hazardous conditions and/or damage to speaker components
not covered by speaker warranty.
6