Инструкция для MAKITA HR2475

(скачивание инструкции бесплатно)
Формат файла: PDF
Доступность: Бесплатно как и все руководства на сайте. Без регистрации и SMS.
Дополнительно: Чтение инструкции онлайн
background image

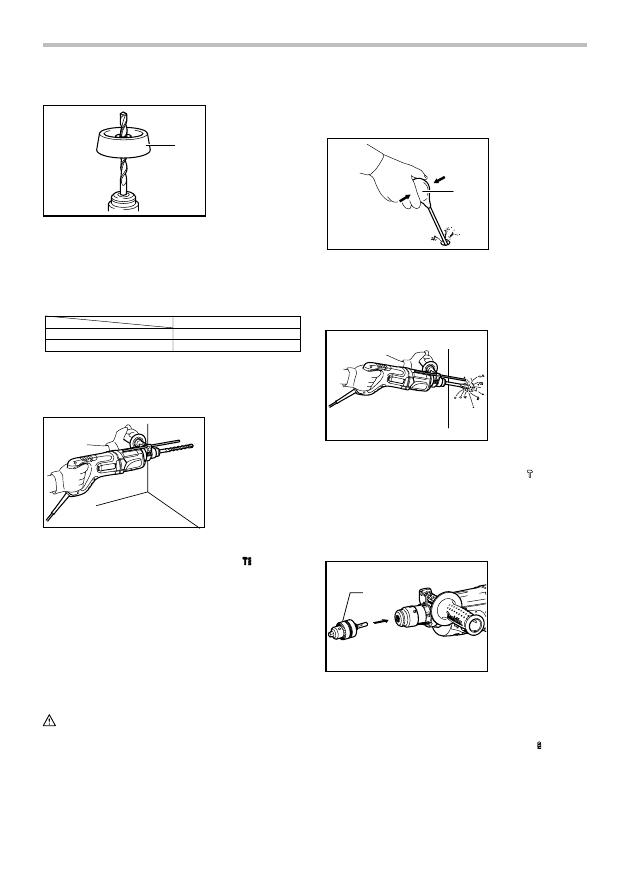
Dust cup 

1


001300 

 
Use the dust cup to prevent dust from falling over the 
tool and on yourself when performing overhead drilling 
operations. Attach the dust cup to the bit as shown in the 
figure. The size of bits which the dust cup can be 
attached to is as follows. 

Bit diameter (mm)

Dust cup 5

6 - 14.5

Dust cup 9

12 - 16


006587 


OPERATION 

Hammer drilling operation 


010167 

 
Set the action mode changing knob to the 

 symbol. 

Position the bit at the desired location for the hole, then 
pull the switch trigger. 
Do not force the tool. Light pressure gives best results. 
Keep the tool in position and prevent it from slipping 
away from the hole. 
Do not apply more pressure when the hole becomes 
clogged with chips or particles. Instead, run the tool at 
an idle, then remove the bit partially from the hole. By 
repeating this several times, the hole will be cleaned out 
and normal drilling may be resumed. 


CAUTION: 

• 

There is tremendous and sudden twisting force 
exerted on the tool/bit at the time of hole 
break-through, when the hole becomes clogged 
with chips and particles, or when striking 
reinforcing rods embedded in the concrete. Always 
use the side grip (auxiliary handle) and firmly hold 
the tool by both side grip and switch handle during 

operations. Failure to do so may result in the loss 
of control of the tool and potentially severe injury. 


Blow-out bulb (optional accessory) 

1


002449 

 
After drilling the hole, use the blow-out bulb to clean the 
dust out of the hole. 


Chipping/Scaling/Demolition 


010168 

 
Set the action mode changing knob to the 

 symbol. 

Hold the tool firmly with both hands. Turn the tool on and 
apply slight pressure on the tool so that the tool will not 
bounce around, uncontrolled. Pressing very hard on the 
tool will not increase the efficiency. 


Drilling in wood or metal 

1


010157 

 
Use the optional drill chuck assembly. When installing it, 
refer to "Installing or removing the bit" described on the 
previous page. 
Set the action mode changing knob to the 

 symbol. 

You can drill up to 13 mm(1/2") diameter in metal and up 
to 32 mm(1-1/4") diameter in wood. 


1. Drill chuck 

assembly 

1. Blow-out bulb 

1. Dust cup 

1
2
3
4
5
6
7
8
9
10
11
12
13
14
15
16
17
18
19
20
21
22
23
24
25
26
27
28
Оглавление инструкции
  • Страница 1 из 29
    INSTRUCTION MANUAL MANUEL D'INSTRUCTION MANUAL DE INSTRUCCIONES Combination Hammer Marteau combiné Martillo combinado HR2475 010154 DOUBLE INSULATION DOUBLE ISOLATION DOBLE AISLAMIENTO 1
  • Страница 2 из 29
    ENGLISH SPECIFICATIONS Model Capacities HR2475 Concrete 25 mm (1") Core bit 54 mm (2-1/8") Steel 13 mm (1/2") Wood 32 mm (1-1/4") No load speed (RPM) 0 - 1,100/min. Blows per minute 0 - 4,500 Overall length 429 mm (16-7/8") Net weight 3.0 kg ( 6.6 lbs) • Due to our continuing programme of research
  • Страница 3 из 29
    or binding of moving parts, breakage of parts and any other condition that may affect the power tool’s operation. If damaged, have the power tool repaired before use. Many accidents are caused by poorly maintained power tools. 22. Keep cutting tools sharp and clean. Properly maintained cutting
  • Страница 4 из 29
    4. 5. 6. 7. 8. 9. 10. 11. 12. 13. 14. operator an electric shock. Wear a hard hat (safety helmet), safety glasses and/or face shield. Ordinary eye or sun glasses are NOT safety glasses. It is also highly recommended that you wear a dust mask and thickly padded gloves. Be sure the bit is secured in
  • Страница 5 из 29
    Use the reversing switch only after the tool comes to a complete stop. Changing the direction of rotation before the tool stops may damage the tool. • When you operate the tool in counterclockwise rotation, the switch trigger is pulled only halfway and the tool runs at half speed. For
  • Страница 6 из 29
    Bit grease Bit angle (when chipping, scaling or demolishing) Coat the bit shank head beforehand with a small amount of bit grease (about 0.5 -1 g; 0.02 - 0.04 oz.). This chuck lubrication assures smooth action and longer service life. 1. Action mode changing knob 2. Lock button Installing or
  • Страница 7 из 29
    Dust cup operations. Failure to do so may result in the loss of control of the tool and potentially severe injury. 1. Dust cup Blow-out bulb (optional accessory) 1 1. Blow-out bulb 1 001300 Use the dust cup to prevent dust from falling over the tool and on yourself when performing overhead drilling
  • Страница 8 из 29
    • • • • • • • CAUTION: Never use "rotation with hammering" when the drill chuck assembly is installed on the tool. The drill chuck assembly may be damaged. Also, the drill chuck will come off when reversing the tool. Pressing excessively on the tool will not speed up the drilling. In fact, this
  • Страница 9 из 29
    MAKITA LIMITED ONE YEAR WARRANTY Warranty Policy Every Makita tool is thoroughly inspected and tested before leaving the factory. It is warranted to be free of defects from workmanship and materials for the period of ONE YEAR from the date of original purchase. Should any trouble develop during
  • Страница 10 из 29
    FRANÇAIS SPÉCIFICATIONS Modèle Capacités HR2475 Béton 25 mm (1") Trépan 54 mm (2-1/8") Acier 13 mm (1/2") Bois 32 mm (1-1/4") Vitesse à vide (T/MIN) 0 - 1 100/min. Nombre de frappes par minute 0 - 4 500 Longueur totale 429 mm (16-7/8") Poids net 3,0 kg ( 6,6 lbs) • Étant donné l'évolution constante
  • Страница 11 из 29
    19. Débranchez la fiche de la source d'alimentation et/ou retirez le bloc-piles de l'outil électrique avant d'effectuer tout réglage, de changer un accessoire ou de ranger l'outil électrique. De telles mesures préventives réduisent les risques de démarrage accidentel de l'outil électrique. 20.
  • Страница 12 из 29
    longueur du cordon et de l'intensité nominale figurant sur la plaque signalétique. En cas de doute, utilisez un cordon plus robuste. Plus le numéro de calibre est bas, plus le cordon est robuste. Tableau 1. Gabarit minimum du cordon Intensité nominale Plus de Pas plus de 0 6 10 12 6 10 12 16 Volts
  • Страница 13 из 29
    blessure. Inverseur USD202-2 Symboles Les symboles utilisés ci-dessous. ・ volts pour ・ ampères ・ hertz ・ courant alternatif l'outil sont indiqués B 1 010156 ATTENTION: Vérifiez toujours le sens de rotation avant de mettre l'outil en marche. • N'actionnez l'inverseur qu'une fois que l'outil est
  • Страница 14 из 29
    ASSEMBLAGE Pour percer dans le béton, la maçonnerie, etc., enfoncez le bouton de verrouillage et tournez le bouton de changement de mode jusqu’au symbole . Utilisez un foret à pointe en carbure de tungstène. Martelage seulement 1 ATTENTION: Avant d'effectuer toute intervention sur l'outil,
  • Страница 15 из 29
    1 2 Gabarit de profondeur 1. Embout 2. Couvercle du mandrin 1. Jauge de profondeur 1 010162 010166 Pour retirer le foret, tirez le couvercle du mandrin à fond vers le bas puis dégagez le foret. 1 2 Le gabarit de profondeur vous permet de percer des trous de même profondeur. Desserrez la poignée
  • Страница 16 из 29
    UTILISATION Burinage / Ecaillage / Démolition Perçage avec martelage 010168 010167 Réglez le bouton de changement de mode sur le symbole . Tenez votre outil fermement à deux mains. Mettez le contact et appliquez une légère pression sur l'outil de façon qu'il ne risque pas de sauter d'un côté ou de
  • Страница 17 из 29
    • • • Un foret coincé peut se retirer en plaçant l'inverseur sur la direction opposée. Il faut alors faire très attention car l'outil risque de reculer brusquement si vous ne le tenez pas fermement. Assurez toujours les petites pièces à percer à l'aide d'un étau ou d'un mode de fixation analogue.
  • Страница 18 из 29
    ESPAÑOL ESPECIFICACIONES Modelo Capacidades HR2475 Concreto 25 mm (1") Corona perforadora 54 mm (2-1/8") Acero 13 mm (1/2") Madera 32 mm (1-1/4") Revoluciones por minuto (r.p.m.) 0 - 1 100r/min Golpes por minuto 0 - 4 500 Longitud total 429 mm (16-7/8") Peso neto 3,0 kg ( 6,6 lbs) • Debido a
  • Страница 19 из 29
    18. No utilice la herramienta eléctrica si el interruptor no la enciende y apaga. Cualquier herramienta eléctrica que no pueda ser controlada con el interruptor es peligrosa y debe ser reemplazada. 19. Desconecte la clavija de la fuente de energía y/o la batería de la herramienta eléctrica antes de
  • Страница 20 из 29
    cable y el amperaje nominal indicado en la placa de características. Si no está seguro, utilice el siguiente calibre más alto. Cuanto menor sea el número de calibre, más corriente podrá conducir el cable. suficiente para conducir la corriente que demande el producto. Un cable de calibre inferior
  • Страница 21 из 29
    GUARDE ESTAS INSTRUCCIONES. Para empezar a utilizar la herramienta, sólo tiene que accionar el gatillo interruptor. La velocidad de la herramienta aumenta al incrementar la presión en el gatillo interruptor. Suelte el gatillo interruptor para que la herramienta se detenga. Si desea que funcione en
  • Страница 22 из 29
    siempre ubicada positivamente en una de las tres posiciones del modo acción. Rotación de martillo 1. Botón de bloqueo 2. Rotación con martilleo 3. Perilla que cambia el modo de acción 2 1 • 3 ENSAMBLE 010158 Para taladrar en concreto, mampostería, etc., presione el botón de bloqueo y gire la
  • Страница 23 из 29
    Limpie el zanco de la broca y aplíquele grasa antes de instalarla. Inserte la broca en la herramienta. Gire la broca y empújela hacia el interior hasta que enganche. Después de instalarla, siempre asegúrese de que la broca esté firme en su lugar intentando jalarla hacia fuera. 1 2 010165 1. Broca
  • Страница 24 из 29
    Cincelado/Tallado/Demolición OPERACIÓN Operación de taladrado con percusión 010168 Fije la perilla que cambia el modo de accionamento al símbolo . Sostenga la herramienta firmemente con ambas manos. Encienda la herramienta y aplique una leve presión sobre ésta para evitar que la herramienta rebote
  • Страница 25 из 29
    • • • tenga cuidado cuando la broca comience a romper la pieza de trabajo. Una broca atorada podrá extraerse simplemente poniendo el interruptor de inversión en giro contrario para que retroceda. Sin embargo, la herramienta podrá retroceder bruscamente si no la sujeta firmemente. Sujete siempre las
  • Страница 26 из 29
    GARANTÍA LIMITADA MAKITA DE UN AÑO Ésta Garantía no aplica para México Política de garantía Cada herramienta Makita es inspeccionada y probada exhaustivamente antes de salir de fábrica. Se garantiza que va a estar libre de defectos de mano de obra y materiales por el periodo de UN AÑO a partir de
  • Страница 27 из 29
    27
  • Страница 28 из 29
    < USA only > WARNING Some dust created by power sanding, sawing, grinding, drilling, and other construction activities contains chemicals known to the State of California to cause cancer, birth defects or other reproductive harm. Some examples of these chemicals are: • lead from lead-based paints,
  • Страница 29 из 29