Инструкция для PEG-PEREGO Adjustable Base

(скачивание инструкции бесплатно)
Формат файла: PDF
Доступность: Бесплатно как и все руководства на сайте. Без регистрации и SMS.
Дополнительно: Чтение инструкции онлайн
background image

•   IMPORTANT: read the instructions carefully before 

use. Save the instructions for future reference.

•   PEG PEREGO reserves the right to make any 

necessary changes or improvements to the products 

shown at any time without notice.


  Peg Perego S.p.A. is an ISO 9001 certified 

company.


  The fact that we are certified provides 

a guarantee of our honesty for our 

customers, and fosters trust in the 

companyʼs way of working.

CUSTOMER SERVICE

If parts of the model are accidentally lost or damaged, 

use only original Peg Perego spare parts. Contact 

the Peg Perego Customer Service for all repair work, 

replacements, information about products, and sale of 

original spare parts and accessories, at the following:

tel.: 0039-039-60.88.213 

fax: 0039-039-33.09.992

e-mail: assistenza@pegperego.it, 

www.pegperego.com

Peg Perego is at the consumer's service, meeting 

every need in the best way possible. This is why our 

customers' opinions are so important and valuable 

to us. We would be very grateful if you would kindly 

fill in the CUSTOMER SATISFACTION QUESTIONNAIRE 

after using one of our products. You will find the 

questionnaire on the Internet at "www.pegperego.

com/SSCo.html.en-UK". 

Please note any observations or suggestions you may 

have on the questionnaire.

INSTRUCTIONS FOR USE


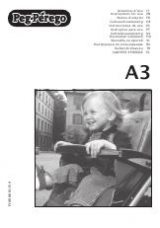
   PRIMO VIAGGIO with ADJUSTABLE BASE


   The "Primo Viaggio" car seat has been designed 

for Group 0+, or children weighing from 0 - 13 

kg. (0 - 12/14 months of age).


   The "Primo Viaggio" car seat has a Ganciomatic 

system, which allows fastening and removing the 

seat from its car base and Peg Perego strollers 

and baby carriages, with a simple flick of the 

hand.

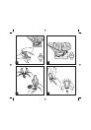
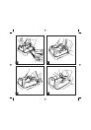
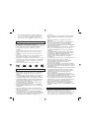
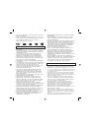
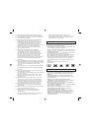
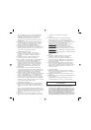
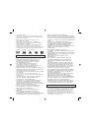
 1•   To detach the child car seat from its base, pull 

the handle behind the backrest upwards with one 

hand while lifting the seat with the other hand.

 2•   To attach the child car seat, line it up with the 

hooks and push downwards with both hands until 

the seat clicks into place.


   SAFETY BELT

 3•   To fasten the safety belt, cross the two straps and 

click the tabs into the buckle.

 4•   To loosen the safety belt, press the red button on 

the buckle.

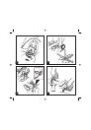
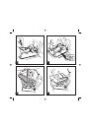
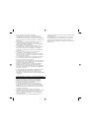
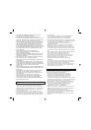
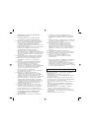
 5•   The child car seat is equipped with three notches 

for adjusting the level of the safety belt to match 

the child's height. The safety belt should be 

neither too high nor too low in relation to the 

child's shoulders. In the correct position, the 

child's shoulders should be just above the notch.  

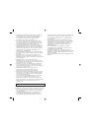
 6•   To change the height of the safety belt, loosen 

it and slip the straps out of the notches on the 

back. Insert the straps into the appropriate 

notches for the child's height.

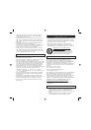
 7•   To adjust the safety belt to a looser position, slip 

a finger into the opening in the seat, and press 

the metal button while pulling the straps upwards 

with the other hand, as shown in the figure. To 

tighten the safety belt so that it fits the child 

snuggly, pull the belt towards you, as shown in 

the figure. Be careful not to tighten the belt too 

much; leave a slight amount of play in the belt.


   PADDING

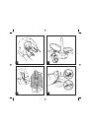
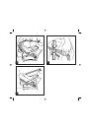
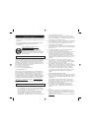
 8•   A pillow for the child's head, two shoulder pads, 

and a protective cushion for the child's legs are 

provided with the car seat. Insert the pillow by 

slipping the straps through the openings in the 

pillow as shown in the figure. Attach the shoulder 

pads using the Velcro fasteners.

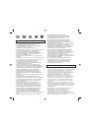
 9•   Position the protective leg cushion by slipping the 

seat strap with the buckle through the cushion, as 

shown in the figure.


   REGULATOR HANDLE

 10•   The car seat regulator handle has four positions.  

To incline the seat, press the two buttons on the 

handle and simultaneously adjust the seat until it 

clicks into the desired position.


   Position A: Set the handle to this position when 

the child car seat is mounted in the car.


   Position B: Set the handle to this position when 

carrying the child car seat by hand or while 

attaching it to its base, to a stroller, or to a baby 

carriage.


   Position C: Set the handle to this position to allow 

the car seat to rock.


   Position D: Set the handle to this position to 

prevent the child car seat from rocking.

EN•ENGLISH

1
2
3
4
5
6
7
8
9
10
11
12
13
14
15
16
17
18
19
20
21
22
23
24
25
26
27
28
29
30
31
32
33
34
35
36
37
38
39
40
41
42
43
44
45
46
47
48
49
50
51
52
53
54
55
56
57
58
59
60
Оглавление инструкции
  • Страница 1 из 61
    Primo Viaggio & Adjustable Base FI000501I22 ECE R44/03 Istruzioni dʼuso Instructions for use Notice dʼemploi Gebrauchsanleitung Instrucciones de uso Instruções para uso Gebruiksaanwijzing Használati útmutató Navodila za uporab Инструкции по пользованию Kullanim klavuzu ΟΔΗΓΙΕΣ ΧΡΗΣΕΩΣ IT EN FR DE
  • Страница 2 из 61
    GM Ganciomatic System GM Ganciomatic System 1 2 3 4
  • Страница 3 из 61
    3 2 1 5 6 B A 7 8
  • Страница 4 из 61
    B C A 9 D 10 B A 11 12
  • Страница 5 из 61
    13 14 15 16
  • Страница 6 из 61
    B A C D OK NO 17 18 19 20
  • Страница 7 из 61
    OK NO 21 22 23 24
  • Страница 8 из 61
    25 27 26
  • Страница 9 из 61
    Primo Viaggio & Adjustable Base 5 1 7 8 6 4 3 2 9
  • Страница 10 из 61
    Primo Viaggio & Adjustable Base 1 2 3 4 5 6 7 8 ARPI0285• IRKCRB00• MMSP0006 BRMACN• BRCACS• BAKRCS• SPST5386GL SPST5303S• SPST5303D• 9 SPST5722GRLP IT• EN• FR• DE• ES• PT• NL• HU• SL• RU• TR• EL• Ricambi disponibili in piú colori da specificare nella richiesta. Spare parts available in different
  • Страница 11 из 61
    IT•ITALIANO • IMPORTANTE: leggere attentamente le istruzioni prima dellʼuso e conservarle per riutilizzarle in futuro. • Peg Perego potrà apportare in qualunque momento modifiche ai modelli descritti in questa pubblicazione, per ragioni di natura tecnica o commerciale. Peg Perego S.p.A. è
  • Страница 12 из 61
    Posizione C: è la posizione che permette al seggiolino di dondolare. Posizione D: è la posizione che permette al seggiolino di non dondolare. CAPOTTINA 11• Per montare la capottina ruotare il maniglione indietro, posizionare i compassi della capottina sul maniglione e agganciare i laccetti di
  • Страница 13 из 61
    di sicurezza dellʼauto dal retro del seggiolino, reclinare il maniglione in posizione retta fino al “click” e sganciare il seggiolino dalla base. La base rimane in auto agganciata, pronta allʼuso. PULIZIA E MANUTENZIONE Il vostro prodotto necessita un minimo di manutenzione. Le operazioni di
  • Страница 14 из 61
    parte, ma non tutti i sedili di veicolo. • Il seggiolino di sicurezza per auto può essere correttamente installato se nel manuale dʼuso e manutenzione del veicolo è indicata la compatibilità di questʼultimo con sistemi di ritenuta “Universali” di gruppo 0+. • Primo Viaggio Car Seat è classificato
  • Страница 15 из 61
    EN•ENGLISH • IMPORTANT: read the instructions carefully before use. Save the instructions for future reference. • PEG PEREGO reserves the right to make any necessary changes or improvements to the products shown at any time without notice. Peg Perego S.p.A. is an ISO 9001 certified company. The
  • Страница 16 из 61
    HOOD 11• To fit the hood, push the handle rearwards, place the hood adjusting couplings onto the handle, then tie up the fastening strings as shown in the figure. To remove the hood, reverse operations. 12• The hood can be adjusted to two positions: To raise or lower it, push on the inner sides of
  • Страница 17 из 61
    • Do not use solvents or similar products to clean the polystyrene bumper. • Protect the product against smog, water, rain and snow. Continued and extended exposure to sunlight can change the colours of many materials. • Store the product in a dry area. SAFETY ATTENTION • IMPORTANT WARNING: IT IS
  • Страница 18 из 61
    are subjected to extreme stress, we recommend replacing the child car seat and the three-point safety belt with new ones. • Adjust the child car seat safety belt, making sure that the strap between the legs is taut, and that it fits snuggly against the child's body without being too tight. •
  • Страница 19 из 61
    démonter dʼun seul geste le siège de sa base auto ainsi que des poussettes et châssis Peg Perego. 1• Pour démonter le siège auto de sa base, tirer vers le haut dʼune main la poignée située derrière le dossier et, dans le même temps, soulever le siège auto de lʼautre. 2• Pour monter le siège auto,
  • Страница 20 из 61
    la poignée A et, de lʼautre, pousser vers le bas la poignée B pour simuler le poids de lʼenfant dans le siège auto, jusquʼà voir entièrement la bulle dans lʼindicateur. 18• Insérer la sangle de la ceinture de sécurité de la voiture dans les deux passants latéraux de la base. 19• Accrocher la boucle
  • Страница 21 из 61
    CEINTURES DE SÉCURITÉ À TROIS POINTS. LʼEMPLOI DE CEINTURES À DEUX POINTS OU ABDOMINALES EST INTERDIT (voir Normes de sécurité). • NE JAMAIS SORTIR LʼENFANT DU SIÈGE AUTO ALORS QUE LA VOITURE SE DÉPLACE. • NE JAMAIS LAISSER LʼENFANT DANS LE TRANSAT SANS SURVEILLANCE. • NE PAS LAISSER LA VOITURE AU
  • Страница 22 из 61
    et 13: Luxembourg). • Plus bas se trouve le numéro dʼhomologation. Sʼil commence par 03, cela signifie quʼil sʼagit du troisième amendement à la loi R44. • Le numéro progressif de production, depuis la date de délivrance de lʼhomologation, personnalise chaque siège auto, caractérisé par son propre
  • Страница 23 из 61
    Sitz mit der anderen Hand nach oben gehoben werden. 2• Um den Sitz zu befestigen, diesen einfach in Übereinstimmung mit den Schnappvorrichtungen anordnen und mit beiden Händen bis zum Einrasten nach unten drücken. SICHERHEITSGURT 3• Zum Anschnallen des Sicherheitsgurts die beiden Schultergurte
  • Страница 24 из 61
    18• Den Riemen des Autosicherheitsgurts durch die beiden Seitenführungen des Unterteils ziehen. 19• Die Schnalle des Autogurts wie in der Abbildung am Autositz befestigen. 20• Wenn Ihr Fahrzeug mit einem Sicherheitsgurt ausgestattet ist, der das freie Gleiten der Befestigungsschnalle gestattet (wie
  • Страница 25 из 61
    • DAS KIND NIE WÄHREND DER FAHRT AUS DEM SICHERHEITS-AUTOSITZ NEHMEN. • LASSEN SIE IHR KIND NIE UNBEAUFSICHTIGT. • LASSEN SIE DEN SICHERHEITS-AUTOSITZ NICHT BEI PRALLER SONNE IM AUTO. PRÜFEN SIE, OB DER SITZ HEISS IST, BEVOR SIE IHR KIND DRAUFSETZEN. • DEN SICHERHEITS-AUTOSITZ NIE AUF HOHE MÖBEL
  • Страница 26 из 61
    ES•ESPAÑOL • IMPORTANTE: leer detenidamente las instrucciones antes del uso y conservarlas para poder utilizarlas en el futuro. • PEG PEREGO podrá modificar los modelos descritos en este prospecto, por razones técnicas o comerciales. Peg Perego S.p.A. cuenta con la certificación ISO 9001. Dicha
  • Страница 27 из 61
    Posición B: es la posición del asa para transportar a mano la silla y para engancharla a la base, a las sillas de paseo y a los carritos. Posición C: es la posición que permite que la silla se balancee. Posición D: es la posición que permite que la silla no se balancee. CAPOTA 11• Para montar la
  • Страница 28 из 61
    • Para quitar la silla del coche quitar el cinturón de seguridad del coche por detrás de la silla, reclinar el asa en posición recta hasta oír “clic” y desenganchar la silla de la base. La base se queda enganchada en el coche, lista para su uso. LIMPIEZA & MANTENIMIENTO Su producto necesita un
  • Страница 29 из 61
    Adecuada para el uso general en los vehículos y compatible con la mayor parte de ellos, pero no para todos los asientos del vehículo. • La silla de seguridad para automóvil puede ser montada correctamente si en el manual de uso y mantenimiento del vehículo está indicada la compatibilidad de este
  • Страница 30 из 61
    PT•PORTUGUÊS • IMPORTANTE: leia atentamente as instruções antes do uso e conserve-as para reutilizá-las futuramente. • A Peg Perego poderá efectuar em qualquer momento modificações aos modelos descritos nesta publicação, por motivos de natureza técnica ou comercial. A Peg Perego S.p.A. é
  • Страница 31 из 61
    transporte manual e quando acoplado à base, às cadeiras de passeio e aos chassis. Posição C: é a posição que permite à cadeira auto balançar. Posição D: é a posição que permite à cadeira auto não balançar. CAPOTINHA 11• Para montar a capotinha rodar a manilha grande de trás, posicionar os compassos
  • Страница 32 из 61
    • Para retirar a cadeirinha do automóvel, solte o cinto de segurança do automóvel da parte de trás da cadeirinha, recline a manilha para a posição recta até sentir o “clique” e solte a cadeirinha da base. A base permanece no automóvel solta, pronta para ser usada. LIMPEZA E MANUTENÇÃO O seu produto
  • Страница 33 из 61
    • A cadeira de segurança para automóvel pode ser instalada correctamente se no manual de uso e manutenção do veículo estiver indicada a compatibilidade deste último com os sistemas de retenção “Universais” de grupo 0+. • A Cadeira auto Primo Viaggio / Primeira Viagem é classificada “Universal”
  • Страница 34 из 61
    NL•NEDERLANDS • BELANGRIJK: lees vóór het gebruik deze handleiding met instructies met aandacht. Bewaar de handleiding voor een toekomstige raadpleging. • Peg Perego kan op ieder gewenst moment wijzigingen aanbrengen op de modellen die in deze publicatie beschreven worden, om reden van technische
  • Страница 35 из 61
    Om het zitje te kantelen drukt u op de twee knoppen op de handgreep, en op hetzelfde moment plaatst u het in de gewenste positie, tot u de plaatsingsklik hoort. Positie A: positie van de handgreep in de auto. Positie B: positie van de handgreep voor het handmatig vervoer en het vastkoppelen aan
  • Страница 36 из 61
    handgreep naar voren. De positionering is juist als u de klik hoort. 25• Neem opnieuw de veiligheidsgordel van de auto vast en voer deze achter de rugleuning langs. 26• Plaats de gordel in de geleider achter de rugleuning, zoals de afbeelding toont. 27• Controleer of de gordel goed gespannen is en
  • Страница 37 из 61
    LOS WANT DEZE ZIJN AANGEBRACHT OP GROND VAN WETTIGE VOORSCHRIFTEN EN ZOUDEN HET PRODUCT NIET MEER CONFORM DE WETTIGE VOORSCHRIFTEN KUNNEN MAKEN. VEILIGHEIDSVOORSCHRIFTEN • Veiligheidszitje voor in de auto, Groep 0+, categorie “Universeel” gehomologeerd volgens de Europese Norm ECE R44/03 voor
  • Страница 38 из 61
    HU•MAGYAR • FONTOS: a használat előtt figyelmesen olvassák el az utasításokat és azokat őrizzék meg a későbbiekben történő tanulmányozás céljából. • A Peg Perego az ebben a kiadásban ismertetett modelleknél műszaki vagy kereskedelmi jellegű okokból kifolyólag bármikor végrehajthat módosításokat.
  • Страница 39 из 61
    szállítja, amikor a talprészre, sportkocsikra és vázakra rögzíti. C pozíció: az a helyzet, amely lehetővé teszi az ülés ringatását. D pozíció: az a helyzet, amelyben az ülést nem lehet ringatni. TETŐRÉSZ 11• Ahhoz hogy felszereljük a gyermekkocsi tetőrészét húzzuk hátra a fogantyút, helyezzük a
  • Страница 40 из 61
    távolítsák el az autó biztonsági övét a gyerekülés hátsó részéről, hajtsák vissza a fogantyút egyenes állásba kattanásig és kapcsolják le a gyermekülést a talprészről. A talprész az autóban használatra készen, rögzítve marad. TISZTÍTÁS ÉS KARBANTARTÁS A termék minimális karbantartást igényel. A
  • Страница 41 из 61
    • A biztonsági gyermek autósülés akkor használható megfelelően, ha a jármű használati és karbantartási utasításai között meg van jelölve az autó 0+ csoportos, "Univerzális" tartó rendszerekkel való kompatibilitása. • A Primo Viaggio Car Seat gyermek autósülés "Univerzálisnak" történő osztályozása
  • Страница 42 из 61
    SL•SLOVENŠČINA • POMEMBNO: skrbno preberite navodila pred uporabo in jih shranite, da jih boste lahko še kdaj prebrali. • Peg Perego se lahko kadarkoli odloči, da bo spremenil modele, objavljene v katalogu, najsi bo to zaradi tehničnih ali tržnih razlogov. Peg Perego S.p.A. ima certifikat ISO 9001.
  • Страница 43 из 61
    STREHICA 11• Da bi namestili strehico, ročaj zavrtite nazaj, napenjalo naslonite na ročaj in pripnite napenjalo, kot prikazuje risba. Da bi strehico odstranili, naredite nasprotno. 12• Strehico lahko uporabljate v dveh položajih, da bi jo dvignili ali spustili z obema rokama potisnite napenjalo
  • Страница 44 из 61
    dele in jih, če je to potrebno, podmažete z lahkim oljem. • Plastične dele redno brišite z vlažno krpo. Ne uporabljajte topil ali drugih podobnih izdelkov. • Blago skrtačite, da z njega odstranite prah. • Naprave za blaženje udarcev in polistirena ne čistite s topili ali drugimi podobnimi izdelki.
  • Страница 45 из 61
    prepričate, da je mednožni jermenček dovolj napet in da se prilega telesu, ne da bi stiskal otroka. • Skrbno upoštevajte navodila proizvajalca sistema za zadrževanje dojenčka. • V avtomobilu bodite še posebej pozorni na prtljago, ki bi lahko poškodovala otroka v varnostnem sedežu v primeru
  • Страница 46 из 61
    Primo Viaggio Car Seat - это автомобильное кресло с системой Ganciomatic, благодаря которой кресло крепится и снимается с автомобильного основания, прогулочных колясок и шасси Peg Perego одним простым движением. 1• Чтобы отсоединить автомобильное кресло от его основания, одной рукой сместите вверх
  • Страница 47 из 61
    крепления, так как он не обеспечивает безопасность кресла. ПОСЛЕДОВАТЕЛЬНОСТЬ ОПЕРАЦИЙ ДЛЯ УСТАНОВКИ ОСНОВАНИЯ В АВТОМОБИЛЕ 17• Поместите основание на сиденье. Несмотря на то, что все автомобильные сидения имеют разный наклон, регулируемое по высоте основание “Adjustable Base” позволяет установить
  • Страница 48 из 61
    БЕЗОПАСНОСТЬ ВНИМАНИЕ • ВАЖНОЕ ПРЕДУПРЕЖДЕНИЕ ОБ ОПАСНОСТИ: АВТОМОБИЛЬНОЕ КРЕСЛО НЕЛЬЗЯ УСТАНАВЛИВАТЬ НА СИДЕНИЕ, ГДЕ ИМЕЕТСЯ ПОДУШКА БЕЗОПАСНОСТИ. • ДАННОЕ АВТОМОБИЛЬНОЕ КРЕСЛО ПРИНАДЛЕЖИТ К ГРУППЕ 0+ И ЕГО НЕОБХОДИМО ВСЕГДА УСТАНАВЛИВАТЬ В ПОЛОЖЕНИЕ, ПРОТИВОПОЛОЖНОЕ НАПРАВЛЕНИЮ ЕЗДЫ. • ВСЕГДА
  • Страница 49 из 61
    • При возникновении сомнений обратитесь к изготовителю или дистрибьютору автомобильного кресла Primo Viaggio Car Seat. • Убедитесь, чтобы ремень с тремя точками крепления транспортного средства, крепящий основание и кресло к транспортному средству, был всегда натянут и не скручен. • Кресло и ремень
  • Страница 50 из 61
    arkasõnda bulunan tutma kolunu bir elinizle yukarõ doğru çekmek ve eş zamanlõ olarak diğer elinizle araba koltuğunu yukarõ kaldõrmak gerekmektedir. 2• Koltuğu takmak için, kancalara karşõlõklõ gelecek biçimde yerleştiriniz ve iki elinizle birden klik sesini duyana dek aşağõ doğru itiniz. EMNİYET
  • Страница 51 из 61
    görünür olmasõ gerekmektedir. • Eğimi ayarlamak için, bir el ile A topuzunu döndürmek ve diğer elle Bʼyi aşağõ doğru, göstergedeki damla tamamen görününceye dek itmek gerekir. Bu şekilde çoçuğun koltuktaki ağõrlõğõ simüle edilmiş olur. 18• Araba emniyet kemerinin kayõşõnõ kaidenin yanlardaki iki
  • Страница 52 из 61
    Normlarõʼna bakõn.). • ŞAYET ARAÇ HAREKET HALİNDE İSE ÇOCUĞU ARABA GÜVENLİK KOLTUĞUNDAN ASLA ÇIKARMAYIN. • ÇOCUĞUNUZU HİÇBİR ZAMAN YANINDA BİR GÖZETMEDEN OLMADAN KOLTUKTA BIRAKMAYIN. • OTOMOBİL İÇİN ÜRETİLEN BU GÜVENLİK KOLTUĞUNU GÜNEŞ ALTINDAYKEN ARACIN İÇİNDE BIRAKMAYIN. ÇOCUĞU YERLEŞTİRMEDEN
  • Страница 53 из 61
    13:Lüksemburg.) • Daha altta, kanuna uygunluk rakamõ bulunur. Eğer 03 ile başlõyorsa, bu R44 kanununun üçüncü uyarlamasõ anlamõna gelir. • Resmî onay çõkõşõndan kademe kademe artan üretim rakamõ, her bir koltuğu belirtir; her koltuk, kendi numarasõnõn karşõtõdõr. • Son olarak da referans
  • Страница 54 из 61
    αυτοκινήτου με Σύστημα που έχει τη δυνατότητα να συνδέεται και να αποσυνδέεται από τη Βάση αυτοκινήτου του, τα καροτσάκια περιπάτου και τα καρότσια με μία πολύ απλή κίνηση. 1• Για να αποσυνδέσετε το κάθισμα αυτοκινήτου από τη βάση του, πρέπει με το ένα χέρι να τραβήξετε προς τα πάνω τη λαβή που
  • Страница 55 из 61
    ΟΔΗΓΙΕΣ ΧΡΗΣΗΣ ΣΤΟ ΑΥΤΟΚΙΝΗΤΟ ΣΗΜΑΝΤΙΚΟ 16• Το κάθισμα “Primo viaggio” μπορεί να τοποθετηθεί στο μπροστινό κάθισμα εάν δεν είναι εξοπλισμένο με AIRBAG ή στο πίσω κάθισμα. Επιτρέπεται μόνον η σύνδεση του καθίσματος με τη ζώνη αυτοκινήτου τριών σημείων (όπως στο σχέδιο). Δεν επιτρέπεται η σύνδεση του
  • Страница 56 из 61
    με ελαφρύ λάδι. • Περιοδικά καθαρίζετε τα πλαστικά μέρη με ένα υγρό πανί, μη χρησιμοποιείτε διαλυτικά ή άλλα παρόμοια προϊόντα. • Βουρτσίζετε τα μέρη από ύφασμα για να απομακρυνθεί η σκόνη. • Μην καθαρίζετε το εξάρτημα απορρόφησης κραδασμών από πολυέστερ με διαλυτικά ή με άλλα παρόμοια προϊόντα. •
  • Страница 57 из 61
    • Το κάθισμα ασφαλείας αυτοκινήτου μπορεί να τοποθετηθεί σωστά εάν στον οδηγό χρήσης και συντήρησης του οχήματος αναγράφεται η συμβατότητα αυτού με συστήματα που θεωρούνται “Γενικά” της ομάδας 0+. • Το Primo Viaggio Car Seat έχει χαρακτηρισθεί ως “Γενικό” σύμφωνα με κριτήρια έγρισης πιο αυστηρά σε
  • Страница 58 из 61
  • Страница 59 из 61
    & PEG PEREGO SpA Via De Gasperi, 50 20043 Arcore (MI) Italy www.pegperego.com ΠΑΙΔΙΚΑ ΕΙΔΗ ΒΡΕΦΑΝΑΠΤΥΞΗΣ ΚΑΙ ΠΑΙΧΝΙΔΙΑ ΕΓΓΥΗΣΗ Η PEG – PEREGO εγγυάται για τυχόν εργοστασιακά ελαττώματα των προιόντων της για διάστημα έξι μηνών από την ημερομηνία αγοράς. Η προσκόμιση της ανάλογης ταμειακής απόδειξης
  • Страница 60 из 61
    Primo Viaggio & Adjustable Base PEG PEREGO S.p.A. VIA DE GASPERI 50 20043 ARCORE MI ITALIA tel. 0039•039•60881 fax 0039•039•615869-616454 Servizio Post Vendita - After Sale: tel. 0039•039•6088213 fax: 0039•039•3309992 PEG PEREGO U.S.A. Inc. 3625 INDEPENDENCE DRIVE FORT WAYNE INDIANA 46808 phone
  • Страница 61 из 61