Инструкция для PHILIPS CED1800BT

(скачивание инструкции бесплатно)
Формат файла: PDF
Доступность: Бесплатно как и все руководства на сайте. Без регистрации и SMS.
Дополнительно: Чтение инструкции онлайн
background image

7

English

EN

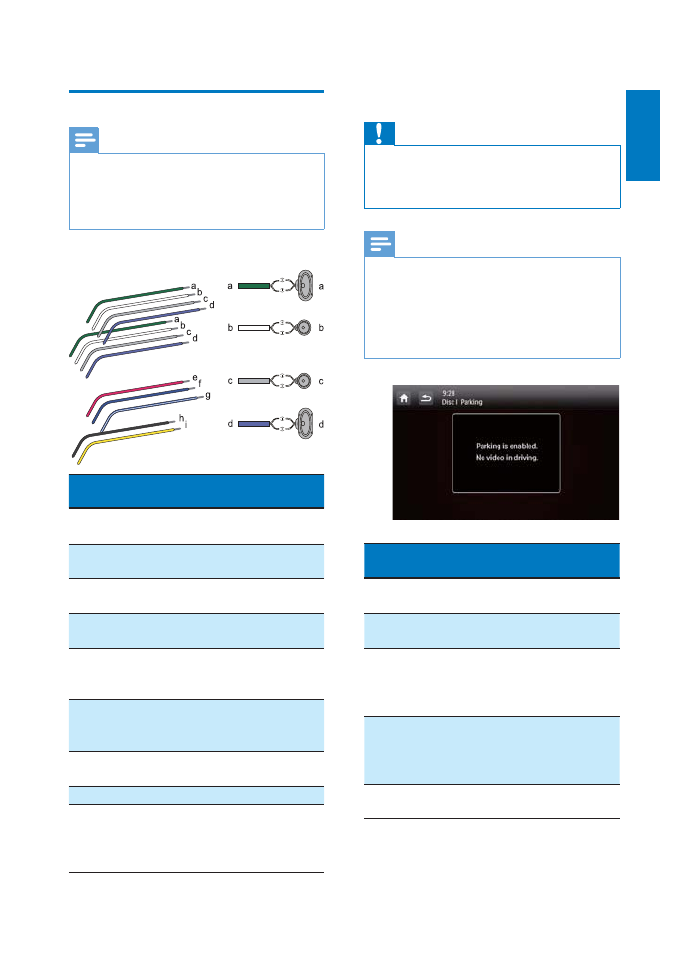
Connect wires

Note


‡

Make sure that all loose leads are insulated with 
electrical tape.


‡

Consult a professional to connect wires as instructed 
below.


‡

Before connection, check the car's wiring carefully.

Connect the ISO male connectors.


 ISO 

male 

connectors

Connect to

a

Green strip, black-
edged green strip

Rear left speaker

b

White strip, black-
edged white strip

Front left speaker

c

Gray strip, black-
edged gray strip

Front right speaker

d

Purple strip, black-
edged purple strip

Rear right speaker

e

Red strip

Ignition key +12V 
DC when ON/
ACC

f

Blue strip

Motor/electric 
antenna relay 
control lead

g

White-edged blue 
strip

$PSOLÀHUUHOD\

control lead

h

Black strip

Ground

i

Yellow strip

The +12V car 
battery which is 
energized at all times

Connect other wires if necessary.

Caution


‡

To avoid an accident, the driver must not watch video 
while driving. By design, this system disallows watching 
video during drive. Park your car in a safe place and 
engage the parking brake before watching video.

Note


‡

When the parking brake of your vehicle is not engaged, 
the video blocking system is activated. It blocks the 
display of front video source only.


‡

If the system is not properly connected with the 
parking brake control module of your vehicle, video 
signals will be blocked by the system, with the below 
message displayed on the TFT.


 Connectors 

and 

sockets on rear panel

External sockets 
or connectors

1

For ISO male 
connectors

As indicated 
above

2

REAR OUT R

 (Red 

socket)

Rear right 
speaker

3

AV-IN R

 (Red socket) Right audio 

channel output 
socket of an 
external player

4

AV-IN L

 (White 

socket)

Left audio 
channel output 
socket of an 
external player

5

REAR OUT L

 (White 

socket)

Rear left speaker

1
2
3
4
5
6
7
8
9
10
11
12
13
14
15
16
17
18
19
20
21
22
23
24
25
26
27
28
29
30
31
32
33
34
35
36
37
38
Оглавление инструкции
  • Страница 1 из 39
    Always there to help you Register your product and get support at www.philips.com/support Question? Contact Philips User manual CED1800BT
  • Страница 2 из 39
  • Страница 3 из 39
    8 Use Bluetooth devices 1 Safety 2 2 Your car entertainment system 3 3 3 3 4 5 Introduction Playable media What's in the box Overview of the main unit Overview of the remote control 3 Install the car entertainment system 6 Connect wires Mount into the dashboard 4 Get started Prepare the remote
  • Страница 4 из 39
    1 Safety Read and understand all instructions before you use the device. If damage is caused by failure to follow instructions, the warranty does not apply. ‡ Use of controls or adjustments or performance of procedures other than herein may result in hazardous radiation exposure or other unsafe
  • Страница 5 из 39
    ‡ PSÀOHV Sampling frequencies: 32 kHz, 44.1 kHz, 48 kHz Bitrates: 8-320 kbps and variable bitrates ‡ ZPDÀOHV Versions: V4, V7, V8, V9 (L1 and L2) Sampling frequencies: 44.1 kHz, 48 kHz Bitrates: 64-192 kbps and variable bitrates ‡ ID3 tag V2.0 or later ‡ 8QVXSSRUWHGÀOHV
  • Страница 6 из 39
    Overview of the main unit l k a b c j d i h e g f h a ‡ Press to eject the disc. i LCD screen b ‡ Press to access the navigation system. ‡ Press and hold to adjust the brightness of LCD screen. c ‡ Press to power on the unit. ‡ Press and hold to power off the unit. ‡ Press to mute the
  • Страница 7 из 39
    h Overview of the remote control English ‡ Enable or disable the FullSound effect. i DVD AUDIO ‡ Select an audio language or audio channel. y a x w v u b c t s r q p o e f g h i j n k m l d j DBB ‡ Enable or disable the DBB (Dynamic Bass Boost) sound effect. k EQ ‡ Select a preset sound
  • Страница 8 из 39
    w / /PRESET +/PRESET ‡ Tune to the previous or next preset radio station. ‡ Skip to the previous or next folder. x ‡ Press to power on the system. ‡ Press and hold to power off the system. ‡ Press to mute the speakers or release them from mute status. y ‡ Press to adjust the brightness of the
  • Страница 9 из 39
    Connect other wires if necessary. English 2 Connect wires Caution Note ‡ Make sure that all loose leads are insulated with ‡ To avoid an accident, the driver must not watch video while driving. By design, this system disallows watching video during drive. Park your car in a safe place and engage
  • Страница 10 из 39
    Connectors and sockets on rear panel External sockets or connectors 6 VIDEO IN (Yellow socket) 7 VIDEO OUT 1 (Yellow socket) 8 VIDEO OUT 2 (Yellow socket) 9 RADIO ANTENNA (Black connector) CAMERA IN (Purple socket) Video output socket of an external player Video input socket of an external display
  • Страница 11 из 39
    r English q p o t n s m l a b c d e f g h i j k EN 9
  • Страница 12 из 39
    Mount into the dashboard 3 Slide the unit into the dashboard until a click sound is heard. Note ‡ Make sure that wires are correctly connected before you mount the main unit into a car. ‡ If preset radio stations are lost when the ignition key is turned OFF and then back ON, reconnect the red leads
  • Страница 13 из 39
    Caution Turn on Press . » PHILIPS logo and a progress bar are displayed while boot-up. ‡ To turn off the system, press and hold for 3 seconds. ‡ Risk of car accidents! Never watch video or operate this system while driving. Prepare the remote control English 4 Get started )RUWKHÀVWWLPHXVH
  • Страница 14 из 39
    [SWC]: Access the interface to assign functions to buttons on the steering wheel. [Settings]: Access the system menu. ‡ ‡ Use the home menu Note ‡ If is displayed when you touch an icon, it indicates that the selected media or feature is unavailable at the current time. Customize the home menu
  • Страница 15 из 39
    4 5 6 7 8 Tap [Clock mode] to select a time format. ‡ [24hr]: 24-hour time format ‡ [12hr]: 12-hour time format Tap [Date] to display the interface for setting the date. Tap Switch display designs English 3 Select a preset display design. 1 In any mode, tap , and then [Display Design]. » The
  • Страница 16 из 39
    5 Play from hard media You can use this system to listen to audio, watch videos, and view photos that are stored on a disc or USB storage device. Region code This system can play DVD discs marked with the following region code. DVD region code Countries and regions $VLD3DFLÀF7DLZDQ.RUHD Note ‡
  • Страница 17 из 39
    Videos ‡ ‡ ‡ ‡ ‡ ‡ ‡ ‡ ‡ ‡ ‡ : Return to the home menu. : Zoom in or out of the image. : Select an available audio channel or audio language. : Select an available subtitle. ‡ For DVD, return to the disc menu or root menu. ‡ )RUUHFRUGHGÀOHVUHWXUQWRWKHOLVWRI ÀOHVRUIROGHUV
  • Страница 18 из 39
    ‡ ‡ )RUUHFRUGHGÀOHVUHSHDWDOOWUDFNV in the current folder. ‡ (highlighted): Repeat all tracks. : Select random play ( highlighted) in gray). or sequential play ( %URZVHUHFRUGHGÀOHV 'XULQJSOD\LQJUHFRUGHGÀOHV\RXFDQDFFHVV WKHÀOHOLVWDQGVHOHFWÀOHVIURPWKHOLVW 1 Tap
  • Страница 19 из 39
    2 Switch to radio mode $IWHUWKHERRWXSDWWKHÀUVWWLPHWKHV\VWHP switches to radio mode automatically. To switch the source back to radio afterwards, tap [Radio] on the home menu. » The interface for radio is displayed. Tap [Distance] or [Local] to select a tuner sensitivity. ‡ [Distance]:
  • Страница 20 из 39
    Store radio stations in memory You can store up to 6 stations in each band. Use RDS related features Note ‡ Only after RDS feature is enabled, you can use RDS related features. Store radio stations manually 1 2 3 Select a band. Tune to the target radio station. Tap and hold one of the channels (1
  • Страница 21 из 39
    8 9 10 11 12 13 14 15 16 17 18 19 20 21 22 23 24 25 26 27 28 29 30 31 CULTURE Culture, religion and society SCIENCE Science VARIED Entertainment programs POP M Pop music ROCK M Rock music MOR M Light music LIGHT M Light classical music CLASSICS Classical music OTHER M Special music programs WEATHER
  • Страница 22 из 39
    7 Use the navigation system Insert the map data card Note ‡ The map data card is not included in the packaging. ‡ Before using the map data card, update the map data if necessary. 8 Use Bluetooth devices With this system, you can listen to audio from a player and make a call through Bluetooth.
  • Страница 23 из 39
    3 Tap on this system to search for other Bluetooth devices. In the device list, tap the name of your Bluetooth device, and then tap behind the name. » The paring starts, and then a pairing request from CED1800 is displayed on your device. 4 5 : Tap it to display the list of paired mobile phones. ‡
  • Страница 24 из 39
    3 4 Tap [New pairing] to start searching for Bluetooth devices. Repeat steps 3 to 5 that are indicated in WKHDERYHVHFWLRQ3DLUWKHÀUVWGHYLFH VHH 3DLUWKHÀUVWGHYLFH RQSDJH WR complete the connection. 6 Tap , , or . Tip ‡ If you want to manually reconnect a device after the
  • Страница 25 из 39
    English Make a call Note ‡ Keep the Bluetooth connection active between the 2 system and your mobile phone. Locate the external microphone You can connect an external microphone for better communication quality. 3 Note Tap number icons to enter the phone number. ‡ To clear the last digit, tap . ‡
  • Страница 26 из 39
    Transfer a phone call to mobile phone By default, the voice comes from the loudspeakers during a call. Manage the phone book 1 2 Tap the name of a contact from the list. Tap . » The following options are displayed. ‡ [Delete one]: Delete the selected contact. ‡ [Delete all]: Delete all contacts.
  • Страница 27 из 39
    When you listen to radio, enjoy music, or watch video, follow the instructions below to adjust sound. Adjust the volume level Press +/- repeatedly on the front panel. ‡ +: Increase the volume level. ‡ -: Decrease the volume level. Mute sound Press on the front panel. ‡ To release the speakers
  • Страница 28 из 39
    3 4 Tap on the circle or bar to adjust the settings. ‡ [Bass]: bass range (-14 to +14) ‡ [Middle]: middle range (-14 to +14) ‡ [Treble]: treble range (-14 to +14) ‡ [LPF]ORZSDVVÀOWHUUDQJH +] Hz, 100 Hz, or 160 Hz) ‡ [MPF]PLGGOHSDVVÀOWHUUDQJH  kHz, 1.0 kHz, 1.5 kHz, or
  • Страница 29 из 39
    Adjust general settings English 10 Adjust settings Access system setup menus 1 Tap > to display all feature icons. Settings Options [Radio Region] [Beep] 2 [On] Tap [Settings]. » The [General] menu is displayed. [Off] [Language] 3 4 5 Tap an icon on the left. ‡ : Access the [General] menu to
  • Страница 30 из 39
    View system information Settings Options [ARM version] [Servo version] [MCU version] [Bluetooth version] [DVD regions] 9LHZÀUPZDUHYHUVLRQV [Restore factory defaults] 28 EN View the version of Bluetooth. View the DVD region code that the system supports. Tap to display the dialog box for
  • Страница 31 из 39
    11 Others English Adjust Bluetooth settings Play external audio/video input Bluetooth settings [New Pairing] [Auto Connect] [Auto Answer] Options [On] [Off] [On] [Off] [Pin Code] [External microphone] [On] [Off] Description Search for new devices. When a paired device is within effective range, the
  • Страница 32 из 39
    Use buttons on the steering wheel Set the rear view camera You can assign a function to a button on the steering wheel, and then control the system with that button. 1 1 2 Tap > to access the full menu with all feature icons displayed. If a rear view camera is connected, you can view on the screen
  • Страница 33 из 39
    ‡ If the fuse gets damaged immediately after it is replaced, an internal malfunction may occur. In this case, consult your retailer. 8SJUDGHWKHÀUPZDUH Perform the upgrade 1 2 3 4 Note ‡ Power supply must not be interrupted during the upgrade. ‡ :KHQWKHÀUPZDUHXSJUDGHVXFFHHGVDOOVHWWLQJVDUH
  • Страница 34 из 39
    12 Product information Note ‡ Product information is subject to change without prior notice. General Power supply Fuse Suitable speaker impedance Maximum power output Continuous power output Pre-Amp output voltage Sub-woofer output voltage Aux-in level Dimensions (W x H x D) Weight (main unit) 12 V
  • Страница 35 из 39
    Warning ‡ Never remove the casing of this product. To keep the warranty valid, never try to repair the product yourself. If you encounter problems when using this product, check the following points before requesting service. If the problem remains unsolved, go to the Philips Web page (www.
  • Страница 36 из 39
    Cannot connect with the system. ‡ 7KHGHYLFHGRHVQRWVXSSRUWWKHSURÀOHV required for the system. ‡ The Bluetooth function of the device is not enabled. Refer to the user manual of the device for how to enable the function. ‡ The system is not in the pairing mode. ‡ The system is already
  • Страница 37 из 39
    Trademark notice The Bluetooth® word mark and logos are registered trademarks owned by Bluetooth SIG, Inc. and any use of such marks by WOOX Innovations is under license. Copyright English Environmental information All unnecessary packaging has been omitted. We have tried to make the packaging easy
  • Страница 38 из 39
    Specifications are subject to change without notice. 2014 © WOOX Innovations Limited. All rights reserved. Philips and the Philips’ Shield Emblem are registered trademarks of Koninklijke Philips N.V. and are used by WOOX Innovations Limited under license from Koninklijke Philips N.V.
  • Страница 39 из 39