1
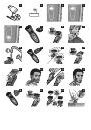
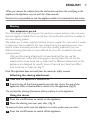
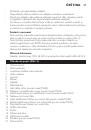
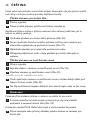
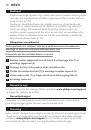
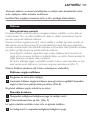
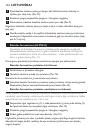
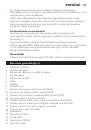
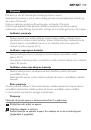
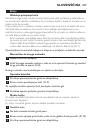
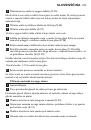
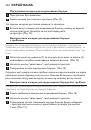
Press the length selector (1) and then push it to the left or right (2) to
select the desired hair length setting. (Fig. 14)
2
Press the on/off button to switch on the appliance.
3
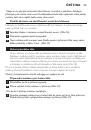
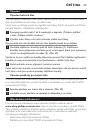
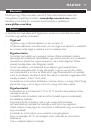
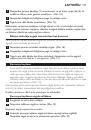
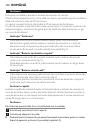
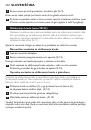
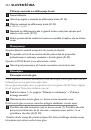
You can now start styling your beard. (Fig. 15)
Make sure that the front of the comb is fully in contact with the skin and move the
appliance against the direction of hair growth. You may want to try different positions
(upwards, downwards, or across), depending on the direction of hair growth.
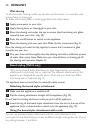
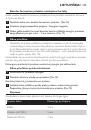
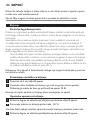
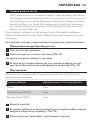
using the beard styler attachment without comb
You can use the beard styler attachment without comb to contour or cut shapes
in beard hair.
1
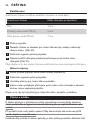
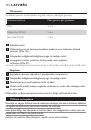
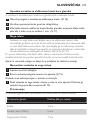
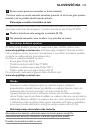
Pull the comb off the beard styler attachment. (Fig. 16)
2
Press the on/off button to switch on the appliance.
3
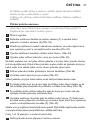
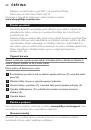
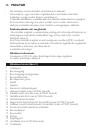
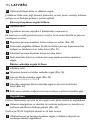
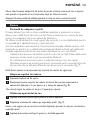
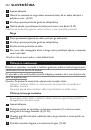
You can now start contouring your beard. Be careful, the appliance cuts hair
very close to the skin, at a length of 1mm. (Fig. 17)
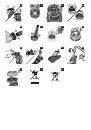
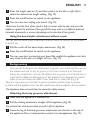
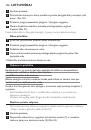
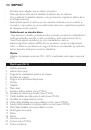
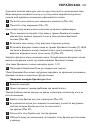
Bodygrooming
- Only use this body groomer attachment to groom your body hair. You can use
this attachment wet or dry to groom or trim hair on all parts of the body
below the neckline. Do not use this attachment to groom or trim facial hair or
scalp hair. The different attachments of this appliance are designed for specific
types of hair and body hair differs from facial hair or scalp hair (Fig. 18).
Take your time when you first start to groom sensitive areas. You have to acquire
practice with the appliance. Your skin also needs some time to adjust to the procedure.
The appliance does not work from the mains for safety reasons.
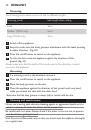
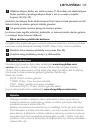
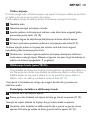
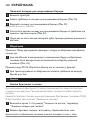
attaching the body groomer attachment
1
Make sure the appliance is switched off.
2
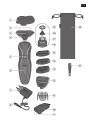
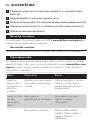
Pull the shaving attachment straight off the appliance (Fig. 12).
Do not twist the attachment while you pull it off the appliance.
3
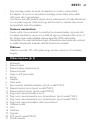
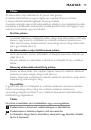
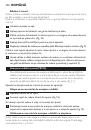
Insert the lug of the body groomer attachment into the slot in the top of
the appliance. Press it downwards to attach it to the appliance (Fig. 19).
EngliSh
11
 1
1
 2
2
 3
3
 4
4
 5
5
 6
6
 7
7
 8
8
 9
9
 10
10
 11
11
 12
12
 13
13
 14
14
 15
15
 16
16
 17
17
 18
18
 19
19
 20
20
 21
21
 22
22
 23
23
 24
24
 25
25
 26
26
 27
27
 28
28
 29
29
 30
30
 31
31
 32
32
 33
33
 34
34
 35
35
 36
36
 37
37
 38
38
 39
39
 40
40
 41
41
 42
42
 43
43
 44
44
 45
45
 46
46
 47
47
 48
48
 49
49
 50
50
 51
51
 52
52
 53
53
 54
54
 55
55
 56
56
 57
57
 58
58
 59
59
 60
60
 61
61
 62
62
 63
63
 64
64
 65
65
 66
66
 67
67
 68
68
 69
69
 70
70
 71
71
 72
72
 73
73
 74
74
 75
75
 76
76
 77
77
 78
78
 79
79
 80
80
 81
81
 82
82
 83
83
 84
84
 85
85
 86
86
 87
87
 88
88
 89
89
 90
90
 91
91
 92
92
 93
93
 94
94
 95
95
 96
96
 97
97
 98
98
 99
99
 100
100
 101
101
 102
102
 103
103
 104
104
 105
105
 106
106
 107
107
 108
108
 109
109
 110
110
 111
111
 112
112
 113
113
 114
114
 115
115
 116
116
 117
117
 118
118
 119
119
 120
120
 121
121
 122
122
 123
123
 124
124
 125
125
 126
126
 127
127
 128
128
 129
129
 130
130
 131
131
 132
132
 133
133
 134
134
 135
135
 136
136
 137
137
 138
138
 139
139
 140
140
 141
141
 142
142
 143
143
 144
144
 145
145
 146
146
 147
147
 148
148
 149
149
 150
150
 151
151
 152
152
 153
153
 154
154
 155
155
 156
156
 157
157
 158
158
 159
159
 160
160
 161
161
 162
162
 163
163
 164
164
 165
165
 166
166
 167
167
 168
168
 169
169
 170
170
 171
171
 172
172
 173
173
 174
174
 175
175
 176
176
 177
177
 178
178
 179
179
 180
180
 181
181
 182
182
 183
183
 184
184
 185
185
 186
186
 187
187
 188
188
 189
189
 190
190
 191
191
 192
192
 193
193
 194
194
 195
195
 196
196
 197
197
 198
198
 199
199
 200
200
 201
201
 202
202
 203
203
 204
204
 205
205
 206
206
 207
207
 208
208
 209
209
 210
210
 211
211
 212
212
 213
213
 214
214
 215
215
 216
216
 217
217
 218
218
 219
219
 220
220
 221
221
 222
222
 223
223
 224
224
 225
225
 226
226
 227
227
 228
228
 229
229
 230
230
 231
231
 232
232
 233
233
 234
234
 235
235
 236
236