Инструкция для ROWENTA LOVELY EP4320

(скачивание инструкции бесплатно)
Формат файла: PDF
Доступность: Бесплатно как и все руководства на сайте. Без регистрации и SMS.
Дополнительно: Чтение инструкции онлайн
background image

5

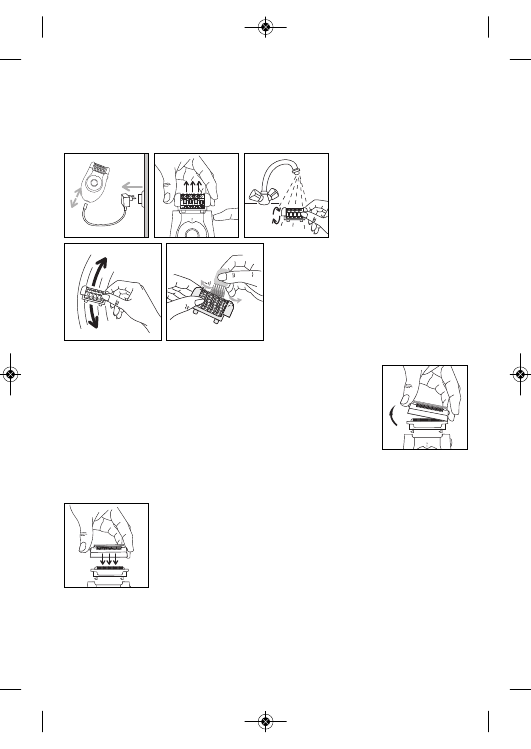
9- CLEANING THE APPLIANCE

• Cleaning the epilator head:

1. Unplug the epilator. 
2. Press the release button on the head and remove the epilator head.
3. Rinse the epilator head under cold running water by turning it for 5 to 10 seconds.

4. Shake the epilator head vigorously
and dry it with a towel before fitting it
to the epilator again.
You can also use the small cleaning brush
supplied.

• Cleaning the shaving head

- Stop and unplug the device.
- Remove the protective hood (17). 
To do so: hold the appliance firmly and place your fingers on the grip
zone (15) on the shaving head and then pull upwards.
You will remove the protective hood (17) from the blade unit (16).

- Carefully remove the hairs by blowing on 
and around the micro grid (13)

Never use the small brush for cleaning the micro grid (13).

You can also run the protective hood (17) and the blade block (16)
under running cold water to remove all the hair. Shake the parts well
and then dry them using a towel without pressing down on the
micro grid before reassembling them.

- Put the protective hood (17) back on the blade unit (16).
You will hear a click.

DO NOT PRESS ON THE MICRO GRID WHEN PUTTING IT BACK INTO PLACE.
Do not apply alcohol to the body of the appliance in order to avoid damaging
its colours. Do not use a metal or sharp tool.

1

2

1
2
3
4
5
6
7
8
9
10
11
12
13
14
15
16
17
18
19
20
21
22
23
24
25
26
Оглавление инструкции
  • Страница 1 из 27
    EP4211-EP4321 www.rowenta.com EN • DEPILATOR CS • DEPILÁTOR BG • ЕПИЛAТОР BS • DEPILATOR RU • ЗПИЛЯТОР SL • DEPILATOR RO • DEPILATOR ET • EPILAATOR UK • ЕПІЛЯТОР SK • DEPILÁTOR SR • DEPILÁTOR LV • EPILATORU PL • DEPILATOR HU • EPILÁTOR HR • DEPILATOR LT • EPILIATORIU
  • Страница 2 из 27
    7 3 2 1 6 8 5 4 18 11 12 10 15 15 17 16 14 9 13
  • Страница 3 из 27
    EN Please read carefully before use 1-DESCRIPTION OF YOUR APPLIANCE 1-Depilator head 2-Tweezers 3-Massaging beads 4-Exfoliator head (EP4211) 5-2 exfoliating bands (depending on model) 6-Release button for removable head 7-Cap 8-2 speed and stop switch 9-Cleaning brush 10-Adaptor 11-Pouch 12-Shaving
  • Страница 4 из 27
    • Do not use aggressive products or solvents for cleaning. • Do not use at temperatures of less than 0°C or more than 35°C GUARANTEE Your appliance is designed for use in the home only. It should not be used for professional purposes. Any commercial use, inappropriate use or failure to comply with
  • Страница 5 из 27
    When using the Micro-Peeling function for the first time or if your skin is very delicate, we recommend: 1. skin is wet before peeling, use cotton wool or a flannel to do this 2. making slow and gentle rotating movements when using the appliance3. not to use the appliance more than twice on the
  • Страница 6 из 27
    8- HAIR REMOVAL FROM SENSITIVE AREAS For optimum epilation, we recommend that you tilt the epilator slightly towards your skin in the direction of epilation, as shown in the diagram. • Preparing the area where you want to remove hair: clic! - If the hairs are long trim to approximately 1cm. - Dry
  • Страница 7 из 27
    9- CLEANING THE APPLIANCE • Cleaning the epilator head: 1. Unplug the epilator. 2. Press the release button on the head and remove the epilator head. 3. Rinse the epilator head under cold running water by turning it for 5 to 10 seconds. 1 2 4. Shake the epilator head vigorously and dry it with a
  • Страница 8 из 27
    • Cleaning sensitive area accessory. (в • Cleaning the Exfoliator Head. We recommend that you change the exfoliating band after three sessions of exfoliation or when it is worn out. ! Do not clean the band under running water. 10- SKIN CARE Small red spots may appear. They will disappear quickly.
  • Страница 9 из 27
    RU (EP4321) (EP4211) (в зависимости от модели) (EP4211-4321) 7
  • Страница 10 из 27
    ПОДКЛЮЧЕНИЕ ПРИБОРА ОТКЛЮЧЕНИЕ ПРИБОРА 1 2 2 1 8
  • Страница 11 из 27
    a b 9
  • Страница 12 из 27
    clic! A- Эпилятором - Установите насадку для подмышек (14) на головку эпилятора до щелчка. - Переведите переключатель на 1. 10
  • Страница 13 из 27
    B-Режущей rоловкой (EP4321): Порядок выполнения: - Снимите rоловку эпилятора, нажав на кнопку выброса - Установите режущую rоловку (12) на прибор - переведите переключатель на 2. - после использования выключите прибор. - Чтобы снять режущую rоловку: поставьте пальцы по сторонам rоловки и тяните её
  • Страница 14 из 27
    Чистка насадок для чувствительных зон ! 10. 12
  • Страница 15 из 27
    УВАЖНО ПРОЧИТАЙТЕ ПЕРЕД ВИКОРИСТАННЯМ 1-ОПИС 1-Епiляцiйна rоловка 2-Щипчики 3-Масажнi кульки 4-Головка для пiлiнrу(EP4321) 5-2 очищувальнi валики (в залежності від моделі) 6-Кнопка вiдокремлення знiмної rоловки 7-ковпачок 8-2-швидкiсний перемикач i вимикач 9-щiточка для очищення UK 10-адаптер
  • Страница 16 из 27
    • Нiколи не залишайте прилад дiтям без наrляду. • Не користуйтесь подовжувачами. • Не користуйтесь приладом, якщо у вас волоri руки. • Не допускайте потрапляння на прилад сонячних променiв. • Не користуйтесь приладом при низькiй температурi. • Не занурюйте прилад у воду i не пiдставляйте пiд
  • Страница 17 из 27
    • Спосiб використання: - Натиснiть кнопку вiдокремлення епiляцiйної rоловки. - Приєднайте rоловку для пiлiнrу до епiлятора. - Встановiть вимикач у положення “1”. - Почнiть процедуру пiлiнrу, повiльно i плавно рухаючи прилад вrору i вниз. Якщо у вас дуже делiкатна шкiра, то при першому використаннi
  • Страница 18 из 27
    - Встановiть вимикач у положення ввiмкнення “2 “. - Пiд час використання вимикач весь час повинен залишатися на виду. - Видаляйте волосся у напрямку, протилежному напрямку, в якому лежать волосини, ставлячи епiлятор перпендикулярно до шкiри. 8. ВИДАЛЕННЯ ВОЛОССЯ З ЧУТЛИВИХ ДІЛЯНОК ШКІРИ Для
  • Страница 19 из 27
    B- З використанням бриючої rоловки (EP4321): • Інструкцiї з використання: - Знiмiть епiляцiйну rоловку, натиснувши кнопку вiдокремлення rоловки. - Встановiть на прилад бриючу rоловку (12). - Встановiть вимикач у положення 2. - По закiнченнi використання вимкнiть прилад. - Щоб зняти бриючу rоловку,
  • Страница 20 из 27
    - Ви також можете пiдставити захисний ковпачок (17) та блок з лезами (16) пiд струмiнь холодної води для повноrо видалення волосинок. Енерriйно потрусiть деталi, а потiм просушiть їх за допомоrою рушника, не натискаючи на мiкросiточку, перед тим як знову їх скласти. - Встановiть захисний ковпачок
  • Страница 21 из 27
    PL 1-G∏owica depilatora 2-Pinceta 3-Kulki masujàce 4-G∏owica z∏uszczajàca (EP4211) 5-2 paski z∏uszczajàce (w zależności od 9-Szczoteczka czyszczàca 10-Adapter 11-Woreczek 12-G∏owica golàca (EP4321) 13-Krateczka 14-Golarka 15-Uchwyty 16-Ostrza 17-Os∏ona 18- Dodatek do depilacji pach (EP4211-EP4321)
  • Страница 22 из 27
    • Nie u˝ywaç urzàdzenia w niskich temperaturach. • Nie zanurzaç urzàdzenia w wodzie. • Nie u˝ywaç produktów agresywnych lub rozpuszczalników do czyszczenia. • Nie u˝ywaç w temperaturze poniçej 0°C powyçej 35°C. GWARANCJA Urzàdzenie jest przeznaczone wy∏àznie do u˝ytku domowego. Nie mo˝e byç
  • Страница 23 из 27
    rolki rolki rolki a b 21
  • Страница 24 из 27
    clic! A- Depilator - Na∏ó˝ dodatek do depilacji pach (18) na nasadk´ depilatora do us∏yszenia klikni´cia. - Ustaw prze∏àcznik na pozycji 1. 1 Ustaw prze∏àcznik na pozycji 2. 22
  • Страница 25 из 27
    1 2 • Czyszczenie nasadki golàcej - Wy∏àczyç i od∏àczyç urzàdzenie. - Zdjàç os∏onk´ (17). W tym celu: przytrzymaç mocno depilator i umieÊciç palce w strefach uchwytu (15) nasadki golàcej, a nast´pnie pociàgnàç do góry. W ten sposób zdejmuje si´ os∏onk´ (17) z zespo∏u ostrzy (16). - Dok∏adnie usunàç
  • Страница 26 из 27
    rolki ! 10. 11. BIERZMY CZYNNY UDZIAŁ W OCHRONIE ŚRODOWISKA! Twoje urządzenie jest zbudowane z materiałów, które mogą być poddane ponownemu przetwarzaniu lub recyklingowi. W tym celu należy je dostarczyć do wyznaczonego punktu zbiórki. Nie należy go umieszczać z innymi odpadami komunalnymi. 24
  • Страница 27 из 27