Русский - 30
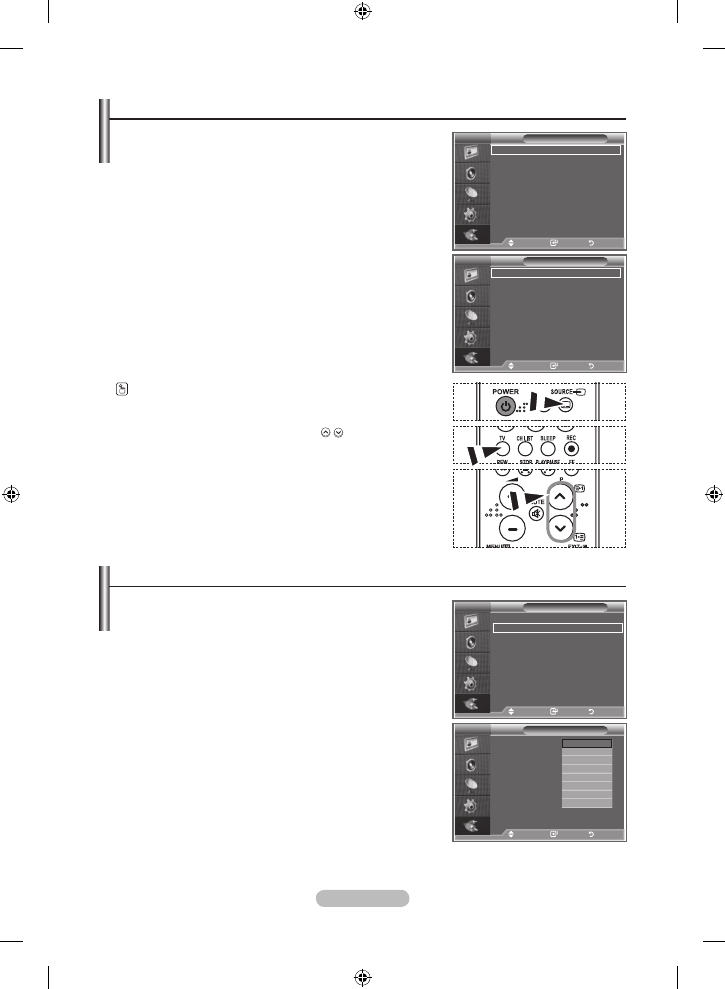
Выбор источника
Источник можно выбрать из внешних источников,
подсоединенных к входным гнездам телевизора.
.
Нажмите кнопку
MenU
для отображения меню.
Нажмите кнопку
enteR/OK
для выбора пункта “Вход”.
.
Снова нажмите кнопку
enteR/OK
для выбора пункта
“Список источн.”.
Если к телевизору не подключено ни одного внешнего
устройства, в меню “Список источн.” включены только
параметры “TV”, “Внешний 1”, “Внешний 2”. Параметры
“AV”, “S-Video”, “Компонентный”, “PC”, “HDMI1”,
“HDMI2”, “HDMI3” включаются только при подключении
соответствующих устройств к телевизору.
3.
Выберите необходимое устройство, нажимая кнопку
или
.
Нажмите кнопку
enteR/OK
.
Редактирование названий источников входного сигнала
Укажите название устройства, подключенного к входным
разъемам, для упрощения процедуры выбора источника.
.
Нажмите кнопку
MenU
для отображения меню.
Нажмите кнопку
enteR/OK
для выбора пункта “Вход”.
.
Нажмите кнопку
или
для выбора пункта “Редактир.
назв.”, затем нажмите кнопку
enteR/OK
.
3.
Нажмите кнопку
или
для выбора устройства, название
которого необходимо отредактировать. Нажмите кнопку
enteR/OK
.
.
Нажмите кнопку
или
для выбора необходимого
устройства.
Нажмите кнопку
enteR/OK
.
.
Нажмите кнопку
eXIt
для выхода.
➣
Нажмите кнопку
SOURCe
на пульте дистанционного
управления для переключения между всеми доступными
источниками. Режим TV можно выбрать с помощью кнопки
tV
, номерных кнопок(0~9) и кнопки
P
/ на пульте
дистанционного управления. Но его можно выбрать с
помощью кнопки
SOURCe
.
Mode
: Custom
equalizer
SRS tS Xt
: Off
Auto Volume
: Off
Internal Mute
: Off
Reset
Mode
: Custom
equalizer
SRS tS Xt
: Off
Auto Volume
: Off
Internal Mute
: Off
Reset
Move
enter
Return
tV
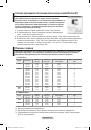
Редактир. назв.
Внешний
: ----
Внешний
: ----
AV
: ----
S-Video
: ----
Компонентный : ----
ПК
: ----
HDMI
: ----
HDMI
: ----
HDMI3
: ----
----
VHS
DVD
D-VHS
Кабельное ТВ
ТВЧ
Спут. приставка
Перем.
Вxод
Возврат
Move
enter
Return
tV
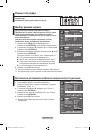
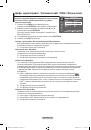
Вход
Список источн. : tV
Редактир. назв.
Anynet+(HDMI-CeC)
Перем.
Вxод
Возврат
Mode
: Custom
equalizer
SRS tS Xt
: Off
Auto Volume
: Off
Internal Mute
: Off
Reset
Mode
: Custom
equalizer
SRS tS Xt
: Off
Auto Volume
: Off
Internal Mute
: Off
Reset
Move
enter
Return
tV
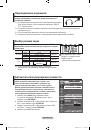
Список источн.
tV
Внешний
: ----
Внешний
: ----
AV
: ----
S-Video
: ----
Компонентный : ----
ПК
: ----
HDMI
: ----
HDMI
: ----
HDMI3
: ----
Перем.
Вxод
Возврат
Move
enter
Return
tV
Вход
Список источн. : tV
Редактир. назв.
Anynet+(HDMI-CeC)
Перем.
Вxод
Возврат
BN68-01166F-Rus-0317.indd 30
2007-03-17 �� 9:32:46