Инструкция для TELEFUNKEN TF-AS1203U

(скачивание инструкции бесплатно)
Формат файла: PDF
Доступность: Бесплатно как и все руководства на сайте. Без регистрации и SMS.
Дополнительно: Чтение инструкции онлайн
background image

Instruction manual

3

Utilization of the product


If you want to dispose this product, do not 

mix it with general household waste. There is a 
separate collection system for used electronic 
products in accordance with legislation that 
requires proper treatment, recovery and 
recycling.

Please contact your local authorities for 

the correct method of disposal. By doing so, 
you will ensure that your disposed product 
undergoes the necessary treatment, recovery 
and recycling and thus prevent potential 
negative effects on the environment and 
human health.

Important safeguards


•  The instruction manual contains important 

operating and maintenance instructions. For 
your safety, it is necessary to refer the manual. 
Keep the manual for use in future.

•  Do not hit or drop the unit.
•  Do not expose the unit to vibration, direct 

sunlight, too high or low temperature or humidity.

•  Do not disassemble the unit yourself. 

Refer servicing to qualified service personnel.

Power supply


•  Before the first connecting of the appliance 

check that voltage indicated on the rating label 
corresponds the mains voltage in your home.

•  Insert the plug into power supply.

Caution:

 Always unplug the appliance from 

power supply, when no use long time.
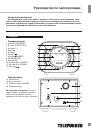
General operations

Power on/off

When the unit is connected to the current 

supply mains, slide POWER switch to ON 
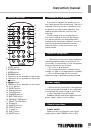
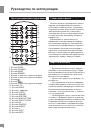
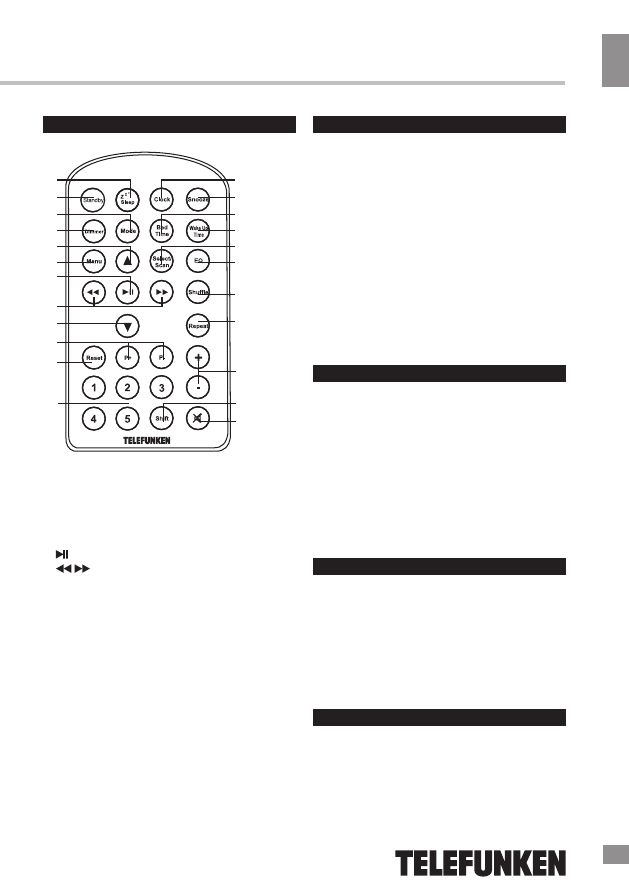
Remote controller


1
2
3
4
5
6
7

8
9

10
11

12

13
14
15
16

17
18

19

20

21

22
23

1. SLEEP button
2. STANDBY button
3. MODE button
4. DIMMER button
5. The button is not operable for this model
6. The button is not operable for this model
7.   button
8. 

/

 buttons

9. The button is not operable for this model
10. P+/P- buttons
11. RESET button
12. Number buttons
13. CLOCK button
14. SNOOZE button
15. BED TIME button
16. WAKE UP TIME button
17. SELECT/SCAN button
18. EQ button
19. SHUFFLE button
20. REPEAT button
21. +/- buttons
22. SHIFT button
23. MUTE button

1
2
3
4
5
6
7
8
9
10
11
12
13
Оглавление инструкции
  • Страница 1 из 14
    USB/SD AUDIO SYSTEM WITH SUBWOOFER / АУДИОСИСТЕМА C USB/SD И САБВУФЕРОМ TF-AS1203U Instruction manual Руководство по эксплуатации
  • Страница 2 из 14
    Instruction manual Dear customer! Thank you for purchasing our product. For safety, it is strongly recommended to read this manual carefully before connecting, operating and/or adjusting the product and keep the manual for reference in future. Description Front panel 1. STBY/MODE button 2.
  • Страница 3 из 14
    Instruction manual Remote controller 1 2 3 4 5 6 7 8 9 Utilization of the product 13 14 15 16 17 18 19 20 10 11 12 21 22 23 1. SLEEP button 2. STANDBY button 3. MODE button 4. DIMMER button 5. The button is not operable for this model 6. The button is not operable for this model 7. button 8. /
  • Страница 4 из 14
    Instruction manual position to switch the power on; the unit will go into standby mode. Press STBY/MODE button on the panel or STANDBY button on the RC to switch the unit from standby mode; the backlight on the front panel will light up. To turn the unit to standby mode press and hold STBY/ MODE
  • Страница 5 из 14
    Instruction manual USB/SD operation Connecting USB/SD • Insert a USB device into the USB port or insert a memory card into the memory card slot. The unit will switch to USB or SD mode automatically. The unit will start reading the device, LOAD will be displayed. • When the device and tracks on it
  • Страница 6 из 14
    Instruction manual is set as alarm sound but no USB/SD is connected, the alarm sound is buzzer by default. • The alarm will sound for 60 minutes, the alarm icon flashes during this period. To stop the alarm, press STBY/MODE button on the panel or STANDBY button on the RC. • When the alarm is
  • Страница 7 из 14
    Руководство по эксплуатации Уважаемый покупатель! Благодарим Вас за покупку нашего изделия. Чтобы понять, как правильно и безопасно пользоваться Вашей моделью изделия, рекомендуется тщательно изучить настоящее руководство перед включением, регулировкой и эксплуатацией изделия. Сохраняйте
  • Страница 8 из 14
    Руководство по эксплуатации Пульт дистанционного управления 1 2 3 4 5 6 7 8 9 13 14 15 16 17 18 19 20 10 11 12 21 22 23 Утилизация изделия Если вы желаете утилизировать данное изделие, не выбрасывайте его вместе с обычным бытовым мусором. Существует отдельная система сбора использованных
  • Страница 9 из 14
    Руководство по эксплуатации Питание устройства • Перед первым использованием устройства проверьте, соответствует ли электропитание устройство, указанное в таблице с техническими характеристиками, электропитанию в Вашей локальной сети. • Вставьте вилку электрошнура в розетку. Внимание: Всегда
  • Страница 10 из 14
    Руководство по эксплуатации Подсветка дисплея Нажимайте кнопку DIMMER на ПДУ, чтобы изменить уровень яркости подсветки дисплея Операции с радио • Нажимайте кнопку MODE на ПДУ или кнопку STBY/MODE на панели до выбора режима радио. • Для приема FM-сигнала полностью вытяните проводную антенну. • Для
  • Страница 11 из 14
    Руководство по эксплуатации Некоторые модели стандартных USB-накопителей и карт памяти SD могут не поддерживаться данным устройством в связи с нарушениями официальных стандартов USB и карт памяти при производстве этих носителей. • Данным устройством поддерживается файловая система FAT32. Согласно
  • Страница 12 из 14
    Руководство по эксплуатации (120 минут). Нажимайте эту кнопку для изменения интервала времени отключения. По истечении установленного времени устройство автоматически пререйдет в режим ожидания. Чистка и уход При необходимости протрите корпус влажной тканью; при этом убедитесь, что устройство
  • Страница 13 из 14
  • Страница 14 из 14