4
Instruction manual
4
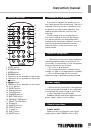
position to switch the power on; the unit will
go into standby mode. Press STBY/MODE
button on the panel or STANDBY button on the
RC to switch the unit from standby mode; the
backlight on the front panel will light up. To turn
the unit to standby mode press and hold STBY/
MODE button on the panel or press STANDBY
button on the RC. To switch the power off, slide
POWER switch to OFF position.
Clock setting
• In standby mode press CLOCK button on
the RC or press SLEEP/CLOCK button on the
panel to enable time setting mode. Hour digits
will blink; press repeatedly
/
buttons to
set hours. Press CLOCK button on the RC
or SLEEP/CLOCK button on the panel again;
minute hours will blink. Press repeatedly
/
buttons to set minutes. Press CLOCK button
on the RC or SLEEP/CLOCK button on the
panel to confirm the time.
• In time setting mode, if no button is pressed
within 5 seconds, the unit will automatically go
to clock mode.
AUX input
You can connect the audio output of an
external device to this unit, to listen to the sound
of that device through the speakers of this unit.
• To connect an external audio device,
please use a standard audio cable with 3.5-mm-
to-3.5 mm plugs to connect the headphone out
or audio line-out of the external device to the
AUX input socket of this unit.
• Press repeatedly MODE button on the RC
or STBY/MODE button on the panel to select
LINE mode; LINE will be displayed.
• Turn on the external device. You cannot
control playback with the buttons of this unit
except adjusting the volume.
Volume
Press VOL+/ALARM2 and VOL-/ALARM1
buttons on the panel or +/- buttons on the RC
to adjust the sound volume level. Press MUTE
button on the RC to mute the sound, press this
button again to resume the sound.
Equalizer
Press EQ button repeatedly to select an
equalizer mode: ROCK/CLASS/FLAT/POP/
JAZZ.
Modes
Press MODE button on the RC or STBY/
MODE button on the panel repeatedly to select
an operation mode: external audio device from
the line input (LINE) => FM radio => USB =>
SD. USB and SD modes are available only if
corresponding storage is connected.
Display backlight
Press DIMMER button on the RC repeat--
edly to change the display backlight brightness
level.
Radio operation
• Press MODE button on the RC or STBY/
MODE button on the panel repeatedly to select
radio mode.
• For FM reception extend the wire antenna.
• To adjust the frequency step by step
press repeatedly
/
buttons. For automatic
search of a station, press and hold
or
button; the unit will look for the next
available station and start its broadcast.
Repeat the operation to search more stations.
Press SELECT/SCAN button on the RC to
automatically search available stations.
• To save a station, press PRESET button
on the RC or press and hold /PRESET
button on the panel. The memory position
will blink. Press P+/P- buttons to select a
memory position. Press PRESET ( /PRESET)
button again to save the current station under
the selected number. You can maximum 20
stations in the memory.
To input a position number for saving
or a stored station number you can also press
number buttons on the RC (1, 2, 3, 4, 5 buttons
for corresponding numbers and SHIFT+1,
SHIFT+2, SHIFT+3, SHIFT+4, SHIFT+5 to
input 6, 7, 8, 9, 0 correspondingly).
• To call a saved station, press P+/P- buttons.