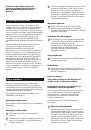
D Put the motor block (2) back in position. The
control knob on the appliance must be set at “0”.
G Plug the appliance into a mains socket.
Switching on the appliance
M When using the appliance in the wet vacuuming
mode, the control knob (7) must be set at the
“carpet + floor nozzle” symbol.
The pump lamp (6) should not be lit up.
The appliance is ready for use.
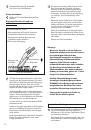
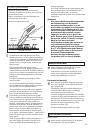
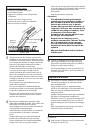
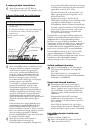
Liquids can be directly vacuumed out of containers
with either the vacuum hose or the hose with a
section.
Take care when vacuuming liquids from
high-sided containers or basins, where the
quantity level exceeds the liquid capacity
of the collecting bin. Remember that, in
such a case, the liquid will continue to flow
from the container even if the collecting bin
is full and the float has stopped the suction
flow of the appliance.
Therefore, vacuum only small quantities of liquid at a
time and empty the collecting bin before switching on
again.
Always lift the suction tube out of the liquid before
switching off the motor.
Warning!
If petrol, paint thinner, fuel oil etc. are
allowed to mix with the suction air flow, explosive
fumes or compounds may be formed.
Acetone, acids and solvents may attack the materials
on your appliance. It is quite safe to vacuum water
which contains ordinary household cleaning agents.
After vacuuming liquids, the collecting bin and all
accessories used should be wiped clean and left to
dry.
Operating the spray-extraction system
Before spray-extraction cleaning
Make sure that what is to be cleaned by spray-
extraction is suitable for this purpose.
Do not use the appliance for delicate, hand-woven or
non-fast carpets.
Test the colour-fastness of your carpet by pouring a
little cleaning solution onto a white cloth and rubbing
this onto a normally hidden section of the carpet. If
there are no traces of dye on the cloth, it can be
assumed that the carpet is colour-fast.
However, if dye comes off onto the cloth, do not clean
the carpet by spray-extraction.
If you are in doubt, contact a specialist dealer.
Before shampooin g your carpet, vacuum-clean the
whole area thoroughly.
Ensure that the room is well-aired during and after
spray-extraction cleaning to enable the carpet to dry
quickly.
Carpet shampooing
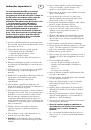
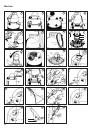
A Pull out the plug and lift off the motor
block (2).
B
When using the appliance in the spray-extraction
mode, ensure that the extraction liquid tank (28) is
inserted in the collecting bin.
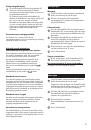
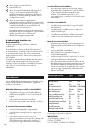
N Pour the cleaning concentrate into the sprayer
tank (28) and fill up with water. (Observe the
dosing instructions on the lable of the Protex
bottle.)
Use lukewarm water (max. 30°C) only. Higher
temperatures can damage not only the appliance,
but also the carpet and upholstery.
L
Detach the cleaning solution tube (37) from its
fixture in the motor block (2).
O While putting the motor block (2) back on the
collecting bin, let the cleaning solution tube (37)
dangle down into the cleaning solution.
D Secure the motor block on the collecting bin by
means of both snap-on fasteners (3).
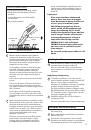
Connecting the flexible hose and delivery
tube
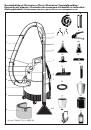
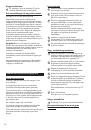
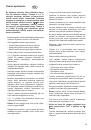
P
Slide the spray diffusor control (17) into the fixture
provided on the suction tube. Then insert the
handgrip (11) in the suction tube. Attach the
delivery tube (19) to the flexible hose (13) by
means of the plastic clips.
E
Then insert the flexible hose (13) in the suction
socket (8) in such a manner that the markings on
both correspond and the button audibly clicks
into place.
Q Subsequently, insert the delivery tube (19) firmly
into the coupling piece (5) on the motor block (2).
Now attach the second suction tube (the one with
fixture studs) to the p suction tube which is
already mounted.
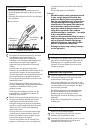
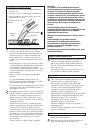
S
Attach the spray-extraction carpet shampoo
nozzle (18).
T
Attach the delivery tube (12), which is mounted on
the nozzle, by the coupling piece (39) to the spray
diffusor control (17) and secure by turning the
coupling piece (39).
Then press the delivery tube (12) into the
sclamping fixtures on the suction tubes.
The control knob on the appliance must be set
at ”0”.
G Plug the appliance into a mains socket.
The appliance is now ready for use.
Switching on the appliance
U Turn the control knob (7) to the „spray-extraction"
symbol.
The pump lamp (6) should now be lit up.
16