EN
6
Use more of your TV
-
Demo partition
: Select the mode in which you
want to demo the effect of motion enhancement.
-
Demo
: Start the demo by pressing
OK
/►
.
4.
Press
Exit
to close the menu.
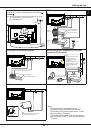
PAP function
To display the pictures from different source inputs
side by side. Note that one window is for both
analogue and digital TV inputs, the other is for VGA,
HDMI and CMP inputs. (
Note: Not available for AV-
Scart on both windows.
)
1.
Press
Menu
to display the main menu.
2.
Select
PAP
and press
OK
to enter.
3.
Select the
PAP
option, and press ◄/► to turn on/
off PAP function.
4.
Select
TV position
, press ◄/► to reposition the
TV window.
5.
Press ◄/► to toggle the focus window.
6.
When the focus is on the TV window, the digit
buttons and
P+/-
work in TV. When the focus is on
the other window,
P+/-
switches available external
sources.
Use subtitles
You can enable subtitles for each TV channel.
Subtitles are broadcast via Teletext or DVB-T/DVB-C
digital broadcasts. With digital broadcasts, you have
the additional option of selecting a preferred subtitle
language.
Turn on/off subtitles
1.
Press
Menu
on the remote control and select
Options > Subtitle.
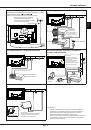
2.
Press
OK/►
to enter. (Refer to Figure 4.)
3.
Select the
Subtitle
option, and press
◄/►
to select
On/Off
to turn on/off subtitles.
Enable subtitle languages on digital TV channels
1.
Press
Menu
on the remote control and select
Options > Subtitle > Digital subtitle language.
2.
Press
◄/►
to select a subtitle language as your
preferred language.
3.
Press
▲/▼
to select
Digital subtitle language
2nd.
4.
Press
◄/►
to select a secondary subtitle language.
5.
Press
Exit
to close the menu.
Shortcut operation
: Press
SUBTITLE
on the remote
control to directly select a subtitle language available
for the selected digital TV programme.
Select a subtitle type on digital TV channels
1.
Press
Menu
on the remote control and select
Options > Subtitle > Subtitle type.
2.
Press
◄/►
to select a subtitle type. You can select
Hearing impaired
to display the hearing impaired
subtitles with your selected language.
Select decoding page language in Teletext
Press
Menu
on the remote control and select
Options
> Decoding page language
. Select a proper type of
language in which Teletext will display.
Digital Teletext language
For digital TV channels, your TV could zap to a
service with multiple initial Teletext pages in different
languages. This function allows you to select an
available language as primary language, which
relates to different initial Teletext pages.
Press
Menu
on the remote control and select
Options
> Digital teletext language
. Press
◄/►
to select.
SPDIF type
Connect to an audio device through the
SPDIF
output. Press
Menu
on the remote control and select
Options > SPDIF type
. Select a proper sound type
from the list for digital programmes.
- If the current programme outputs sound in
Dolby D
format, then either
PCM
or
Dolby D
can be selected.
- If the current programme does not output sound
in
Dolby D
format, only
PCM
can be selected.
Otherwise no sound will be output.
- Select
Off
to turn off the audio output from the audio
device connected to the
SPDIF
output.
Note: The options you may choose depend on the
programme you are watching. If you select
PCM and the sound is ahead of the picture,
you can select SPDIF delay from the Options
menu and press
◄/►
to adjust the delay time
to synchronize the sound with the picture.
T-Link
To search for CEC devices connected to the HDMI
sockets in your TV and enable one-touch play and
one-touch standby between CEC devices.
Enable or disable T-Link
1.
Press
Menu
on the remote control, then select
Options > T-Link
.
2.
Press
◄/►
to select
On
or
Off
.
Use one-touch play
One-touch play enables you to press the play button
on, for example, your DVD remote control. This starts
playback on your DVD device and automatically
switches your TV to the correct source, displaying DVD
content.
English