Инструкция для VITEK VT-1467 GY

(скачивание инструкции бесплатно)
Формат файла: PDF
Доступность: Бесплатно как и все руководства на сайте. Без регистрации и SMS.
Дополнительно: Чтение инструкции онлайн
background image

5

ENGLISH          

• 

To switch the blender on press and hold the 
button (2). Use this operation mode for mix-
ing liquid products.

• 

If you press and hold the button (3), the unit 
will operate at maximum rotation speed.

• 

After  you  finish  using  the  unit,  take  the  plug 
out  of  the  socket,  disconnect  the  whisk  (7) 
from the gear (6) and disconnect the gear (6) 
from the motor unit (4) turning it clockwise.

Attention!

– 

Do  not  use  the  whisk  (7)  to  kneed  tight 
dough.

– 

Products  for  beating/mixing  should  be  put 
into the bowl before switching the unit on.

USING THE CHOPPING KNIFE (18)

Attention!

– 

Do not chop very hard products, such as nut-
megs, coffee beans and cereals.

Before you start chopping:

– 

Remove  bones,  veins  and  cartilage  from 
meat.

– 

Cut  meat,  onion,  garlic,  carrots  etc.  into 
approximately equal slices.

– 

When  chopping  greens,  remove  stems  of 
herbs.

Chopping


Warning: 

– 

Before  assembling  make  sure  that  power 
plug is not inserted into the socket.

– 

Do not overfill the processing bowl.

Caution: The blades are very sharp!

• 

Set the driving shaft (19) on the spindle of the 
processing bowl (17).

• 

Remove the plastic protective cover from the 
blades  of  the  knife  (18)  and  set  the  knife  in 
the slots of the driving shaft (19).

• 

Put  the  products  into  the  processing  bowl 
(17).

• 

Put the geared lid (10) on the bowl (17).

• 

Press the lock button (16) and turn the geared 
lid  (10)  counterclockwise,  setting  it  to  the 
position  “ ”,  release  the  lock  button  (16) 
and make sure that the geared lid (10) is fixed 
properly.

• 

Place  the  motor  unit  (4)  on  the  geared  lid 
(10) and rotate it clockwise until it is securely 
fixed.

• 

Insert the power plug into the socket.

• 

Set the required speed from 1 to 20 using the 
control knob (1). 

• 

To switch the blender on press and hold the 
button (2). 

• 

When  the  button  (3)  is  pressed,  the  knife 
rotates at maximum rotation speed. 

• 

Hold  the  motor  unit  (4)  with  one  hand  and 
the  bowl  (17)  with  the  other  hand  during 
operation.

• 

After  using  the  unit  remove  the  power  plug 
from  the  socket,  disconnect  the  motor  unit 
(4) from the geared lid (10), turning it coun-
terclockwise.

• 

Then  remove  the  geared  lid  (10)  from  the 
bowl (17), pressing the lock button (16) and 
turning the lid (10) clockwise.

• 

Carefully remove the knife (18) gripping the 
upper end of the driving shaft (19).

• 

Take  the  chopped  products  out  of  the  pro-
cessing bowl (17).

• 

Clean, wash and dry all the used parts imme-
diately after operation.

• 

Put  the  knife  (18)  into  the  plastic  protective 
cover.

Attention!  Continuous  operation  time  of  the 
unit should not exceed 20-30 seconds.

USING THE CUBIC ATTACHMENT

Use  the  cubic  attachment  for  cutting  fruit  and 
boiled vegetables.

Attention!

– 

Do not process hard and frozen food. It can 
damage the cubic attachment.

Warning: 

– 

Before assembling make sure that the power 
plug is not inserted into the socket.

• 

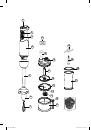
Open  the  clamps  (14),  set  the  knife  (12)  on 
the cubic attachment (13) and fix it with the 
clamps (14).

• 

Match  the  groove  on  the  cubic  attachment 
(13)  with  the  ledge  inside  the  processing 
bowl  (17)  (near  the  bowl  handle)  and  install 
the attachment in the bowl 

(PIC. 1).

• 

Set  the  driving  shaft  (11)  into  the  attach-
ment (13). 

Note: Check whether the attachment (13) is set 
properly,  otherwise  the  processor  lid  (10)  will 
not close.

• 

Put the geared lid (10) on the bowl (17).

• 

Press  the  lock  button  (16)  and  turn  the 
geared lid (10) counterclockwise to the posi-

VT-1467.indd   5

18.10.2012   15:06:31

1
2
3
4
5
6
7
8
9
10
11
12
13
14
15
16
17
18
19
20
21
22
23
24
25
26
27
28
29
30
31
32
33
34
35
36
37
38
39
40
41
42
43
44
45
46
Оглавление инструкции
  • Страница 1 из 47
    VT-1467 GY Hand blender set Блендерный набор 3 7 12 17 22 27 31 36 41 1 VT-1467.indd 1 18.10.2012 15:06:30
  • Страница 2 из 47
    1 2 3 8 18 4 9 19 10 20 11 5 12 21 13 14 6 7 15 16 17 рис. 1 VT-1467.indd 2 18.10.2012 15:06:31
  • Страница 3 из 47
    ENGLISH • Before using the unit make sure that all the parts are set properly. • Place the bowl on a flat, stable surface. • Products should be put into the bowl before switching the unit on. • Do not overfill the chopper bowl with products and watch the level of poured liquids. • The blades of
  • Страница 4 из 47
    ENGLISH • • Close supervision is necessary when children or disabled persons are near the operating unit. This unit is not intended for usage by children or disabled persons unless they are given all the necessary and understandable instructions by a person who is responsible for their safety on
  • Страница 5 из 47
    ENGLISH • • To switch the blender on press and hold the button (2). Use this operation mode for mixing liquid products. • If you press and hold the button (3), the unit will operate at maximum rotation speed. • After you finish using the unit, take the plug out of the socket, disconnect the whisk
  • Страница 6 из 47
    ENGLISH • • • • • • • • • • • • tion “ ”, release the lock button (16) and make sure that the geared lid (10) is fixed properly. Place the motor unit (4) on the geared lid (10) and rotate it clockwise until it is securely fixed. Insert the power plug into the mains socket. Set the required speed
  • Страница 7 из 47
    DEUTSCH STABMIXER-SET • Beschreibung 1. Drehgeschwindigkeitsregler 2. Einschalttaste „I“ 3. Taste des Turbo-Betriebs „II“ 4. Motorblock 5. Stabmixeraufsatz 6. Schlagbesengetriebe 7. Schlagbesen fürs Schlagen/Mischen von flüssigen Nahrungsmitteln 8. Stampfer für Reinigung des Würfelgitters 9.
  • Страница 8 из 47
    DEUTSCH • • • • – – – • • • • • • Ziehen Sie nie den Netzstecker mit nassen Händen aus der Steckdose. Es ist nicht gestattet, das Gerät zu benutzen, wenn das Netzkabel beschädigt ist. Es ist nicht gestattet, das Gerät selbständig zu reparieren. Im Falle der Beschädigung wenden Sie sich an einen
  • Страница 9 из 47
    DEUTSCH • • Um das Gerät einzuschalten, drücken und halten Sie die Taste (2). Stellen Sie die gewünschte Drehgeschwindigkeit von 1 bis 20 mit dem Regler (1) ein. Benutzen Sie diesen Betrieb, um flüssige Nahrungsmittel zu mischen. • Beim Drücken und Halten der Taste (3) läuft das Gerät mit
  • Страница 10 из 47
    DEUTSCH • NUTZUNG DES WÜRFELSCHNEIDERS Der Würfelschneider ist fürs Schneiden von Früchten und abgekochtem Gemüse geeignet. Achtung! – Es ist nicht gestattet, harte Zutaten und gefrorene Nahrungsmittel zu bearbeiten. Sie können den Würfelschneider beschädigen. Warnung: – Vergewissern Sie sich vor
  • Страница 11 из 47
    DEUTSCH • • • • • AUFBEWAHRUNG Bevor Sie das Gerät zur längeren Aufbewahrung wegpacken, lassen Sie die Aufsätze komplett reinigen und trocknen. • Wickeln Sie nie das Netzkabel um den Motorblock. • Bewahren Sie das Gerät an einem kühlen, trockenen und für Kinder unzugänglichen Ort auf.
  • Страница 12 из 47
    русский БЛЕНДЕРНЫЙ НАБОР Описание 1. Регулятор скорости вращения 2. Кнопка включения «I» 3. Кнопка включения турборежима «II» 4. Моторный блок 5. Насадка-блендер 6. Редуктор венчика 7. Венчик для взбивания /смешивания жидких продуктов 8. Толкатель для очистки сетки насадки для нарезки кубиками 9.
  • Страница 13 из 47
    русский • Не тяните за сетевой шнур, и не перекручивайте его. • Не беритесь за сетевую вилку мокрыми руками. • Не используйте устройство с поврежденным сетевым шнуром. • Не пытайтесь самостоятельно ремонтировать устройство. При возникновении неисправностей обращайтесь в авторизованный сервисный
  • Страница 14 из 47
    русский • 1-20. Используйте данный режим работы для смешивания жидких продуктов. • При нажатии и удержании кнопки (3) устройство включится на максимальных оборотах. Используйте данный режим работы для совместной обработки жидких и твердых продуктов. Примечание: – Продукты помещаются в ёмкость до
  • Страница 15 из 47
    русский • Установите моторный блок (4) на крышку-редуктор (10) и поверните по часовой стрелке до фиксации. • Вставьте сетевую вилку в розетку. • Регулятором (1) установите нужную скорость 1-20. • Для включения устройства нажмите и удерживайте кнопку (2). • При нажатии кнопки (3) нож будет вращаться
  • Страница 16 из 47
    русский • • • • • • • • • Очистите, промойте и просушите все используемые детали сразу после окончания работы. Рекомендуется промывать съемные детали теплой водой с нейтральным моющим средством. Для удобства чистки сетки (15) для нарезки кубиками, выньте ее из насадки (13) и удалите оставшиеся
  • Страница 17 из 47
    Қазақ БЛЕНДЕРЛІК ЖИНАҚ Сипаттамасы 1. Айналдыру жылдамдығының реттегіші 2. Қосу түймесі «I» 3. Турборежимді қосу түймесі «II» 4. Моторлы блок 5. Саптама-блендер 6. Көпірткіш редукторы 7. Сұйық өнімдерді көпіртуге/араластыруға арналған көпірткіш 8. Текшелеп турауға арналған саптама торкөзіп
  • Страница 18 из 47
    Қазақ оны бөлмелік температурада кемінде екі сағат уақыт бойы ұстау керек. • Құрылғыны пайдаланар алдында өнімдерге тиетін ұштықтарды бейтарап жуғыш заты бар жылы сумен жуыңыз да, оны әбден кептіріңіз. • Моторлы блокты (4), көпірткіш редукторын (6), процессор тостағанының қақпақредукторын (10)
  • Страница 19 из 47
    Қазақ 1-ден 20-ға дейін. Бұл жұмыс режимін сұйық өнімдерді араластыру үшін пайдаланыңыз. • Түймені (3) басып, ұстап тұрған кезде құрылғы максималды айналымға қосылады. Бұл режимді сұйық және қатты өнімдерді бірге өңдеу үшін пайдаланыңыз. Ескертпе: – Өнімдер құрылғыны қосқанға дейін ыдысқа салынады.
  • Страница 20 из 47
    Қазақ редуктордың (10) сенімді бекітілгенін тексеріңіз. • Моторлы блокты (4) қақпақ-редукторға (10) орнатып, оны сағат тілінің бағытында түбіне дейін бұраңыз. • Желілік ашаны электр розеткасына сұғыңыз. • Реттегішпен (1) қажетті жылдамдықты орнатып алыңыз: от 1 до 20. • Құрылғыны қосу үшін түймені
  • Страница 21 из 47
    Қазақ • Барлық пайдаланылатын бөлшектерді жұмыс істеп болғаннан кейін бірден тазалаңыз, жуыңыз және кептіріңіз. • • ҚҰРЫЛҒЫНЫ ТАЗАЛАУ Жұмысты аяқтаған сайын немесе тазалау алдында құрылғыны өшіріп, оны электр желісінен ажыратыңыз. • Барлық пайдаланылатын бөлшектерді жұмыс істеп болғаннан кейін
  • Страница 22 из 47
    romÂnĂ/ Moldovenească SET BLENDER Nu folosiţi aparatul în afara încăperilor. Utilizaţi doar accesoriile furnizate împreună cu aparatul. • Înainte de prima utilizare a aparatului spălaţi bine toate accesoriile detaşabile care vor intra în contact cu alimentele. • Asiguraţi-vă că toate accesoriile
  • Страница 23 из 47
    romÂnĂ/ Moldovenească • • • • • Din motive de siguranţă a copiilor nu lăsaţi pungile de polietilenă, folosite pentru ambalare fără supraveghere. Atenţie! Nu permiteţi copiilor să se joace cu pungile sau pelicula pentru ambalare. Pericol de asfixiere! Copiii trebuie supravegheaţi pentru a nu se juca
  • Страница 24 из 47
    romÂnĂ/ Moldovenească UTILIZAREA ACCESORIULUI BĂTĂTOR Utilizaţi accesoriul bătător (7) numai pentru baterea cremei, prepararea aluatului de biscuiţi sau pentru mixarea deserturilor. Avertisment: – Înainte de asamblare asiguraţi-vă că fişa cablului de alimentare nu este introdusă în priză. •
  • Страница 25 из 47
    romÂnĂ/ Moldovenească Atenţie! – Nu procesaţi ingrediente tari, precum şi alimente congelate. Acestea pot deteriora accesoriul pentru tăiere cuburi. Avertisment: – Înainte de asamblare asiguraţi-vă că fişa cablului de alimentare nu este introdusă în priza electrică. • Deschideţi fixatoarele (14),
  • Страница 26 из 47
    romÂnĂ/ Moldovenească SPECIFICAŢII TEHNICE Alimentare: 220-240 V ~ 50/60 Hz Consum de putere: 800 W sau la compania, unde a fost procurat produsul dat. Serviciul de garanţie se realizează cu condiţia prezentării bonului de plată sau a oricărui alt document financiar, care confirmă cumpărarea
  • Страница 27 из 47
    Český Český • STOLNÍ MIXÉR (MIXÉROVA SOUPRAVA) Nepoužívejte příslušenství, které není součástí tohoto balení. • Než přístroj poprvé použijete, důkladně umyjte všechny součástky, které přicházejí do styku s potravinami. • Než začnete přístroj používat, přesvědčte se že všechny součástky jsou správně
  • Страница 28 из 47
    Český • Vložte mixovací nástavec (5) do motorové jednotky (4) a otočte ho proti směru hodinových ručiček až na doraz. • Zapojte síťovou vidlici do elektrické zásuvky. • Ponořte mixovací nástavec (5) do nádoby se surovinami, které se chystáte drtit/míchat, můžete k tomu použit měrnou nádobu (21).
  • Страница 29 из 47
    Český • • • Zapojte vidlici síťového kabelu do elektrické zásuvky. • Regulátorem (1) nastavte požadovanou rychlost: od 1 do 20. • Pro zapnutí přístroje stiskněte a podržte tlačítko (2). • Při stisknutí tlačítka (3) se přístroj zapne na maximální otáčky. • Při práci držte jednou rukou motorovou
  • Страница 30 из 47
    Český • • • • • • • • • • • • • • Nasaďte spojovací víko (10) na nádobu (17). Stiskněte klávesu-fixátor (16) a otočte spojovací víko (10) proti směru hodinových ručiček, tak aby se ocitla v poloze “ ”, pusťte klávesu-fixátor (16) a zkontrolujte, zda je spojovací víko (10) dobře upevněno. Umístěte
  • Страница 31 из 47
    УКРАЇНЬСКИЙ БЛЕНДЕРНИЙ НАБІР Опис 1. Регулювальник швидкості обертання 2. Кнопка включення «I» 3. Кнопка включення турборежиму «II» 4. Моторний блок 5. Насадка-блендер 6. Редуктор віночка 7. Віночок для збивання /змішування рідких продуктів 8. Штовхач для очищення сітки насадки для нарізки кубиками
  • Страница 32 из 47
    УКРАЇНЬСКИЙ • • Не беріться за мережеву вилку мокрими руками. • Не використовуйте пристрій з пошкодженим мережевим шнуром. • Не намагайтеся самостійно ремонтувати пристрій. При виникненні несправностей звертайтеся в авторизований (уповноважений) сервісний центр. • Щоб уникнути поразки електричним
  • Страница 33 из 47
    УКРАЇНЬСКИЙ Примітка: – Продукти поміщаються в ємність до включення пристрою. – Перед початком процесу подрібнення/змішування рекомендується зняти шкірку з фруктів, видалити неїстівні частини, такі як кісточки, і порізати фрукти кубиками розміром близько 2х2 см. • Після завершення використання
  • Страница 34 из 47
    УКРАЇНЬСКИЙ • Вставте мережеву вилку в електричну розетку. • Регулювальником (1) встановите потрібну швидкість: від 1 до 20. • Для включення пристрою натисніть і утримуйте кнопку (2). • При натисненні кнопки (3) ніж обертатиметься з максимальними зворотами. • Під час роботи тримайте моторний блок
  • Страница 35 из 47
    УКРАЇНЬСКИЙ • • • • • • • • КОМПЛЕКТ ПОСТАЧАННЯ Моторний блок – 1 шт. Насадка-блендер – 1 шт. Редуктор віночка – 1 шт. Віночок – 1 шт. Кришка-редуктор чаші процесора – 1 шт. Чаша процесора – 1 шт. Ніж-подрібнювач – 1 шт. Мірний стакан – 1 шт. Інструкція – 1 шт. Очистите, промийте і просушите всі
  • Страница 36 из 47
    Беларускi БЛЭНДАРНЫ НАБОР Апісанне 1. Рэгулятар хуткасці кручэння 2. Кнопка ўключэння «I» 3. Кнопка ўключэння турбарэжыма «II» 4. Маторны блок 5. Насадка-блэндар 6. Рэдуктар венца 7. Венца для ўзбівання /змешвання вадкіх прадуктаў 8. Штурхач для ачысткі сеткі насадкі для нарэзкі кубікамі 9. Штурхач
  • Страница 37 из 47
    Беларускi • • Не бярыцеся за сеткавую вілку мокрымі рукамі. • Не выкарыстоўвайце прыладу з пашкоджаным сеткавым шнурам. • Не спрабуйце самастойна рамантаваць прыладу. Пры ўзнікненні няспраўнасцяў звяртайцеся ў аўтарызаваны (упаўнаважаны) сэрвісны цэнтр. • У пазбяганне паразы электрычным токам і
  • Страница 38 из 47
    Беларускi • Пры націску і ўтрыманні кнопкі (3) прылада ўключыцца на максімальных абаротах. Выкарыстоўвайце дадзены рэжым працы для сумеснай апрацоўкі вадкіх і цвёрдых прадуктаў. Нататка: – Прадукты змяшчаюцца ў ёмістасць да ўключэння прылады. – Перад пачаткам працэсу драбнення/ змешвання
  • Страница 39 из 47
    Беларускi • Усталюйце маторны блок (4) на вечкарэдуктар (10) і павярніце яго па гадзіннікавай стрэлцы да фіксацыі. • Устаўце сеткавую вілку ў электрычную разетку. • Рэгулятарам (1) усталюйце патрэбную хуткасць: ад 1 да 20. • Для ўключэння прылады націсніце і ўтрымлівайце кнопку (2). • Пры націску
  • Страница 40 из 47
    Беларускi • ЧЫСТКА ПРЫЛАДЫ • Кожны раз пасля завяршэння працы ці перад чысткай выключайце прыладу і адключайце яе ад электрасеткі. • Ачысціце, прамыйце і прасушыце ўсе дэталі, якія выкарыстоўваліся, адразу пасля завяршэння працы. • Рэкамендуецца прамываць здымныя дэталі цёплай вадой з даданнем
  • Страница 41 из 47
    BLЕNDЕR TO’PLАMI Ўзбек Fаqаt jihоz bilаn qo’shib bеrilаdigаn qismlаrni ishlаting. • Birinchi mаrtа ishlаtishdаn оldin mаsаlliqqа tеgаdigаn yеchilаdigаn qismlаrini yaхshilаb yuving. • Ishlаtishdаn оldin jihоz qismlаri to’g’ri qo’yilgаnini tеkshirib ko’ring. • Idishini tеkis, qimirlаmаydigаn jоygа
  • Страница 42 из 47
    Ўзбек • • • • Diqqаt! Bоlаlаr pоlietilеn хаltа yoki o’rаshgа ishlаtilgаn plyonkаni o’ynаshlаrigа ruхsаt bеrmаng. Bo’g’ilish хаvfi bоr! Bоlаlаr jihоzni o’yinchоq qilib o’ynаshlаrigа ruхsаt bеrmаng. Ishlаyotgаn jihоz yaqinidа bоlаlаr yoki imkоniyati chеklаngаn insоnlаr bo’lgаndа аyniqsа ehtiyot
  • Страница 43 из 47
    Murvаtini (1) kеrаkli tеzlikkа qo’ying: tеzlik 1 dаn 20 gаchа qo’yilаdi. • Jihоzni ishlаtish uchun tugmаsini (2) bоsib ushlаb turing. Bu usul suyuq mаsаlliq аrаlаshtirishgа ishlаtilаdi. • Tugmаsi (3) bоsib ushlаb turilsа jihоzning аylаnishi eng tеz bo’lаdi. • Jihоz ishlаtib bo’lingаnidаn kеyin
  • Страница 44 из 47
    Ўзбек • • • • • • • • • • • • • Rеduktоr qоpqоqni (10) idish (17) ustigа qo’ying. Mаhkаmlаgich tugmаni (16) bоsing vа rеduktоr qоpqоqni (10) sоаt miligа tеskаri burаb “ ” tоmоngа o’tkаzib qo’ying, mаhkаmlаgich tugmаni (16) qo’yib yubоring, rеduktоr qоpqоq (10) mаhkаm turgаnini tеkshirib ko’ring.
  • Страница 45 из 47
    gb A production date of the item is indicated in the serial number on the technical data plate. A serial number is an eleven-unit number, with the first four figures indicating the production date. For example, serial number 0606ххххххх means that the item was manufactured in June (the sixth month)
  • Страница 46 из 47
    © ООО ГОЛДЕР-ЭЛЕКТРОНИКС, 2012 © GOLDER-ELECTRONICS LLC, 2012 VT-1467.indd 46 18.10.2012 15:06:34
  • Страница 47 из 47