Инструкция для VITEK VT-3468 W, VT-3468 BK

(скачивание инструкции бесплатно)
Формат файла: PDF
Доступность: Бесплатно как и все руководства на сайте. Без регистрации и SMS.
Дополнительно: Чтение инструкции онлайн
background image

ENGLISH


4

b)  There are foreign objects inside the unit.
c)  If the unit has been exposed to rain or water. 
d) If the unit does not operate normally by fol-

lowing the operating instructions. 

e)  If the unit has been dropped or its cabinet has 

been damaged.

f)  When the unit exhibits a distinct change in 

performance-this indicates a need for serv-
ice.

Cleaning

Unplug this unit from the wall outlet before clean-
ing. Use a damp cloth for cleaning.  Do not use 
liquid cleaners or aerosol cleaners. 

Cleaning discs

Do not use cracked or deformed discs, it can 
damage a unit.
Hold the disc by the edges. Do not touch the sur-
face. Dust, scratches or fingerprints on the sur-
face may lead to a failure of the unit.  
Protect the disc from direct sunlight; keep them 
away from heat sources, high temperature and 
moisture.
After usage, put the discs in the case for stor-
age.
Wipe periodically the surface of the discs with a 
soft cloth from the center to the edges.  
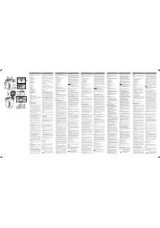
DESCRIPTION

1. FM 

–antenna

2. VOLUME 

control

3.  FUNCTION (RADIO /CD/MP3/USB /OFF) 

SWITCH

4. TUNING 

knob

5. Discs 

compartment 

6.  BAND (AM /FM/ FM ST) switch
7. OPEN/CLOSE 

ledge

8. LCD-display
9. STOP 

 button

10.  SKIP + button
11.  SKIP - button
12. PLAY/PAUSE 

 button

13.  FM ST indicator
14. ALBUM button
15. PROG button
16. MODE button
17.  USB flash drive jack
18.  TIME SET button
19. HOUR button
20. MINUTE button
21.  Power in jack
22. Battery compartment lid

CONNECTING POWER 
Line supply

Before connecting the unit, make sure that your 
home electricity supply corresponds to the volt-
age specified on the unit. 
1.  To connect the unit to the mains, insert one 

end of the power cord into the (21) jack and 
the other one – into the socket. Set the FUNC-
TION switch to CD/MP3/USB or RADIO. 

2. To switch off the unit set the 

FUNCTION


switch to the OFF position.

Note:

 Static electricity can lead to interfer-

ences in the operation of the unit. In this case 
disconnect the unit, and then connect it again. 
If the problem does not disappear, apply to the 
service center.

Battery supply

1.  Disconnect the unit.
2.  Open the battery compartment lid (22) on 

the backside of the unit, by pressing the two 
clamps in the direction of the arrows.

3.  Insert 8 “С” (UM 2) 1,5V batteries (not sup-

plied) into the battery compartment.

4.  Close the battery compartment lid.

Attention!

 Battery leakage can lead to injuries 

and damages of the unit. To avoid damages of 
batteries follow the instructions below:
-   place the batteries properly;
-   take the batteries out if you are not going to 

use the unit for a long time;

-   do not recharge batteries, do not dismantle 

them, and do not subject to high tempera-
tures;

-   replace the batteries in time.

Note: 

When the unit is in the standby mode, 

it still consumes energy, to switch off the unit 
completely, take the power cord out of the 
socket and remove the batteries from the bat-
tery compartment.

BASIC FUNCTIONS
Volume control

To select the desired volume level, use the vol-
ume control. 

Radio stations reception

1. Set the 

FUNCTION

 switch to the RADIO po-

sition. 

2.  Select the desired band: FM, FM ST or AM, 

3468IM.indd   4

3468IM.indd   4

27.07.2010   15:43:21

27.07.2010   15:43:21

1
2
3
4
5
6
7
8
9
10
11
12
13
14
15
16
17
18
19
20
21
22
23
24
25
26
27
28
Оглавление инструкции
  • Страница 1 из 29
    ENGLISH 1 3468IM.indd 1 27.07.2010 15:43:19
  • Страница 2 из 29
    3468IM.indd 2 27.07.2010 15:43:21
  • Страница 3 из 29
    ENGLISH PORTABLE CD/MP3 PLAYER Do not overload wall outlets or extension cords as this can result in a risk of fire or electric shock. Please read these instructions carefully before connecting, operating or adjusting the unit. Follow all warnings and operating recommendations in this manual. Keep
  • Страница 4 из 29
    ENGLISH CONNECTING POWER Line supply Before connecting the unit, make sure that your home electricity supply corresponds to the voltage specified on the unit. 1. To connect the unit to the mains, insert one end of the power cord into the (21) jack and the other one – into the socket. Set the
  • Страница 5 из 29
    ENGLISH set the BAND switch to the corresponding position. 3. Rotate the TUNING control to select the desired radio station. 4. When tuning to the station, transmitting a stereo signal, the FM ST indicator will light up. 5. After you finish listening to the radio set the FUNCTION switch to the OFF
  • Страница 6 из 29
    ENGLISH TROUBLESHOOTING GUIDE Improper usage is always the case of trouble. If you consider that there is something wrong with the unit, check possible causes in this table. If you have not managed to solve the problem, apply to the nearest authorized service center. or SKIP- button. Then press
  • Страница 7 из 29
    РУССКИЙ МАГНИТОЛА С СD/MP3 электрической сети рабочему напряжению устройства. Перед подключением, использованием и настройкой устройства внимательно прочитайте инструкцию. Необходимо соблюдать все предупреждения и рекомендации по эксплуатации устройства, приведенные в этом руководстве. Сохраните
  • Страница 8 из 29
    РУССКИЙ и усилителей), а также в местах, подверженных воздействию прямых солнечных лучей, чрезмерному запылению или механическим ударам. Берите диск только за края. Не прикасайтесь к рабочей поверхности диска. Пыль, царапины или отпечатки пальцев на рабочей поверхности диска могут привести к выходу
  • Страница 9 из 29
    РУССКИЙ Прием радиостанций 1. Установите переключатель FUNCTION в положение RADIO. 2. Выберите желаемый диапазон: FM ST, FM или AM, установив переключатель диапазонов BAND в соответствующее положение. 3. Вращая ручку настройки радиостанций TUNING, выберите желаемую радиостанцию. При настройке на
  • Страница 10 из 29
    РУССКИЙ Воспроизведение В режиме остановки воспроизведения нажмите кнопку PLAY/PAUSE, начнется воспроизведение диска. Пауза Для приостановки воспроизведения нажмите кнопку PLAY/PAUSE в режиме воспроизведения. Для возобновления воспроизведения нажмите повторно кнопку PLAY/PAUSE. Остановка
  • Страница 11 из 29
    РУССКИЙ Производитель оставляет за собой право изменять характеристики прибора без предварительного уведомления. 5. Нажмите и удерживайте кнопку PLAY/ PAUSE для перехода в режим воспроизведения USB. 6. Воспроизведение начнется автоматически, начиная с первого трека. 7. Для приостановки
  • Страница 12 из 29
    УКРАЇНЬСКИЙ ІНСТРУКЦІЯ З ЕКСПЛУАТАЦІЇ Перед підключенням, використанням та налагодженням пристрою уважно прочитайте інструкцію. Необхідно виконувати всі рекомендації та попередження щодо експлуатації пристрою, надані в даному посібнику. Зберігайте цей посібник та використовуйте його в майбутньому
  • Страница 13 из 29
    УКРАЇНЬСКИЙ Будьте особливо уважні, якщо поруч з ввімкненим пристроєм знаходяться діти або особи з обмеженими можливостями, не залишайте їх без нагляду. Після використання кладіть диски до футляру на зберігання. Періодично протирайте робочу поверхню диску м’якою тканиною від центру до краю. Не
  • Страница 14 из 29
    УКРАЇНЬСКИЙ Антена Для найкращого прийому в діапазоні FM висуньте повністю антену і зорієнтуйте її під потрібним кутом. джерел живлення, а потім підключіть знову. Якщо проблема не зникне, зверніться до найближчого сервісного центру. Живлення від батарейок 1. Вимкніть магнітолу від мережі. 2.
  • Страница 15 из 29
    УКРАЇНЬСКИЙ треку натисніть один раз кнопки SKIP+ або SKIP-. 2. Для швидкого переходу до потрібного місця треку, який програвається натисніть і утримуйте кнопки SKIP+ або SKIPвідповідно. Вибір альбому Ви можете вибрати необхідний вам альбом натисканням кнопки ALBUM. Повторення програвання треку або
  • Страница 16 из 29
    УКРАЇНЬСКИЙ ПОШУК І УСУНЕННЯ НЕСПРАВНОСТЕЙ Причиною несправностей або шумів часто є неправильне використання. Якщо ви вважаєте, що з пристроєм щось не так, перевірте можливі причини несправності за даною таблицею. Якщо вам не вдалося усунути несправність, зверніться до найближчого авторизованого
  • Страница 17 из 29
    ҚАЗАҚ тоғының соғу қаупін болдырмас үшін бұл құрылғыны ылғалдығы жоғары жайда ұстамаңыз (ваннаның, суға толы елегеннің, ас үйдегі раковинаның, кір жуатын машинаның, жүзу бассейнінің жанында, ылғалды жертөлелерде жəне т.б.). Құрылғыға су тамшысының тиюін немесе оның шашырауын болдырмаңыз. Құрылғыны
  • Страница 18 из 29
    ҚАЗАҚ балалар немесе мүмкіншілігі шектеулі адамдар болған жағдайда, өте мұқият болыңыз, оларды қараусыз қалдырмаңыз. үшін өзінің қорабына салып қойыңыз. Кезеңімен дискінің жұмыс бетін жұмсақ матамен ортасынан шетіне қарай сүртіп тұрыңыз. Құрылғының үстіне майшам сияқты ашық оты бар заттарды
  • Страница 19 из 29
    ҚАЗАҚ көздерінен ажыратыңыз, ал кейін қайтадан қосыңыз. Егер мəселе шешілмесе, ең жақын қызмет көрсету орталығына хабарласыңыз. Батарейкалардан қоректендіру 1. Магнитоланы желіден айырыңыз 2. Магнитоланың артындағы нұсқа бойынша бағытта ілгектерге басып, батареялық бөліктің (22) қақпағын ашыңыз. 3.
  • Страница 20 из 29
    ҚАЗАҚ SKIP+ немесе SKIP- батырмаларын бір рет басыңыз. 2. Жаңғыртылып жатқан тректің қажетті жеріне өту үшін SKIP+ немесе SKIPбатырмаларын сəйкесіне басыңыз жəне ұстап тұрыңыз. Альбомды таңдау ALBUM батырмасын басып сіз өзіңізге қажетті альбомды таңдай аласыз. Тректі немесе дискіні жаңғыртуды
  • Страница 21 из 29
    ҚАЗАҚ Уақытты баптау Жаңғырту режимінде TIME SET батырмасын басыңыз жəне ұстап тұрыңыз. HOUR жəне MINUTES батырмаларымен сəйкесінше сағатты жəне минутты белгілеңіз (Сағатты жəне минутты белгілеу уақытында TIME SET батырмасын басыңыз жəне ұстап тұрыңыз). Белгілеуді бітіру үшін TIME SET батырмасын
  • Страница 22 из 29
    ЎЗБЕК CD/MP3 VA BIR KASSETALI STEREOMAGNITOLA Elektr ta’minot tarmogidagi kuchlanish buyumning ish kuchlanishiga mos kelishini tekshiring. FOYDALANISH YO’RIQNOMASI Yong’in yoki elektr tokining zarbasi bilan shikastlanish kelib chiqmasligi uchun ushbu buyumni yuqori namlik sharoitlarida (vannalarga
  • Страница 23 из 29
    ЎЗБЕК mexanik zarbalar tushishi imkoniyati mavjud bo’lgan joylarda joylashtirmang. Agar yoqilgan buyum yonida bolalar yoki imkoniyatlari cheklangan kishilar bo’lganda alohida ehtiyotkor bo’lib, ularga diqqat qiling, ularni qarovsiz qoldirmang. Buyumning ustiga ochiq alangan manbalarini, masalan,
  • Страница 24 из 29
    ЎЗБЕК 2. Buyumni o’chirish uchun FUNCTION ishlash rejimlarini o’tkazish dastakchasini OFFholatiga o’rnating. Eslatma: Statik elektr yig’ilishi buyumning ishidagi buzilishlarga olib kelishi mumkin. Bu holda buyumni ta’mnot manbalaridan olib o’chiring, keyin esa buyumni yana yoqing. Agar muammo hal
  • Страница 25 из 29
    ЎЗБЕК PAUSE tugmasini bosing, diskni qayta tinglash boshlanadi. Pauza Qayta tinglashni to’xtatib turish uchun qayta tinglash rejimida PLAY/PAUSE tugmasini bosing. Qayta tinglashni tiklash uchun PLAY/PAUSE tugmasini yana bir marta bosing. Qayta tinglashni to’xtatish Qayta tinglashni to’xtatish uchun
  • Страница 26 из 29
    ЎЗБЕК 5. 6. 7. 8. 9. MP3 fayllarni o’qishni va qayta eshittirishni boshlaydi. USB ni qayta tinglash rejimiga o’tish uchun PLAY/PAUSE tugmasini bosing va ushlab turing. Fayllarni qayta tinglash birinchi trekdan boshlab avtomatik ravishda boshlanadi. Qayta tinglashni to’xtatib turish uchun PLAY/
  • Страница 27 из 29
    GB A production date of the item is indicated in the serial number on the technical data plate. A serial number is an eleven-unit number, with the first four figures indicating the production date. For example, serial number 0606ххххххх means that the item was manufactured in June (the sixth month)
  • Страница 28 из 29
    3468IM.indd 28 27.07.2010 15:43:22
  • Страница 29 из 29