5
ENGLISH
9. Watch the food during cooking, if necessary stir the
products with a plastic soup ladle (15) or spatula
(17), intended for using with non-stick coating.
Attention! To avoid burns by hot steam and oil be
very careful when opening the multicooker lid (6),
be very careful, don’t bend over the unit and don’t
place your hands above the bowl (3)!
Don’t use metal objects which can scratch the bowl
(3) or make cracks.
Do not open the lid (6) during baking.
10. When cooking is finished you will hear 5 sound sig-
nals, the unit will switch to the keep warm mode, op-
eration time in this mode will be shown on the display
starting from “0h» and indicator
.
Note:
Despite the unit keeps the ready dish warm for 12
hours, it is not recommended to leave the food in this
mode for too long, because this may lead to changing
of taste and color of the products.
Do not use the keep warm function for heating up the
products.
After steam cooking do not remove products with bare
hands, use kitchen tools.
11. To switch the selected mode off press the “Keep
warm/STOP» button (24).
control panel buttons (10)
Every pressing of the control panel buttons (10) is ac-
companied by a short sound signal.
“HourS» (20) and “miNuteS» (21) buttons
Use the buttons (20) and (21) to set the cooking time in
programmed modes of the multicooker and to choose
the cooking end time in “Delayed START» mode.
current time setting
Press and hold the “HOURS» (20) or “MINUTES» (21)
button for about 3 seconds, there will be a short sound
signal, and digital time values will be flashing on the
display (9).
Set the current time (24 Hr) by consequently pressing or
holding the “HOURS» (24) and “MINUTES» (21) buttons.
To finish time settings press the “START» button (25).
The current time will appear on the display (9) and the
divisional dots “:» will be flashing.
“time» button (22)
This button is intended to enter the cooking time setting
mode in your chosen program.
“Delayed StArt” Button (23)
You can preset
the time by which the cooking pro-
cess is to be finished
with the help of this function.
This function is available in the following modes: “Yo-
gurt», “Porridge», “Stewing», «Soup», “Rice», “Steam-
ing», “Cereal».
•
Select one of modes indicated above by pressing
the “MENU» button (26).
•
You may change cooking time of the product.
Note:
In delayed start mode product cooking time
should be not less than the cooking time set by default.
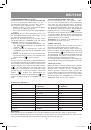
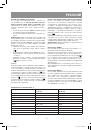
Press the “TIME» button (22), and then set the time
with the “HOURS» (20) and “MINUTES» (21) buttons
(see Table
1).
•
Press the “Delayed START» button (23),
sign
will start flashing on the display.
•
Press the “HOURS» (20) and “MINUTES» (21) but-
tons to set the cooking end time.
•
Press the “START» button (25) to switch the delayed
start function on,
sign will be constantly flash-
ing on the display.
Example
If the duration of the chosen program is 30 minutes, and
the dish should be cooked in 3:30, the unit will remain in
standby mode for 3 hours, and current time and “
» sign will be shown on the display. When the cooking
start time is reached, you will hear a sound signal, “
» sign will disappear, countdown of the cooking time will
start and the
sign will appear. The cooking process
will start and it will end up in 30 minutes.
“keep warm/StoP» Button (24)
After the cooking ends the unit will be switched to the
keep warm mode automatically. You can activate the
keep warm function by yourself. To do this, press the
“Keep warm/STOP» button (24) once, operation time in
this mode starting from “0h” and
indicator will be
shown on the display.
The ready dish can be kept warm up to 12 hours. To
switch the keep warm mode off press the “Keep warm/
STOP» button (24) one more time.
Note:
This function is not intended for heating up the
products.
“StArt” Button (25)
Use the button to switch the program on and keep set-
tings of the current time.
Press the “START» button (25) once to launch the cho-
sen program,
indication of the unit operation mode
will light up on the display. When the set cooking time is
up, the cooking mode will be switched off automatically
and the «Keep warm» mode will be activated.
To switch the selected mode off press the “Keep warm/
STOP» button (24).
“menu» Button (26)
Press the button (26) repeatedly to choose one of the
programmed cooking modes: “Rice», “Steaming», “Ce-
real», “Roasting», “Reheat», “Soup», “Baking», “Stew-
ing», “Porridge», “Yogurt». You may change cooking
time of the product. Press the “TIME» button (22), and
then set the time with the “HOURS» (20) and “MINUTES»
(21) buttons (see Table
1).
VT-4207_IM.indd 5
11.07.2013 17:42:22