34
B
Brra
an
nc
ch
he
em
me
en
ntt é
élle
ec
cttrriiq
qu
ue
e
Contrôlez, que le compteur électrique peut supporter
l'intensité absorbée par votre appareil (indications
portées sur la plaque signalétique) compte tenu des
autres appareils branchés.
Tolérance admise : ±6 % de la tension nominale. Pour
l'adaptation de l'appareil à des tensions différentes,
l'adjonction d'un autotransformateur d'une puissance
adéquate est indispensable.
IIm
mp
po
orrtta
an
ntt
U
Uttiilliis
se
ez
z u
un
n s
so
oc
clle
e d
de
e p
prriis
se
e d
de
e c
co
ou
urra
an
ntt
c
co
om
mp
po
orrtta
an
ntt u
un
ne
e b
bo
orrn
ne
e d
de
e m
miis
se
e à
à lla
a tte
errrre
e,, q
qu
uii d
do
oiitt ê
êttrre
e
o
ob
blliig
ga
atto
oiirre
em
me
en
ntt rra
ac
cc
co
orrd
dé
ée
e c
co
on
nffo
orrm
mé
ém
me
en
ntt à
à lla
a n
no
orrm
me
e
N
NF
FC
C 1
15
51
10
00
0 e
ett a
au
ux
x p
prre
es
sc
crriip
pttiio
on
ns
s d
de
es
s ffo
ou
urrn
niis
ss
se
eu
urrs
s
d
d''é
én
ne
errg
giie
e é
élle
ec
cttrriiq
qu
ue
e..
Vérifiez que la prise de terre est conforme aux
règlements en vigueur. Si la prise de courant murale
n'est pas mise à la terre, branchez l'appareil sur une
prise de terre conformément aux normes en vigueur, en
faisant appel à lun électricien. L'appareil ne doit pas
être raccordé à l'aide d'un prolongateur ou d'une prise
multiple.
N
No
ottrre
e rre
es
sp
po
on
ns
sa
ab
biilliitté
é n
ne
e s
sa
au
urra
aiitt ê
êttrre
e e
en
ng
ga
ag
gé
ée
e e
en
n c
ca
as
s
d
d''iin
nc
ciid
de
en
ntts
s o
ou
u d
d''iin
nc
ce
en
nd
diie
e p
prro
ov
vo
oq
qu
ué
és
s p
pa
arr u
un
ne
e m
miis
se
e à
à lla
a
tte
errrre
e iin
ne
ex
xiis
stta
an
ntte
e o
ou
u d
dé
éffe
ec
cttu
ue
eu
us
se
e.. L
L''iin
ns
stta
alllla
attiio
on
n d
do
oiitt ê
êttrre
e
rré
éa
alliis
sé
ée
e c
co
on
nffo
orrm
mé
ém
me
en
ntt a
au
ux
x rrè
èg
glle
es
s d
de
e ll''a
arrtt,, a
au
ux
x
p
prre
es
sc
crriip
pttiio
on
ns
s d
de
e lla
a n
no
orrm
me
e N
NF
FC
C 1
15
51
10
00
0 e
ett a
au
ux
x
p
prre
es
sc
crriip
pttiio
on
ns
s d
de
es
s ffo
ou
urrn
niis
ss
se
eu
urrs
s d
d''é
én
ne
errg
giie
e é
élle
ec
cttrriiq
qu
ue
e..
Cet appareil est conforme aux directives
communautaires suivantes:
87/308 CEE du 2.6.87 concernant la suppression des
interférences radio-électriques.
73/23 CEE du 19.2.73 (Basse tension) et modifications
successives.
89/336 CEE du 3.5.89 (Compatibilité
électromagnétique) et modifications successives.
IIm
mp
po
orrtta
an
ntt!!
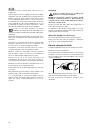
L'appareil doit pouvoir être débranché à tout moment
du secteur ; il est donc nécessaire que la prise murale
reste accessible une fois que l'installation est terminée.
E
En
nc
ca
as
sttrre
em
me
en
ntt
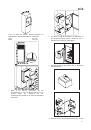
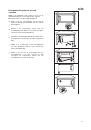
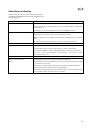
D
Diim
me
en
ns
siio
on
ns
s d
de
e lla
a n
niic
ch
he
e
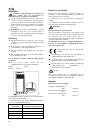
Hauteur (1)
880
1225 mm
Profondeur (2)
550
550 mm
Largeur (3)
560
560 mm
F
FR
R
IIn
ns
stta
alllla
attiio
on
n
L
Lo
orrs
s d
du
u ttrra
an
ns
sp
po
orrtt e
ett d
de
e ll''iin
ns
stta
alllla
attiio
on
n d
de
e ll''a
ap
pp
pa
arre
eiill,,
v
ve
eiilllle
err à
à n
n''e
en
nd
do
om
mm
ma
ag
ge
err a
au
uc
cu
un
ne
e p
pa
arrttiie
e d
du
u c
ciirrc
cu
uiitt
rré
éffrriig
gé
érra
an
ntt..
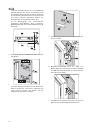
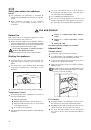
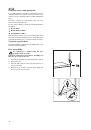
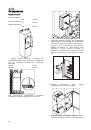
Pendant le fonctionnement normal, le condenseur
et le compresseur à l'arrière de l'appareil
s'échauffent sensiblement. Pour des raisons de
sécurité et le bon fonctionnement de l'appareil, la
ventilation doit être prévue. Voir les instructions
d'installation.
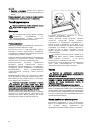
· Important : en cas de dommage du câble
d'alimentation, il faudra le remplacer par un câble
spécial ou un ensemble disponible chez le
fabricant ou son service après-vente
E
Em
mp
plla
ac
ce
em
me
en
ntt
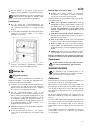
À la réception de l'appareil, déballez-le et vérifiez
qu'il n'est pas endommagé.
· Placez de préférence votre appareil loin d'une
source de chaleur (chauffage, cuisson ou rayons
solaires trop intenses).
· Évitez les expositions prolongées de l'appareil aux
rayons solaires.
· Pour des raisons de sécurité, un minimum de
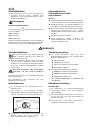
ventilation doit être prévu comme illustré.
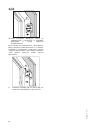
IIm
mp
po
orrtta
an
ntt :: V
Ve
eiilllle
ez
z à
à c
ce
e q
qu
ue
e lle
es
s o
orriiffiic
ce
es
s d
de
e v
ve
en
nttiilla
attiio
on
n n
ne
e
s
so
oiie
en
ntt p
pa
as
s o
ob
bs
sttrru
ué
és
s
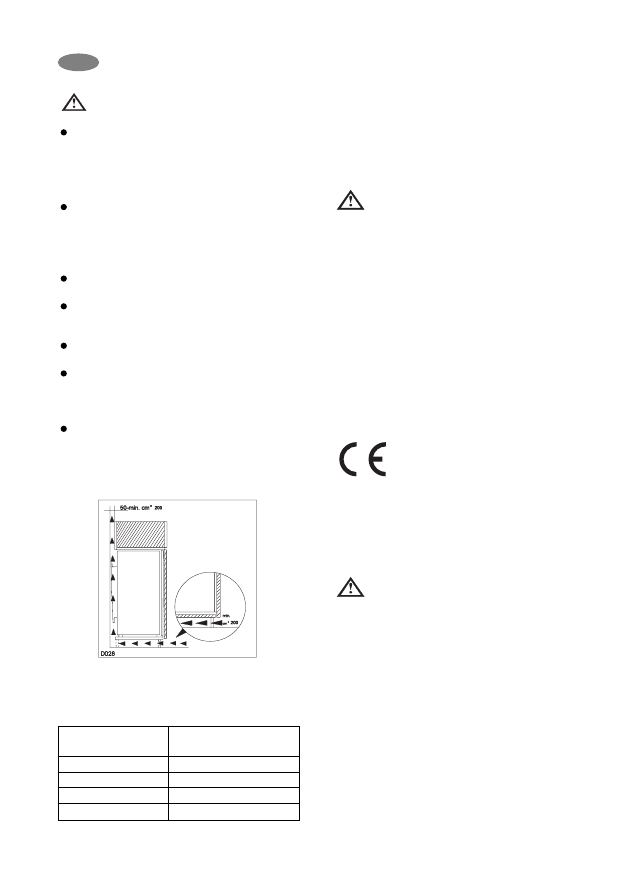
Il est nécessaire que la niche d'encastrement soit
dotée d'un conduit de ventilation ayant les
dimensions suivantes :
Profondeur : 50 mm
Largeur : 540 mm
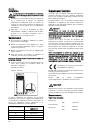
La classe climatique est indiquée sur la plaque
signalétique, qui se trouve à l'intérieur de l'appareil sur
le côté gauche. Le tableau ci-dessous vous permet de
repérer les différentes classes climatiques et les
températures ambiantes correspondantes :
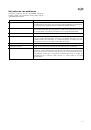
C
Clla
as
ss
se
e c
clliim
ma
attiiq
qu
ue
e
p
po
ou
urr u
un
ne
e tte
em
mp
pé
érra
attu
urre
e
a
am
mb
biia
an
ntte
e d
de
e
SN
+10 à +32 °C
N
+16 à +32 °C
ST
+16 à +38 °C
T
+16 à +43 °C