Инструкция для ARISTON C34S M57

(скачивание инструкции бесплатно)
Формат файла: PDF
Доступность: Бесплатно как и все руководства на сайте. Без регистрации и SMS.
Дополнительно: Чтение инструкции онлайн
background image

16

GB

HOOD

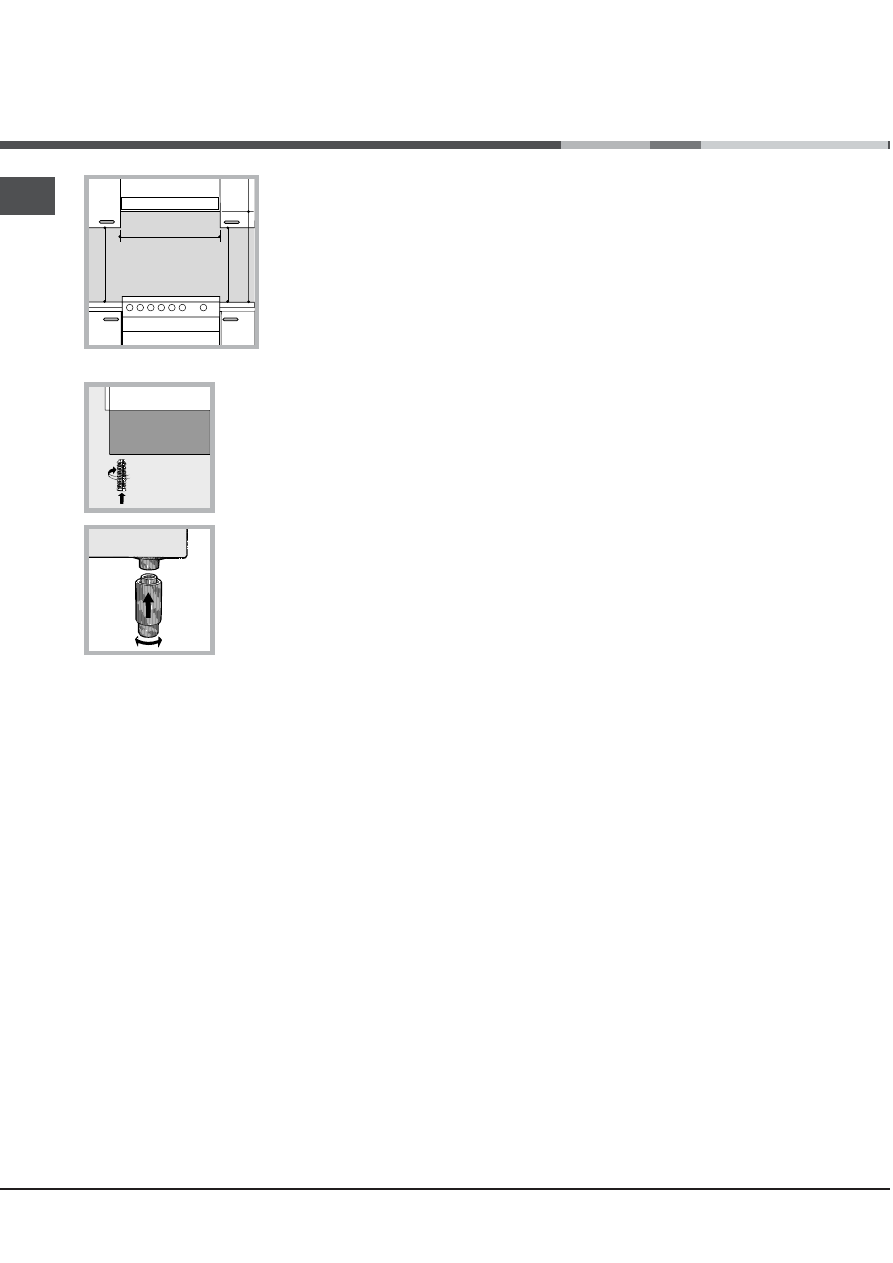
420

Min.

min. 

650

 mm. with hood

min. 

700

 mm. without hood

mm.

600

Min.

mm.

420

Min.

mm.

* Only available in certain models

• Do not position
blinds behind the
cooker or less than 200
mm away from its
sides.
• Any hoods must be
installed according to
the instructions listed in
the relevant operating
manual.

Levelling

If it is necessary to level the
appliance, screw the
adjustable feet into the places
provided on each corner of the
base of the cooker (

see

figure).

The legs* fit into the slots on
the underside of the base of
the cooker.

Electrical connections

Install a standardised plug corresponding to the
load indicated on the appliance data plate (

see

Technical data table).
The appliance must be directly connected to the mains
using an omnipolar circuit-breaker with a minimum
contact opening of 3 mm installed between the
appliance and the mains. The circuit-breaker must be
suitable for the charge indicated and must comply with
NFC 15-100 regulations (the earthing wire must not be
interrupted by the circuit-breaker). The supply cable
must be positioned so that it does not come into
contact with temperatures higher than 50°C at any point.

Before connecting the appliance to the power
supply, make sure that:
• The appliance is earthed and the plug is compliant

with the law.

• The socket can withstand the maximum power of

the appliance, which is indicated by the data plate.

• The voltage is in the range between the values

indicated on the data plate.

• The socket is compatible with the plug of the

appliance. If the socket is incompatible with the
plug, ask an authorised technician to replace it.
Do not use extension cords or multiple sockets.

!

 Once the appliance has been installed, the power

supply cable and the electrical socket must be
easily accessible.

!

 The cable must not be bent or compressed.

!

 The cable must be checked regularly and replaced

by authorised technicians only.

!


The manufacturer declines any liability should

these safety measures not be observed.

Gas connection

Connection to the gas network or to the gas cylinder
may be carried out using a flexible rubber or steel
hose, in accordance with current national legislation
and after making sure that the appliance is suited to
the type of gas with which it will be supplied (see
the rating sticker on the cover:  if this is not the case
see below). When using liquid gas from a cylinder,
install a pressure regulator which complies with
current national regulations. To make connection
easier, the gas supply may be turned sideways*:
reverse the position of the hose holder with that of
the cap and replace the gasket that is supplied with
the appliance.

!

 Check that the pressure of the gas supply is consistent

with the values indicated in the Table of burner and
nozzle specifications (

see below). This will ensure the

safe operation and durability of your appliance while
maintaining efficient energy consumption.

Gas connection using a flexible rubber hose

Make sure that the hose complies with current
national legislation. The internal diameter of the hose
must measure: 8 mm for liquid gas supply; 13 mm
for methane gas supply.

Once the connection has been performed, make
sure that the hose:
• Does not come into contact with any parts that

reach temperatures of over 50°C.

• Is not subject to any pulling or twisting forces and

that it is not kinked or bent.

• Does not come into contact with blades, sharp

corners or moving parts and that it is not
compressed.

• Is easy to inspect along its whole length so that

its condition may be checked.

• Is shorter than 1500 mm.
• Fits firmly into place at both ends, where it will be

fixed using clamps that comply with current
regulations.

1
2
3
4
5
6
7
8
9
10
11
12
13
14
15
16
17
18
19
20
21
22
23
24
25
26
27
28
Оглавление инструкции
  • Страница 1 из 29
    Руководство по эксплуатации КУХОННАЯ ПЛИТА RS РУССКИЙ, 1 GB English, 14 Содержание Монтаж, 2-5 Расположение и нивелировка Электрическое подсоединение Подсоединение к газопроводу Настроика на различные типы газа Технические данные Таблица характеристик горелок и форсунок Описание изделия,6 Общии вид
  • Страница 2 из 29
    Установка RS ! Важно сохранить данное руководство для его последующих консультации. В случае продажи, передачи или переезда проверьте, чтобы данное руководство сопровождало изделие. ! Внимательно прочитаите инструкции: в них содержатся важные сведения об установке, эксплуатации и безопасности
  • Страница 3 из 29
    420 mm. 420 mm. Min. 600 mm. Min. Min. min. 650 mm. with hood min. 700 mm. without hood HOOD не приближаите их на расстояние меньше 200 мм. • возможная кухонная вытяжка должна быть установлена в соответствии с инструкциями, приведенными в техническом руководстве к вытяжке. Нивелировка При
  • Страница 4 из 29
    RS ! Если одно или несколько из вышеописанных условии не будет соблюдено, и если кухонная плита устанавливается в условиях класса 2, подгруппа 1 (изделие, встроенное между двух мебельных элементов), необходимо использовать гибкии стальнои шланг (см. ниже). ! В случае использования сжиженного газа
  • Страница 5 из 29
    Таблица характеристик горелок и форсунок Таблица 1 Горелка Диаметр (мм) Быстрая (большая)(R) Полубыстрая (средняя) (S) Вспомогательная (малая) (А) Тепловая мощность кВт (H.s.*) Сжиженный газ Форсунка Расход* 1/100 гр/час (мм) *** ** Расход* л/час Номинальная Сокращенная 100 3.00 0.7 41 87 218 214
  • Страница 6 из 29
    Описание изделия RS Общии вид Панель управления Ðóêîÿòêà ÏÐÎÃÐÀÌÌÛ Ðóêîÿòêà ÒÅÐÌÎÑÒÀÒÀ Èíäèêàòîð ÒÅÐÌÎÑÒÀÒÀ Ðóêîÿòêè ÊÎÍÔÎÐÎÊ âàðî÷íîé ïàíåëè Ýëåêòðîííûé òàéìåð Êíîïêà òàéìåðà ВНИМАНИЕ! При нагреве стеклянная крышка может лопнуть. Прежде чем закрыть ее, выключить все конфорки или электрические
  • Страница 7 из 29
    Включение и эксплуатация Эксплуатация варочнои панели в параграфе «Характеристики конфорок и форсунок». Включение конфорок Эксплуатация духового шкафа Напротив каждого рукоятки КОНФОРКИ закрашенным кружком показано положение даннои конфорки на варочнои панели. Порядок включения конфорки на варочнои
  • Страница 8 из 29
    RS Программы приготовления ! Для всех программ можно задать температуру от 50°C до МАКС кроме: • ГРИЛЬ и ДВОИНОИ ГРИЛЬ (рекомендуется устанавливать только МАКС. температуру); • ДВОИНОИ ВЕНТИЛИРОВАННЫИ ГРИЛЬ (рекомендуется не превышать температуру 200°C). a Программа СТАТИЧЕСКАЯ ДУХОВКА Включаются
  • Страница 9 из 29
    Порядок отмены заданного времени Одновременное приготовление на нескольких уровнях RS Нажмите кнопку до визуализации 0:00. Регуляция громкости звукового сигнала После осуществления и подтверждения регуляции часов при помощи кнопки - можно отрегулировать громкость звукового сигнала. Вертел Порядок
  • Страница 10 из 29
    RS Таблица приготовления в духовом шкафу Программы Продукты Утка Жаркое из телятины или говядины Статическое Жаркое из свинины Печенье (песочное) Песочный торт с начинкой Пицца (на 2 уровнях) Лазанья Баранина Курица с картошкой Скумбрия Вентилированное Кекс Эклеры (на 2 уровнях) Печенье (на 2
  • Страница 11 из 29
    Предосторожности и рекомендации ! Изделие спроектировано и изготовлено в соответствии с международными нормативами по безопасности. Необходимо внимательно прочитать настоящие предупреждения, составленные в целях вашеи безопасности. Общие требования к безопасности • Инструкции относятся только к
  • Страница 12 из 29
    Техническое обслуживание и уход RS Экономия электроэнергии и охрана окружающеи среды • Если вы будете пользоваться духовым шкафом вечером и до раннего утра, это поможет сократить нагрузку потребления электроэнергии электростанциями. • При использовании режимов ГРИЛЬ, ДВОИНОИ ГРИЛЬ и ДВОИНОИ
  • Страница 13 из 29
    Уход за рукоятками газовои варочнои панели Со временем рукоятки варочнои панели могут заблокироваться или вращаться с трудом, поэтому потребуется произвести их внутреннюю чистку и замену всеи рукоятки. ! Данная операция должна выполняться техником, уполномоченным производителем. Замена лампочки в
  • Страница 14 из 29
    Operating Instructions COOKER Contents Installation, 15-18 RS РУССКИЙ, 1 GB English, 14 Positioning and levelling Electrical connections Gas connection Adapting to different types of gas Technical data Table of burner and nozzle specifications Description of the appliance, 19 Overall view Control
  • Страница 15 из 29
    Installation ! Before operating your new appliance please read this instruction booklet carefully. It contains important information concerning the safe installation and operation of the appliance. ! Please keep these operating instructions for future reference. Make sure that the instructions are
  • Страница 16 из 29
    GB 420 mm. 420 mm. Min. 600 mm. Min. Min. min. 650 mm. with hood min. 700 mm. without hood HOOD • Do not position blinds behind the cooker or less than 200 mm away from its sides. • Any hoods must be installed according to the instructions listed in the relevant operating manual. Levelling If it is
  • Страница 17 из 29
    ! If one or more of these conditions is not fulfilled or if the cooker must be installed according to the conditions listed for class 2 - subclass 1 appliances (installed between two cupboards), the flexible steel hose must be used instead (see below). GB Connecting a flexible jointless stainless
  • Страница 18 из 29
    GB Table of burner and nozzle specifications Table 1 Burner Diameter (mm) Fast (Large)(R) Semi Fast (Medium)(S) Auxiliary (Small)(A) Thermal Power kW (p.c.s.*) Nominal Reduced Liquid Gas Nozzle Flow* 1/100 g/h (mm) *** ** Nozzle 1/100 (mm) Natural Gas Flow* Nozzle l/h 1/100 (mm) Flow* l/h 100 3.00
  • Страница 19 из 29
    Description of the appliance Overall view GB Gas burner Hob grid Containment surface for spills GUIDE RAILS for the sliding racks position 5 position 4 position 3 position 2 position 1 Control panel GRILL DRIPPING PAN Adjustable foot Adjustable foot Control panel SELECTOR Knob THERMOSTAT knob
  • Страница 20 из 29
    Start-up and use GB Using the hob Using the oven Lighting the burners For each BURNER knob there is a complete ring showing the strength of the flame for the relevant burner. To light one of the burners on the hob: 1. Bring a flame or gas lighter close to the burner. 2. Press the BURNER knob and
  • Страница 21 из 29
    Cooking modes ! A temperature value can be set for all cooking modes between 50°C and MAX, except for the following modes: • GRILL and DOUBLE GRILL (recommended: set only to MAX power level). • FAN-ASSISTED DOUBLE GRILL (recommended: do not exceed 200°C). a STATIC OVEN mode Both the top and bottom
  • Страница 22 из 29
    GB Cancelling a time that has already been set Cooking on several shelves simultaneously Press the - button until the display shows 0:00. If it is necessary to use two racks, use the FAN OVEN cooking mode b, as this is the only cooking mode suited to this type of cooking. We also recommend that: •
  • Страница 23 из 29
    Oven cooking advice table GB Cooking modes Foods Duck Roast veal or beef Static Roast pork Biscuits (shortcrust pastry) Tarts Pizza (on 2 racks) Lasagne Lamb Roast chicken + potatoes Mackerel Fan-assisted Sponge cake made with yoghurt Cream puffs (on 2 racks) Biscuits (on 2 racks) Sponge cake (on 1
  • Страница 24 из 29
    Precautions and tips GB ! This appliance has been designed and manufactured in compliance with international safety standards. The following warnings are provided for safety reasons and must be read carefully. General safety • These instructions are only valid for the countries whose symbols appear
  • Страница 25 из 29
    Care and maintenance Switching the appliance off The cover If the cooker is fitted with a cover, this cover should be cleaned using lukewarm water. Do not use abrasive products. It is possible to remove the cover in order to make cleaning the area behind the hob easier. Open the cover fully and
  • Страница 26 из 29
    GB 26
  • Страница 27 из 29
    GB 27
  • Страница 28 из 29
    11/2010 - 195085191.01 XEROX FABRIANO GB 28
  • Страница 29 из 29