2
GB
!
Before placing your new appliance into operation
please read these operating instructions carefully.
They contain important information for safe use, for
installation and for care of the appliance.
!
Please keep these operating instructions for future
reference. Pass them on to possible new owners of
the appliance.
Positioning
!
Keep packaging material out of the reach of
children.
It can become a choking or suffocation
hazard (
see Precautions and tips).
!
The appliance must be installed by a qualified
person in compliance with the instructions provided.
Incorrect installation may cause harm to persons,
animals or may damage property.
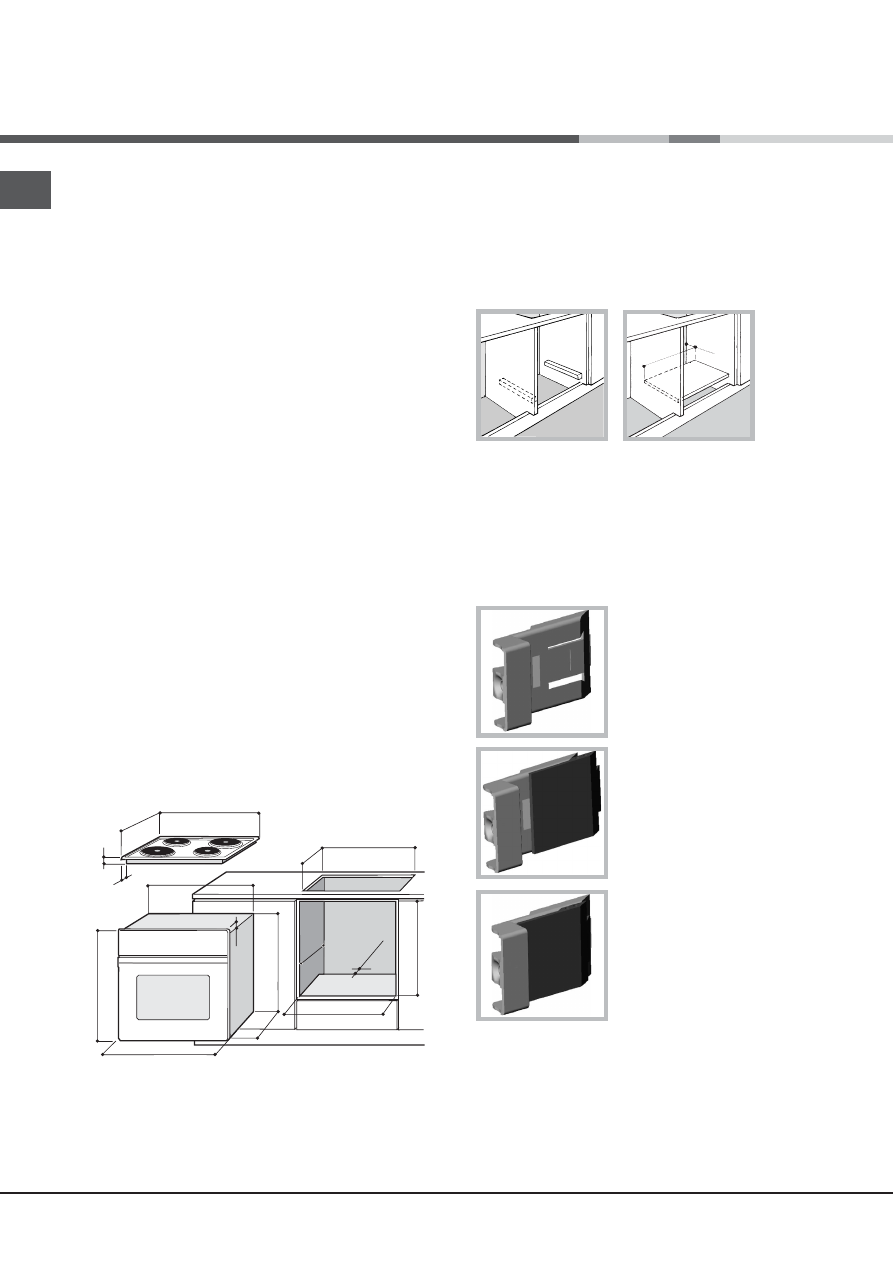
Fitting the appliance
Use the appropriate cabinet to ensure that the
appliance functions properly.
• The panels adjacent to the oven must be made of
heat-resistant material.
• Cabinets with a veneer exterior must be assembled
with glues which can withstand temperatures of up
to 100°C.
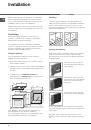
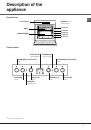
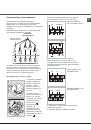
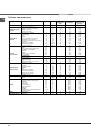
• To install the oven
under the counter
(
see
diagram) and in a
kitchen unit
, the cabinet must
have the following dimensions:
!
The appliance must not come into contact with
electrical parts once it has been installed.
The consumption indications on the data plate have
been calculated for this type of installation.
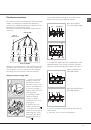
Ventilation
To ensure good ventilation, the back panel of the
cabinet must be removed. It is advisable to install the
oven so that it rests on two strips of wood, or on a
completely flat surface with an opening of at least 45 x
560 mm (
see diagrams).
Centring and fastening
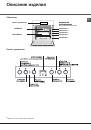
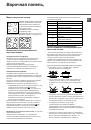
Position the 4 tabs on the side of the oven according
to the 4 holes of the outer frame. Adjust the tabs
according to the thickness of the cabinet side panel,
as shown below:
thickness of 20 mm: take off
the removable part of the tab
(
see diagram)
thickness of 18 mm: use the
first groove, which has already
been set in the factory (
see
diagram)
thickness of 16 mm: use the
second groove (
see diagram)
Secure the appliance to the cabinet by opening the
oven door and putting 4 screws into the 4 holes of the
outer frame.
!
All parts which ensure the safe operation of the
appliance must not be removable without the aid of a
tool.
595
558
min
45
min
575-585
min
560
+4 -0
480
+4 -0
547 min
555
580
500
39
15
595
23
572
543
54
3
545
560 mm.
45 mm.
Installation