9
Dansk
Norsk
Svenska
English
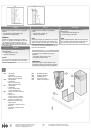
1.
Placer holderen (E) på den lodrette streg,
65 mm under den markerede overkant af
den øverste beskyttelsesplade (C).
2.
Marker monteringshullernes placering på
væggen. Bor monteringshullerne, og skru
h
olderen fast på væggen.
3. Ved recirkulation monteres studsen her
(D).
4.
Slut emhætten til strømforsyningen.
5.
Placer beskyttelsespladerne (B+C) på
emhætten. Skru dem fast på holderen.
1.
Plasser holderen (E) på den loddrette
linjen, 65 mm under den merkede
overkanten av de
n øvre
beskyttelsesplaten (C).
2.
Merk av festehullenes plassering på
veggen. Bor festehullene og skru
holderen fast til veggen.
3. Ved sirkulerende inneluft skal
luftdeflektoren monteres.
4.
Koble viften til strømforsyningen.
5. Plasser beskyttelsesplat
ene (B+C) på
ventilatoren. Skru fast mot holderen.
1.
Placera hållaren (E) på den lodräta linjen,
65 mm under den markerade överkanten
på den övre skyddsplåten (C).
2.
Markera monteringshålens placering på
väggen. Borra monteringshålen och
skruva fast hållaren på väggen.
3. Vid cirkulerande inomhusluft, montera
luftdeflektorn.(D) for recirculation use.
4.
Anslut fläkten till el.
5.
Placera skyddsplåtarna (B+C) på
fläktkåpan. Skruva fast mot hållaren.
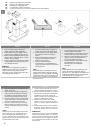
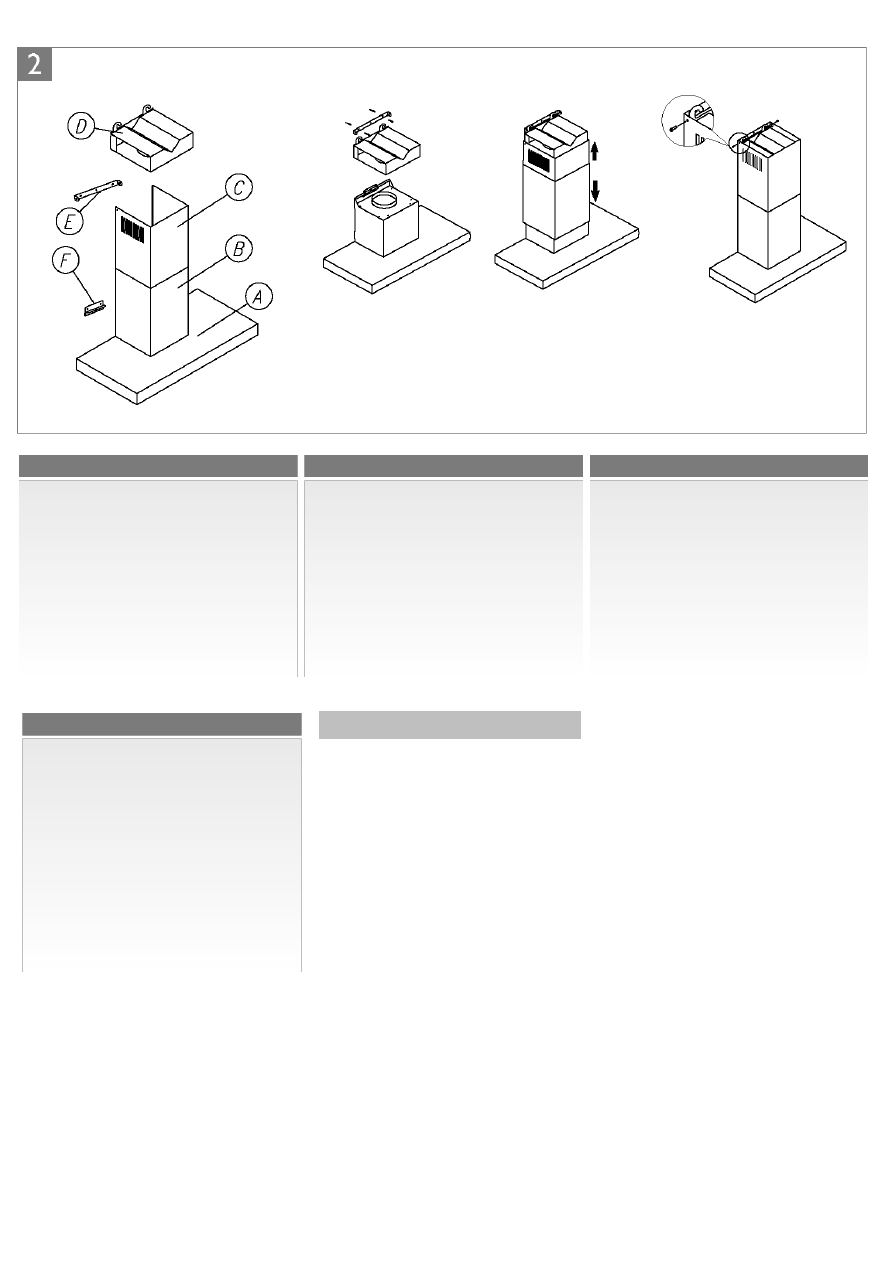
1. Position the bracket (E) for attaching the
cover plate (C) on the vertical line, 65 mm
below the marked maximum height of the
exhaust duct (C).
2. Mark the positions of the mounting holes
for the bracket (E), drill the holes, position
the plugs and screw the bracket (E) to the
wall.
3. If necessary, install the air deflector (D) for
recirculation use.
4. Connect the cooker hood to the mains.
5. Position the cover plates (B+C) on the
cooker hood and screw it to the upper
bracket (E) with the corresponding
screws.
Français
1. Positionnez le support (E) pour la fixation
de la plaque de recouvrement (C) sur la
ligne verticale, 65 mm en dessous de la
hauteur maximale marquée du conduit
d'évacuation (C).
2. Marquez les positions des trous de
fixation pour le support (E), percez les
trous, installez les prises et vissez le
support (E) au mur.
3.
Si nécessaire, installez le déflecteur d'air
(D) pour l'utilisation de recirculation.
4. Branchez la hotte sur le secteur.
5. Positionnez les plaques de recouvrement
(B + C) sur la hotte et vissez-les sur le
support supérieur (E) avec les vis
correspondantes.