11
XENYX QX1202USB/QX1002USB User Manual
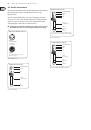
3.2 Live sound
CLIP
SIG
L
R
XM8500
B215D Active Speakers
Bass Guitar
DI100
F1320D Active Monitors
MP3 Player
FX2000 Effects Processor
Portable
Digital
Recorder
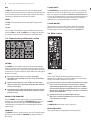
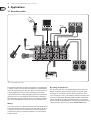
Fig 3.2: Live performance with the QX1202USB
The above diagram shows some typical connections for a live performance using
the QX1202USB. Mono sources such as microphones and line-outs from guitar
preamps or DI boxes can be connected to channels 1-4 via XLR or ¼" cables.
Stereo sources can be connected to channels 5/6 through 11/12 via ¼" cables.
If an external effects processor is to be used instead of the onboard processor,
connect the FX SEND jack to the input of your processor. Turn the FX knob
up on each channel that you want to add effects to. Connect the outputs
(usually stereo) from the processor to one of the stereo channels as shown
in the diagram. Make sure to leave the FX knob for this stereo channel fully
counterclockwise (off) to avoid feedback loops. Turn the LEVEL knob up on the
stereo channel receiving the processed signal to blend the effects into the mix.
Connect the MAIN OUTPUTS to active speakers or a power amplifier. You may also
connect active floor monitors to the CONTROL ROOM OUTPUTS so the on-stage
talent can hear the mix. The 2-Track inputs can be used to connect an MP3
player for music between sets, and the 2-Track outputs can be used to connect a
digital recorder.
4. Installation
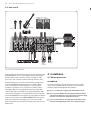
4.1 Mains connection
AC POWER IN
Connect the power supply to the 3-pin mains connector on the rear of the
console. Use the AC adapter supplied to connect the console to the mains.
The adapter complies with all applicable safety standards.
◊
Please use only the power supply unit provided with the console.
◊
Never connect the XENYX to the power supply unit while the latter is
connected to the mains! First connect the console to the power supply
unit, then connect the power supply unit to the mains.
◊
Please note that both the power supply unit and the mixing console
heat up considerably during operation. This is completely normal.