16
English
Problem
What to do
• Make sure the boat’s receiver is turned ON.
• Make sure the power supply of the boat is connected and
adequately charged.
• Make sure the receiver is not set to MUTE.
• Refer to the owner’s guide that came with your receiver.
• Check connections to both the speakers and the receiver.
Refer to “Test the speakers” on page 6. Correct any connection
errors.
• Disconnect the working speaker from the receiver.
• Switch the cord of the “faulty” speaker from its original
receiver connections to the other set of connections (the
working speaker was originally attached to those connections).
– If the speaker now works, the problem is in your receiver.
– If the speaker does not work, continue below.
• Remove the cord from the working speaker and connect it to
the “faulty” speaker and either set of receiver connections.
– If the speaker now works, the problem is in the original speaker
cord.
– If the speaker does not work, the problem is in the speaker.
• Follow the same procedure for the problem of no sound from one
speaker, as outlined above.
• Adjust the bass and treble controls on the receiver.
• Check the connections to make sure they are correctly in phase
(+ to + and – to –). Refer to “Test the speakers” on page 6.
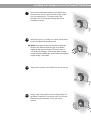
Maintaining Your Speakers
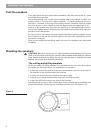
Cleaning the speakers
Wipe the grilles using a soft cloth dampened with a mild detergent, such as dish soap. When
cleaning near the speakers with a hose, be careful to avoid forcing water behind the grille,
onto the driver, or into the acoustic ports.
No other regular maintenance is required.
Troubleshooting
If you have a problem with your 131
TM
marine speakers, turn off your sound source and try the
solutions below. If one of these solutions does not solve your problem, contact your Bose
®
dealer to arrange for service. Or, to contact Bose directly, refer to the inside back cover of this
guide. Bose Corporation will make every effort to remedy any problem within the terms of
your warranty.
No sound
No sound from one
speaker
Not enough bass
or treble
One speaker
sounds distorted