Страница 1 из 19 The Bose® 131™ Marine Speaker System Owner’s Guide
Страница 2 из 19 Safety, Warranty, and Technical Information English Please read this owner’s guide ® TM The Bose 131 marine speaker system is engineered to provide sound quality far beyond other marine speaker systems. This guide helps you install and use your speaker system properly. Please read the installation
Страница 3 из 19 Contents/Records Where to find… Installing Your Speakers Test the speakers ......................................................................................................... 6 Mounting the speakers
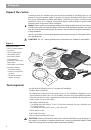
Страница 4 из 19 English Setting Up Unpack the carton Carefully unpack your speakers and save all packing materials for possible future use. Do not attempt to use your speaker system if any part of it appears damaged. Notify Bose Corporation or your authorized Bose dealer immediately. Check that your system
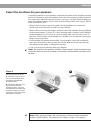
Страница 5 из 19 Setting Up Select the locations for your speakers • Allows sufficient room to snap on the grille. Use the template to be sure there is enough area around the holes you will cut in the bulkhead. • Allows sufficient room for the speaker enclosure behind the bulkhead. During installation, the
Страница 6 из 19 Installing Your Speakers English Test the speakers It is a good idea to test your system before installation. With the power turned off, connect the receiver to the speakers. The provided speaker cord consists of two insulated wires; one is marked or ribbed, and is always positive (+). The plain
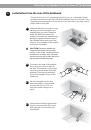
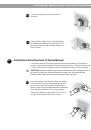
Страница 7 из 19 Installing Your Speakers From The Rear Of The Bulkhead Installation from the rear of the bulkhead English A Choose the 53⁄8 inch (13.6 cm) diameter hole size if you can comfortably hold the speaker enclosure from behind the wall while installing screws from the front. This is the preferred mounting
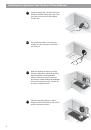
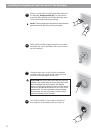
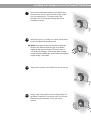
Страница 8 из 19 English Installing Your Speakers From The Rear Of The Bulkhead A5 Using the sabre saw, cut the hole for the speaker, carefully following the line. Take your time; you want a smooth-edged circular hole. A6 Use a half-round file or wood rasp to smooth out any roughness in the hole you have cut. A7 A8
Страница 9 из 19 Installing Your Speakers From The Rear Of The Bulkhead English A 9 Mark six screw holes. Use the smallest hole pattern that fits. A 10 Remove the enclosure from behind the bulkhead. CAUTION: Be sure the enclosure is not in place behind the bulkhead while drilling. A 11 Drill the marked holes using
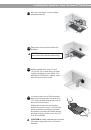
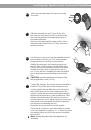
Страница 10 из 19 Installing Your Speakers From The Rear Of The Bulkhead English A 13 Connect the speakers. Be sure the receiver or amplifier is turned OFF. If possible, disconnect the power source. Use the supplied silicone-filled wire nuts to secure the ends of each wire pair. Place the stripped end of the
Страница 11 из 19 Installing Your Speakers From The Front Of The Bulkhead English A 17 Remove the speaker cone shield from the enclosure. A 18 Snap the grille in place on the mounting flange. No hardware is needed to secure this part. You are now finished with the assembly. Enjoy your music system! B B Installation
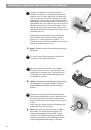
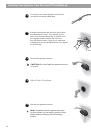
Страница 12 из 19 English Installing Your Speakers From The Front Of The Bulkhead B2 Mark six screw holes from the largest hole pattern on the template, but do not drill yet. You may need to mark and drill a different set of holes along the same circle before finally attaching the flange. Note: These markings are
Страница 13 из 19 Installing Your Speakers From The Front Of The Bulkhead B7 Attach the mounting flange to the enclosure using six screws. English B6 Slide this assembly into the 71⁄8 inch (18 cm) hole and rotate the enclosure a full 360° to determine the best mounting position for the extended portion of the
Страница 14 из 19 English Installing Your Speakers From The Front Of The Bulkhead B 10 Tie a knot in each joined wire pair to protect the connection from being pulled apart. B 11 Reinsert the enclosure into the wall in the position you determined in Step 7. If the outside circle of holes in the mounting flange line
Страница 15 из 19 Installing Your Speakers From The Front Of The Bulkhead Remove the perforated speaker cone shields from the enclosure cartons. Insert the tabs of the shields into the speaker ports. This helps protect the speaker cone from potential damage during the installation process. B 16 Install six screws,
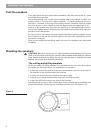
Страница 16 из 19 English Maintaining Your Speakers Cleaning the speakers Wipe the grilles using a soft cloth dampened with a mild detergent, such as dish soap. When cleaning near the speakers with a hose, be careful to avoid forcing water behind the grille, onto the driver, or into the acoustic ports. No other
Страница 17 из 19 Bose® Corporation Bose Corporation, The Mountain Framingham, MA 01701-9168 1-800-367-4008 Phone hours - ET (eastern time): Weekdays 8:30 a.m. to 8 p.m. Saturdays 9 a.m. to 3 p.m. Canada Bose Ltd., 1-35 East Beaver Creek Road Richmond Hill, Ontario L4B 1B3 1-800-465-2673 Phone hours - ET (eastern