Configuring the Network Address
Dell 7330 Mono Laser Printer
3-5
Configuring the Network Address
This section includes:
■
■
Automatically Setting the Printer’s IP Address
■
Dynamic Methods of Setting the Printer’s IP Address
■
Manually Setting the Printer’s IP Address
TCP/IP and IP Addresses
If your computer is on a large network, contact your network administrator for the appropriate
TCP/IP addresses and additional configuration information.
If you are creating your own small Local Area Network or connecting the printer directly to
your computer using Ethernet, follow the procedure for automatically setting the printer’s
Internet Protocol (IP) address.
PCs and printers primarily use TCP/IP protocols to communicate over an Ethernet network.
With TCP/IP protocols, each printer and computer must have a unique IP address. It is
important that the addresses are similar, but not the same; only the last digit needs to be
different. For example, your printer can have the address 192.168.1.2 while your computer has
the address 192.168.1.3. Another device can have the address 192.168.1.4.
Generally, Macintosh computers use either TCP/IP or the EtherTalk protocol to talk to a
networked printer. For Mac OS X systems, TCP/IP is preferred. Unlike TCP/IP, however,
EtherTalk does not require printers or computers to have IP addresses.
Many networks have a Dynamic Host Configuration Protocol (DHCP) server. A DHCP server
automatically programs an IP address into every PC and printer on the network that is
configured to use DHCP. A DHCP server is built into most cable and DSL routers. If you use a
cable or DSL router, see your router’s documentation for information on IP addressing.
See also:
Automatically Setting the Printer’s IP Address
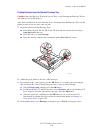
If the printer is connected to a small established TCP/IP network without a DHCP server, use
the installer on the
Software and Documentation CD
to detect or assign an IP address to your
printer. For further instructions, insert the
Software and Documentation CD
into your
computer’s CD drive. After the Dell Printer Installer launches, follow the prompts for
installation.
Note:
For the automatic installer to function, the printer must be connected to an established
TCP/IP network.
 1
1
 2
2
 3
3
 4
4
 5
5
 6
6
 7
7
 8
8
 9
9
 10
10
 11
11
 12
12
 13
13
 14
14
 15
15
 16
16
 17
17
 18
18
 19
19
 20
20
 21
21
 22
22
 23
23
 24
24
 25
25
 26
26
 27
27
 28
28
 29
29
 30
30
 31
31
 32
32
 33
33
 34
34
 35
35
 36
36
 37
37
 38
38
 39
39
 40
40
 41
41
 42
42
 43
43
 44
44
 45
45
 46
46
 47
47
 48
48
 49
49
 50
50
 51
51
 52
52
 53
53
 54
54
 55
55
 56
56
 57
57
 58
58
 59
59
 60
60
 61
61
 62
62
 63
63
 64
64
 65
65
 66
66
 67
67
 68
68
 69
69
 70
70
 71
71
 72
72
 73
73
 74
74
 75
75
 76
76
 77
77
 78
78
 79
79
 80
80
 81
81
 82
82
 83
83
 84
84
 85
85
 86
86
 87
87
 88
88
 89
89
 90
90
 91
91
 92
92
 93
93
 94
94
 95
95
 96
96
 97
97
 98
98
 99
99
 100
100
 101
101
 102
102
 103
103
 104
104
 105
105
 106
106
 107
107
 108
108
 109
109
 110
110
 111
111
 112
112
 113
113
 114
114
 115
115
 116
116
 117
117
 118
118
 119
119
 120
120
 121
121
 122
122
 123
123
 124
124
 125
125
 126
126
 127
127
 128
128
 129
129
 130
130
 131
131
 132
132
 133
133
 134
134
 135
135
 136
136
 137
137
 138
138
 139
139
 140
140
 141
141
 142
142
 143
143
 144
144
 145
145
 146
146
 147
147
 148
148
 149
149
 150
150
 151
151
 152
152
 153
153
 154
154
 155
155
 156
156
 157
157
 158
158
 159
159
 160
160
 161
161
 162
162
 163
163
 164
164
 165
165
 166
166
 167
167
 168
168
 169
169
 170
170
 171
171
 172
172
 173
173
 174
174
 175
175
 176
176
 177
177
 178
178
 179
179
 180
180
 181
181
 182
182
 183
183
 184
184
 185
185
 186
186
 187
187
 188
188
 189
189
 190
190
 191
191
 192
192
 193
193
 194
194
 195
195
 196
196
 197
197
 198
198
 199
199
 200
200
 201
201
 202
202
 203
203
 204
204
 205
205
 206
206
 207
207
 208
208
 209
209
 210
210
 211
211
 212
212
 213
213
 214
214
 215
215
 216
216
 217
217
 218
218
 219
219
 220
220
 221
221
 222
222
 223
223
 224
224
 225
225
 226
226
 227
227
 228
228
 229
229
Инструкции и руководства похожие на DELL 7330, 7330dn