19
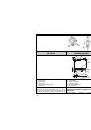
The appliance is designed for installation in the line of
kitchen cabinets. The cooker can be located in the
standard kitchen with a minimum space of 20m
3
.
If the kitchen is smaller (but not less than 15m
3
as a
minimum) it is necessary to provide a hood. Regarding
thermal resistance the cooker can be positioned on any
floor, as long as it is not located on a pedestal.
Плита может быть установлена в ряд с кухонной
мебелью. Объём помещения должен быть
минимально 20м
3
. Помещения с меньшим объёмом
(минимально 15 м
3
)
должны быть обеспечены
вентиляцией. С точки зрения теплостойкости плиту
можно поставить на любой пол (покрытие).
Плита не должна устанавливаться на подставку.
Прилад спроектовано для інсталяції на лінії
кухонних шкафів. Плиту можна розмістити в
стандартній кухні з мінімальною площею 20m
3
.
Якщо площа кухні менша (але не менша ніж 15m
3
, як
мінімум), необхідно на кухні розмістити витяжку.
Відносно теплового опору плиту можна розмістити
на будь-яку підлогу, але не на підставку.
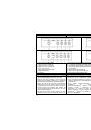
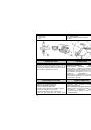
“X” - a minimum distance of 750 mm, in line with the
manufacturer’s instructions.
Х - минимальное расстояние 750 мм
Остальные размеры при установке
воздухоочистителя должны соблюдаться в
соответствии с рекомендациями изготовителя
воздухоочистителей.
“X” – мінімальна відстань 750 мм, згідно інструкцій
виробника.
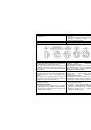
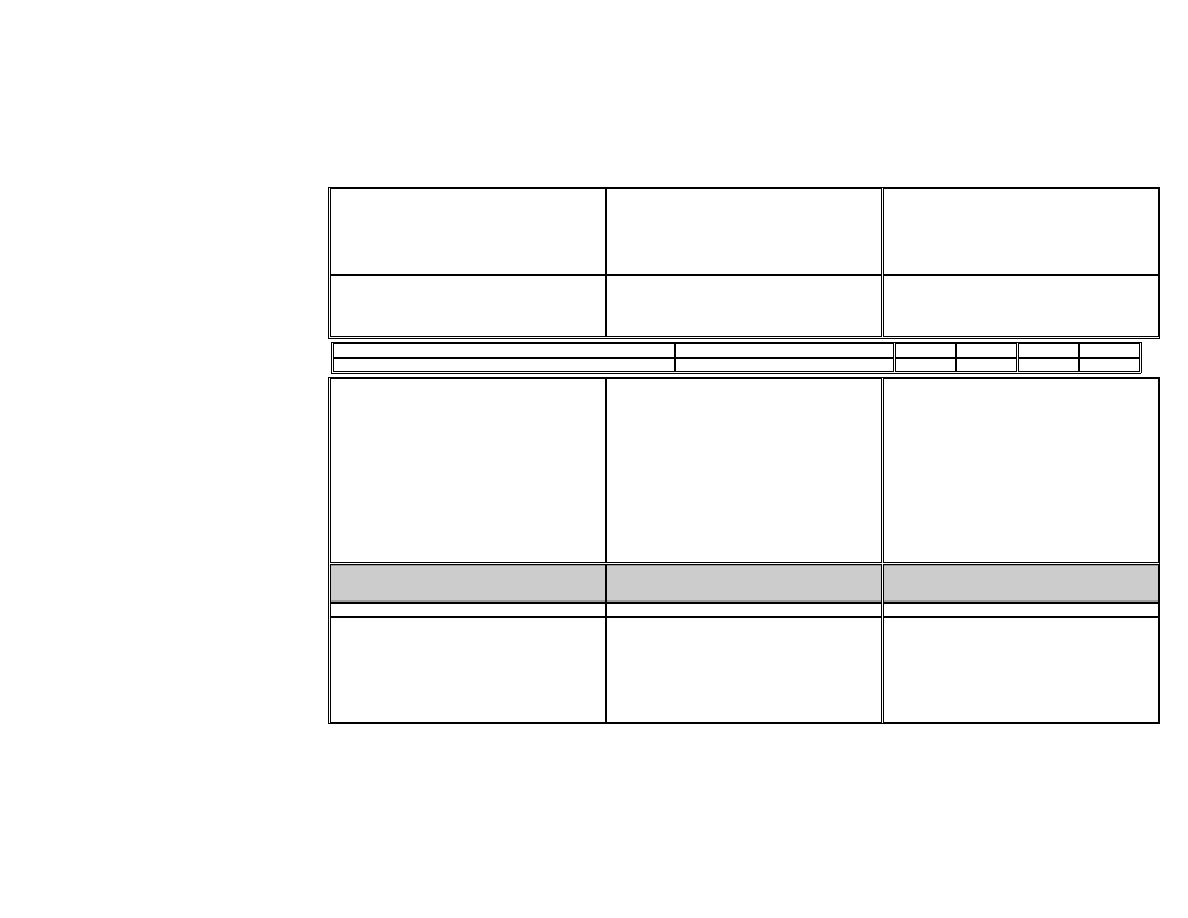
Combustibility degree /
Степень горючести
/ Ступінь займистості
A B
C
1
C
2
C
3
d (mm)
no gap / вплотную / проміжок не потрібний
3 5 10
20
•
When placing the cooker against the walls with
combustibility degrees: B - low combustibility, C1 -
minimum, C2 - medium, and C3 - easily combustible,
maintain safe distances from the appliance to the
wall.
•
If the back wall is incombustible (Class A) no gap is
required.
•
The cooker may be set against the walls with
combustibility degrees B, C1, C2, C3 under the
condition that the furniture wall is made of or covered
with heat-resistant material (e.g. aluminum foil)
securing a heat resistance of 100° C for the box (a
portion of the range under the hob).
•
если плита устанавливается около стен со
степенью горючести В, C1, C2, C3 , то безопасное
расстояние от плиты
до стены необходимо
соблюдать в соответствии с нижеприведённой
таблицей.
•
Без соблюдения расстояния плиту можно
поставить около стен со степенью горючести А.
•
Плита может быть установлена вплотную к стенам
со степенью горючести В, C1, C2, C3 при условии,
что стенки мебели будут покрыты
теплоизоляционным материалом (например,
алюминиевой фольгой), который обеспечит их
теплостойкость - 100° C (речь идёт о той части
плиты, которая расположена ниже уровня
варочного стола).
•
Розміщуючи плиту навпроти стін зі ступенем
займистості: B – низька займистість, C1 -
мінімальна, C2 - середня, та C3 – висока
займистість, необхідно забезпечити безпечну
відстань від приладу до стіни.
•
Якщо задня стінка не є займистою (клас А),
проміжок непотрібний.
•
Плиту можна розмістити навпроти стін з
наступними ступенями займистості B, C1, C2, C3
при умові, що стінка меблів зроблена або покрита
термостійким матеріалом (наприклад, алюмінієва
фольга), який забезпечує стійкість високої
температури 100° C для панелі (частина плити під
варильною поверхнею).
CONNECTION
TO GAS SUPPLY
ПРИСОЕДИНЕНИЕ ПЛИТЫ К
ГАЗОПРОВОДУ
ПІДКЛЮЧЕННЯ
ГАЗУ
Cooker class 1.
Плита класса 1.
Плита класа 1.
GAS SUPPLY
The appliance may be connected to gas supply by only
by the authorized personnel. Connection must comply
with the local standards and requirements. The gas
supply pipe must be fitted with the accessible gas shut-
off cock, located before the coupling with the cooker.
ГАЗОПРОВОД
Присоединение плиты к газопроводу должно быть
выполнено специалистами уполномоченной
сервисной организации в соответствии с нормами и
правилами, действующими в стране Покупателя.
ГАЗОПОСТАЧАННЯ
Підключити прилад до газопостачання має право лише
кваліфікований фахівець. Підключення повинне
відповідати усім діючим місцевим стандартам та
інструкціям. Труба газопостачання повинна бути
обладнана доступним краном для перекривання подачі
газу, який повинен знаходитися перед з’єднанням з
плитою.