Инструкция для GORENJE MGN52103FW1

(скачивание инструкции бесплатно)
Формат файла: PDF
Доступность: Бесплатно как и все руководства на сайте. Без регистрации и SMS.
Дополнительно: Чтение инструкции онлайн
background image

2


the authorized service personnel every two years. 
Such professional maintenance will extend the useful 
life of the appliance. 

 If you should smell gas, immediately shut the gas pipe 

cock and cut the gas supply. In such cases the 
appliance may be used only after the cause of such 
gas escape is discovered and removed by qualified 
personnel and the room thoroughly ventilated. 

 When using gas for cooking, heat and moisture are 

generated into the room, so make sure it gets 
sufficient air supply: keep a window open or install a 
mechanical ventilation device (a vapor hood with 
mechanical extraction). Prolonged operation of the 
appliance may require extensive ventilation, for 
instance opening the window or boosting the 
performance of the hood with a mechanical fan.  

 The appliance requires a minimum air admission of 

2m

3

/h for every kW of power input. 

 Never use naked light to detect gas leakage!  

 If you detect any defects on the gas installation of the 

appliance, never attempt to repair it by yourself. 
Switch the appliance off, cut the gas supply and call 
authorized personnel to make the repair. 

 If you plan an absence exceeding 3 days, turn off the 

gas pipe cock and shut the gas supply. If the 
appliance is out of service for more than 3 months, it 
is advised to retest and reset all functions of the 
appliance.  

 In change of the environment for which the appliance 

is designed, with a transient risk of fire or blast (e.g. at 
linoleum or PVC gluing, working with paints, etc.), the 
appliance must be put out of service in time, prior to 
the risk.  


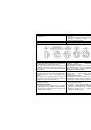
Do not place any combustible objects on the 
appliance or at a distance shorter than its safety 
distance (the shortest distance of an appliance from 
combustible items is 750 mm in the direction of main 
radiation and 100 mm in other directions). 

 Do not use cookware with damaged surface coating 

or otherwise defective due to wear or handling.  

 Do not place the appliance on a pedestal. 


Manufacturer does not recommend using any 
additional accessories, for instance flame 
extinguishing protectors, or efficiency increase 

 Плита укомплектована и отрегулирована для работы 

на природном газе давлением 1,3 кПа. 


Для плит, работающих на природном газе, 
допускается установить  регулятор давления газа. Для 
плит, работающих на пропан-бутане, установка 
регулятора давления газа на баллоне должна 
выполняться в полном соответствии с нормами, 
действующими в стране Покупателя. 


Плита предназначена только для теплового 
приготовления пищи. Недопустимо использовать 
плиту с целью отапливания помещения, так как это 
может привести к нарушению функции плиты из-за 
чрезмерной тепловой нагрузки. 

 Предупреждаем, что на самой плите и на расстоянии 

меньше, чем безопасное расстояние, не должны 
находиться предметы из горючих материалов. 
Наименьшее расстояние между плитой и горючими 
материалами в направлении основного теплового 
излучения может быть 750 мм, в остальных 
направлениях - 100 мм.   

 Недопустимо в ящик для хранения принадлежностей 

плиты класть какой-либо горючий материал. 

 Не закрывайте крышку плиты до тех пор, пока горелки 

горячие.  

 В случае, если плита не будет эксплуатироваться 

дольше 3-х дней, закройте кран подачи газа, 
расположенный на газопроводе. Если же плита не 
эксплуатировалась дольше 3-х месяцев, то 
рекомендуем перед вводом в эксплуатацию испытать 
все её функции.   

 При любой манипуляции с плитой (при очистке плиты 

и при ремонте), помимо повседневного  применения, 
закройте кран подачи газа, расположенный на 
газопроводе, и отключите плиту от электросети 
(подводящий шнур должен быть вытащен из розетки). 

 В случае, если почувствуете запах газа, немедленно 

закройте кран подачи газа, расположенный на 
газопроводе. Плитой можно пользоваться вновь 
только после выяснения причины утечки газа, её 
устранения (специалистом уполномоченной 
сервисной организации) и проветривания помещения. 


При обнаружении неисправности газовой или 
электрической части плиты не рекомендуем 
проводить ремонт самостоятельно. Отключите плиту и 
воспользуйтесь услугами уполномоченной сервисной 
организации.  

 Запрещается проводить испытание на герметичность 

приладу.  

 При появі запаху газу негайно перекрийте подачу 

газу або зачиніть газовий балон. У такому випадку 
приладом можна користуватися лише після 
виявлення причини витоку газу та усунення 
несправності фахівцем та  ретельного 
провітрювання приміщення.  


Використовуючи газ для приготування страв, 
температура та вологість виробляються в кімнаті, 
тому необхідно забезпечити відповідну циркуляцію 
повітря: відчиняйте вікно, або установіть 
механічний вентиляційний пристрій (витяжку з 
механічним відводом повітря) Тривала робота 
приладу потребує надмірної вентиляції, 
наприклад, відкрийте вікно або увімкніть більш 
потужний рівень роботи витяжки.   

 Мінімальна пропускна можливість витяжки для 

даного приладу складає 2 м

3

/год. на кожен кВт. 

 Ніколи не використовуйте відкритий вогонь для 

виявлення витоку газу!  


Якщо ви виявили виток газу, ніколи не 
намагайтеся провести ремонт самостійно. 
Вимкніть прилад, перекрийте подачу газу і 
викличте фахівця сервісного центру.  

 Якщо ви плануєте не користуватися приладом 

більше 3 днів, закрийте газовий кран. Якщо ви не 
користувалися приладом впродовж 3 місяців, 
рекомендується протестувати та установити 
заново усі функції приладу.    


Не можна розміщувати прилад у кімнаті, де 
утворюються небезпечні пари, які можуть 
спричинити пожежу або вибух (наприклад, при 
наявності лінолеуму, клею ПВА, тощо).  

 Не розміщуйте ніяких легкозаймистих предметів 

на прилад або поблизу (найкоротша відстань між 
приладом та легкозаймистим предметом складає 
750 мм в напрямку до основного радіуса і 100 мм в 
інших напрямках). 

 Не використовуйте кухонний посуд з пошкодженою 

поверхнею, щоб не пошкодити прилад.  

 Не розміщуйте прилад на підставку. 


Виробник не рекомендує використовувати 
додаткове приладдя, наприклад, засоби 
пожежегасіння або пристроїв збільшення 

1
2
3
4
5
6
7
8
9
10
11
12
13
14
15
16
17
18
19
20
21
22
23
24
25
26
27
28
29
30
Оглавление инструкции
  • Страница 1 из 31
    GB GAS COOKER RU BY ПЛИТА ГАЗОВАЯ UA ГАЗОВІ ПЛИТИ
  • Страница 2 из 31
    GB RU BY UA OPERATING AND MAINTENANCE INSTRUCTIONS РУКОВОДСТВО ПО ЭКСПЛУАТАЦИИ ІНСТРУКЦІЯ З ЕКСПЛУАТАЦІЇ Dear customer! Thank you for purchasing the appliance from our new range of gas cookers. The following information will help you understand the features of the appliance and use it safely. We
  • Страница 3 из 31
    • • • • • • • • • • • 2 the authorized service personnel every two years. Such professional maintenance will extend the useful life of the appliance. If you should smell gas, immediately shut the gas pipe cock and cut the gas supply. In such cases the appliance may be used only after the cause of
  • Страница 4 из 31
    gadgets. • Do not move the cooker by holding the hob. • The manufacturer declines responsibility for any damage caused by violating the instructions and recommendations set herewith. • Do not use pressure vapor cleaner for cleaning the appliance. • Cooker may only be installed against non
  • Страница 5 из 31
    CONTROL PANEL ПАНЕЛЬ УПРАВЛЕНИЯ ПАНЕЛЬ УПРАВЛІННЯ MGN 51104 F MGN 51123 F, MGN 51123 FX MGN 52103 F MGN 52160 F 1 - Left front burner control knob 2 - Left rear burner control knob 3 - Right rear burner control knob 4 - Right front burner control knob 5 - Oven control knob 6 - High voltage gas
  • Страница 6 из 31
    door or other hot parts of the range while in operation. • Убедитесь, что подводящие шнуры иных приборов не будут иметь контакт с варочным столом или другими горячими частями плиты. приладів не торкаються конфорок, дверцят духовки та інших гарячих частин плити під час її роботи. ATTENTION! ВНИМАНИЕ
  • Страница 7 из 31
    COOKING HOB LIGHTING THE HOB BURNERS ВАРОЧНАЯ ПЛИТА ЗАЖИГАНИЕ ГОРЕЛКИ ВАРИЛЬНА ПОВЕРХНЯ УВІМКНЕННЯ КОНФОРОК Press the appropriate burner control knob slightly towards the appliance and turn it anti-clockwise to the „MAXIMUM POWER“ position. Light the gas using a match or any gas ignition device.
  • Страница 8 из 31
    COOKING • Use low and wide cookware for preparing food on gas burners. Make sure the burner flames heat the dish bottom and do not go beyond its rim. • The appliance is fitted with different size burners. For optimum (economical) consumption of gas use the recommended cookware bottom diameters: -
  • Страница 9 из 31
    they may scratch the glass surface and cause discoloration. окончания приготовления пищи, как только она остынет. • При очистке не используйте абразивные чистящие средства, которыми можно поцарапать поверхность стекла и краску. повного охолодження варильної поверхні. • Для чищення кришки не
  • Страница 10 из 31
    A TEMPERATURE SELECTOR C ПОМОЩЬЮ ЭЛЕКТРОРОЗЖИГА • Установите ручку термостата духовки в положение “8”. В данном случае, ручку термостата нужно просто прижать к панели до упора и подержать, пока от искры загорится газ горелки. • Если газ загорелся, то ручку крана/термостата подержите прижатой к
  • Страница 11 из 31
    BAKING / ROASTING FOOD • Preheat the oven for a period of 10 - 15 min before putting yeast dough to bake. • Put the baking tray to the centre of oven, keep the distance between back wall and baking tray A TAP PROTECTED The oven knob is set to the position „MAXIMUM POWER“. After preheating put the
  • Страница 12 из 31
    • If possible, avoid opening the oven door during the baking process if possible. The temperature regime within the oven might be disturbed, resulting in prolonged baking time or burnt food. • If you should detect considerable differences between the set temperature and the actual oven temperature,
  • Страница 13 из 31
    • At the same time hold a match at the grill burner near the oven ceiling or press the ignition button. The automatic ignition device will fire the burner. • After firing the burner hold the knob pressed towards the panel for about 5 seconds until the flame sensor heats up. • Release the knob and
  • Страница 14 из 31
    GRILLING WITH ROASTING SPIT ГРИЛЬ НА ПОВОРОТНОМ ВЕРТЕЛЕ Roasting spit set consists of : 1. Spit support - 1 pcs 2. Handle - 1 pcs 3. Fixing forks - 2 pcs 4. Roasting spit - 1 pcs Комплект принадлежностей поворотного вертела состоит из следующих частей: 1. подставка для вертела - 1 шт. 2. рукоятка -
  • Страница 15 из 31
    NOTICE: • When grilling large roasts (e.g. chicken) make sure that the food fixed on the roasting spit is well balanced, so that the spit rotates with ease. • When grilling with the oven door opened, always use the protection sheet to shield the control panel, otherwise the control knobs might get
  • Страница 16 из 31
    NOTICE: ПРЕДУПРЕЖДАЕМ , что рассекатели пламени изготовлены из алюминиевого сплава, и поэтому не рекомендуем их мыть в моечной машине. ПРИМІТКА: Since the burner distributor caps are made of aluminum alloy, we discourage you from cleaning them in a washing machine. OVEN ОЧИСТКА ДУХОВКИ ДУХОВКА BULB
  • Страница 17 из 31
    NOTE: ПРИМЕЧАНИЕ: ПРИМІТКА: For oven illumination always use T 300° C, E14, 230-240V, 25W bulb. 1. Glass cover 2. Lamp 3. Sleeve 4. Oven rear wall Для освещения духовки применяется лампа T 300°, E14, 230/240 B, 25 Bт. 1. Плафон 2. Лампа 3. Патрон 4. Задняя стенка духовки Для освітлення духовки
  • Страница 18 из 31
    NOTE: ПРИМЕЧАНИЕ: ПРИМІТКА: The appliance will be delivered to you with the appropriate protective wrapping. This packaging material is valuable and can be recycled if such facilities are available in your locality. Данное изделие содержит материалы, которые могут быть использованы вторично. Прилад
  • Страница 19 из 31
    INSTALLATION INSTRUCTIONS AND SETTINGS РУКОВОДСТВО ПО МОНТАЖУ И ТЕХНИЧЕСКОМУ ОБСЛУЖИВАНИЮ ІНСТРУКЦІЯ З УСТАНОВКИ ТА ПІДКЛЮЧЕННЯ The appliance must be installed in accordance with valid local regulations, and shall be placed only in well vented spaces. Плита должна быть установлена и подключена в
  • Страница 20 из 31
    The appliance is designed for installation in the line of kitchen cabinets. The cooker can be located in the standard kitchen with a minimum space of 20m3. If the kitchen is smaller (but not less than 15m3 as a minimum) it is necessary to provide a hood. Regarding thermal resistance the cooker can
  • Страница 21 из 31
    WARNING: ВНИМАНИЕ! ЗАСТЕРЕЖЕННЯ: In handling the gas line (e.g. connection to the gas distribution system or flexible gas hose) always use a wrench to hold the gas line terminal, in order to avoid deformations. Чтобы при выполнении присоединения плиты к газопроводу или при присоединении с помощью
  • Страница 22 из 31
    1 2 3 4 5 6 IMPORTANT PRECAUTION: ВНИМАНИЕ! ВАЖЛИВЕ ЗАСТЕРЕЖЕННЯ: In case of left side connection (seen from the front) the hose must be connected by means of a clamp fixed in the back cover opening. You will find the fixing clamp in the accessory kit. Подвод газа к плите может быть выполнен с
  • Страница 23 из 31
    OVEN BURNER SETTINGS РЕГУЛИРОВКА ГОРЕЛКИ ДУХОВКИ 1 – Front oven wall 2 – Oven bottom 3 – Ignition tube 4 – Oven burner 5 – Oven burner adjusting screw 6 – Grill burner 1 – передняя стена духовки 2 – дно духовки 3 – трубка запальная 4 – горелка духовки 5 – винт регулировочный 6 – горелка гриля
  • Страница 24 из 31
    air is increase, by tightening it is reduced. The air/gas mixture is correct when the flame has blue color. Adjust screw 5 for value X in accordance with the table, and tighten the nut. Check that the burner is working properly: the flame must be blue and sharp, without a yellow tip. воздуха можно
  • Страница 25 из 31
    Flame sensor position 1 – Oven burner 2 – Flame sensor 3 - Grill GRILL BURNER SETTINGS PRIMARY AIR ADJUSTMENT To access the primary air adjusting screw (5), open or remove oven door and remove oven bottom (2). By unscrewing the adjusting screw the quantity of primary air is increase, by tightening
  • Страница 26 из 31
    information. • наладку или, возможно, замену регулятора давления газа (если он вообще установлен на подводящем газопроводе), • первоначальный заводской типовой щиток заменить новым, поставляемым совместно с комплектом сопел, •о проведении данной операции сделать соответствующие записи в
  • Страница 27 из 31
    NOTE: Leveling screws are unnecessary if the appliance height and horizontal position are acceptable. NOTICE The manufacturer reserves the right to make minor changes in these instructions for use resulting from technological changes which have no impact on the functioning of the appliance.
  • Страница 28 из 31
    Burner Конфорка UA RU BY 27 Small Малая Маленька Medium Cредняя Середня Номинальная мощность (кВт) 1,0 1,75 Input power (kW) Mощность „малое пламя“ (кВт) 0,36 0,36 Input power „SAVING“ (kW) Natural gas / Природный газ / Природiй газ G 20 – 1,3 кПа Nozzle diameter 0,83 1,12 Дiаметр форсунки (мм)
  • Страница 29 из 31
    GB RU BY UA Technical data Технические данные Технічні дані Gas cooker Плита газовая Газові плити Dimensions: height / width / depth Размеры плиты: высота / ширина / глубина Розміри: Висота / ширина / глибина Burner Горелки Газові конфорки Left front (kW) Left rear (kW) Right rear (kW) левая
  • Страница 30 из 31
    151C / MGN 51104 F, MGN 51123 F, MGN 51123 FX, 157C / MGN 52103 F, MGN 52103 F1, MGN 52160 F, MGN 52160 F1 / 2011 04 15 / SAP 233522
  • Страница 31 из 31