4
English
SPECIFICATIONS
STANDARD ACCESSORIES
䡬
Chuck wrench (Spec. only for keyed chuck) ..... 1
Standard accessories are subject to change without notice.
OPTIONAL ACCESSORIES (sold separately)
(1) Side handle
(2) Hook
(3) Hook (A)
Optional accessories are subject to change without notice.
APPLICATIONS
䡬
Boring holes in metal, wood and plastic.
PRIOR TO OPERATION
1. Power source
Ensure that the power source to be utilized conforms
to the power requirements specified on the product
nameplate.
2. Power switch
Ensure that the power switch is in the OFF position.
If the plug is connected to a receptacle while the
power switch is in the ON position, the power tool
will start operating immediately, inviting serious
accident.
3. Extension cord
When the work area is removed from the power
source. Use an extension cord of sufficient thickness
and rated capacity. The extension cord should be
kept as short as practicable.
4. Selecting the appropriate drill bit:
䡬
When boring metal or plastic
Use ordinary metalworking drill bits.
䡬
When boring wood
Use ordinary woodworking drill bits.
However, when drilling 6.5 mm or smaller holes,
use a metalworking drill bit.
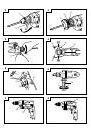
5. Mounting and dismounting of the bit
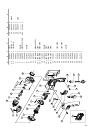
For keyed chuck
(Fig. 1)
(1) Open the chuck jaws, and insert the bit into the
chuck.
(2) Place the chuck wrench in each of the three holes
in the chuck, and turn it in the clockwise direction
(viewed from the front side). Tighten securely.
(3) To remove the bit, place the chuck wrench into one
of the holes in the chuck and turn it in the
counterclockwise direction.
For keyless chuck (Fig. 2)
(1) Open the chuck jaws, and insert the bit into the
chuck.
To open the chuck jaws, hold the ring while turning
the sleeve in the counterclockwise direction (viewed
from the front side).
(2) Firmly grasp the ring and turn the sleeve in the
clockwise direction. Tighten securely.
(3) To remove the bit, firmly grasp the ring and turn
the sleeve in the counterclockwise direction.
(4) If it is hard to loosen the sleeve, fix the spindle
using the open-end wrench, hold the sleeve firmly,
and turn it in the loosening direction
(counterclockwise when viewed from the front).
(Fig. 3)
6. Check the rotational direction (Fig. 4)
The bit rotates clockwise (viewed from the rear
side) by pushing the R-side of the push button.
The L-side of the push button is pushed to turn the
bit counterclockwise.
(The
L
and
R
marks are provided on the body.)
7. Installing the side handle (Optional accessory)
A Side handle can be installed on either side of
the tool for right or left handed use.
To install the side handle, thread it into the socket
on the desired side of the gear cover and tighten
it securely. (Fig. 6)
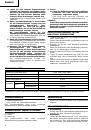
Voltage (by areas)*
(110V, 220V, 230V, 240V)
Power input
460W*
No load speed
0–2300 min
–1
Drill chuck capacity
10 mm
Steel
Twist Bit
10 mm
Capacity
Flat Spade Bit
25 mm
Wood
Auger Bit
16 mm
Weight (without cord)
1.3 kg
*Be sure to check the nameplate on product as it is subject to change by areas.
PRECAUTIONS ON USING DRILL
1. Wear ear protectors with impact drills.
Exposure to noise can cause hearing loss.
2. Use auxiliary handles supplied with the tool.
Loss of control can cause personal injury.
3. Hold the drill securely when using.
4. Do not wear gloves made of stuff liable to roll up
such as cotton, wool, cloth or string, etc.
5. Prior to drilling into walls, ceilings or floors, ensure
there are no electric cables or conduits inside.