GB
11
Start-up and use
!
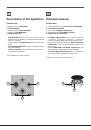
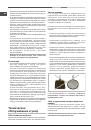
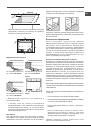
The position of the corresponding gas burner or electric
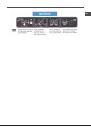
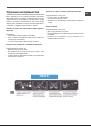
hotplate* is shown on every knob.
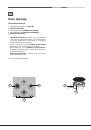
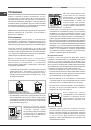
Gas burners
Each burner can be adjusted to one of the following settings
using the corresponding control knob:
● Off
Maximum
Minimum
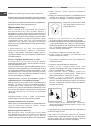
To light one of the burners, hold a lit match or lighter near
the burner and, at the same time, press down and turn the
corresponding knob anti-clockwise to the maximum setting.
Since the burner is fitted with a safety device, the knob
should be pressed for approximately 2-3 seconds to allow
the automatic device keeping the flame alight to heat up.
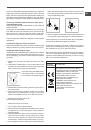
When using models with an ignition button, light the desired
burner by first pressing the gas burners button (identifiable
by the
symbol), then pressing down the corresponding
knob as far as possible and turning it anticlockwise towards
the maximum setting.
Some models are equipped with an ignition button
incorporated into the control knob. If this is the case, the
ignitor is present, but not the button.
To light a burner, simply press the corresponding knob all the
way in and then turn it in the counter-clockwise direction to
the “High” setting, keeping it pressed in until the burner lights.
!
If a flame is accidentally extinguished, turn off the control
knob and wait for at least 1 minute before trying to relight it.
To switch off the burner, turn the knob in a clockwise
direction until it stops (when reaches the “●” position).
Practical advice on using the burners
To ensure the burners operate efficiently:
• Use appropriate cookware for each burner (see table)
so that the flames do not extend beyond the bottom of
the cookware.
• Always use cookware with a flat base and a cover.
• When the contents of the pan reach boiling point, turn
the knob to minimum.
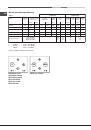
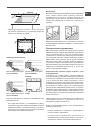
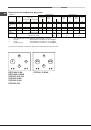
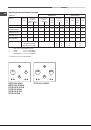
Burner
Rapid (R)
Reduced Rapid (RR)
Semi-Rapid (S)
Auxiliary (A)
Mini WOK (MW)
Ø Cookware Diameter (cm)
24 - 26
24 - 26
16 - 20
10 - 14
24 - 26
To identify the type of burner, refer to the designs in the
section entitled, “Burner and Nozzle Specifications”.
Precautions and tips
!
This appliance has been designed and manufactured
in compliance with international safety standards. The
following warnings are provided for safety reasons and
must be read carefully.
General safety
• This is a class 3 built-in appliance.
• Gas appliances require regular air exchange to
maintain efficient operation. When installing the hob,
follow the instructions provided in the paragraph on
“Positioning” the appliance.
• These instructions are only valid for the countries
whose symbols appear in the manual and on the serial
number plate.
• The appliance was designed for domestic use inside the
home and is not intended for commercial or industrial
use.
• The appliance must not be installed outdoors, even in
covered areas. It is extremely dangerous to leave the
appliance exposed to rain and storms.
• Do not touch the appliance with bare feet or with wet or
damp hands and feet.
• The appliance must be used by adults only for the
preparation of food, in accordance with the instructions
outlined in this booklet. Any other use of the appliance
(e.g. for heating the room) constitutes improper use and
is dangerous. The manufacturer may not be held liable
for any damage resulting from improper, incorrect and
unreasonable use of the appliance.
• Ensure that the power supply cables of other electrical
appliances do not come into contact with the hot parts
of the oven.
• The openings used for ventilation and dispersion of heat
must never be covered.
• Always make sure the knobs are in the “●”/“
○
” position
when the appliance is not in use.
• When unplugging the appliance always pull the plug from
the mains socket, do not pull on the cable.
• Never carry out any cleaning or maintenance work
without having detached the plug from the mains.
• In case of malfunction, under no circumstances should
you attempt to repair the appliance yourself. Repairs
carried out by inexperienced persons may cause injury
or further malfunctioning of the appliance. Contact a
Service Centre (see Assistance).
• Always make sure that pan handles are turned towards
the centre of the hob in order to avoid accidental burns.
• Do not close the glass cover (if present) when the gas
burners
• Do not use unstable or deformed pans.
• The appliance should not be operated by people
(including children) with reduced physical, sensory or
mental capacities, by inexperienced individuals or by
anyone who is not familiar with the product. These
individuals should, at the very least, be supervised by
someone who assumes responsibility for their safety or
receive preliminary instructions relating to the operation
of the appliance.
• Do not let children play with the appliance.
• The appliance is not intended to be operated by means
of an external timer or separate remote-control system.