Инструкция для HOTPOINT-ARISTON 7OFK 1049LS X RU HA

(скачивание инструкции бесплатно)
Формат файла: PDF
Доступность: Бесплатно как и все руководства на сайте. Без регистрации и SMS.
Дополнительно: Чтение инструкции онлайн
background image

GB

13

of 50°C is ideal for preparing yoghurt.

Basic recipe for one litre of yoghurt: one litre of 

whole UHT milk, one pot of natural yoghurt

Method:

•  Heat the milk in a steel pan until it reaches boiling point.

•  Remove the layer of cream on the surface and leave to 

cool.

•  Stir  3  or  4  tablespoons  of  milk  into  the  yoghurt  and 

combine well.

•  Add the mixture to the remaining milk and mix thoroughly.

•  Pour into airtight jars.

•  Stand the jars on the dripping pan and place in the oven, 

on level 2.

•  At the end of this process, place the jars in the refrigerator 

to chill for at least 12 hours. Store the yoghurt in the 

refrigerator for up to one week.

•  The recipe can be adjusted to taste.

Programming cooking

!

 A cooking mode must be selected before programming 

can take place.

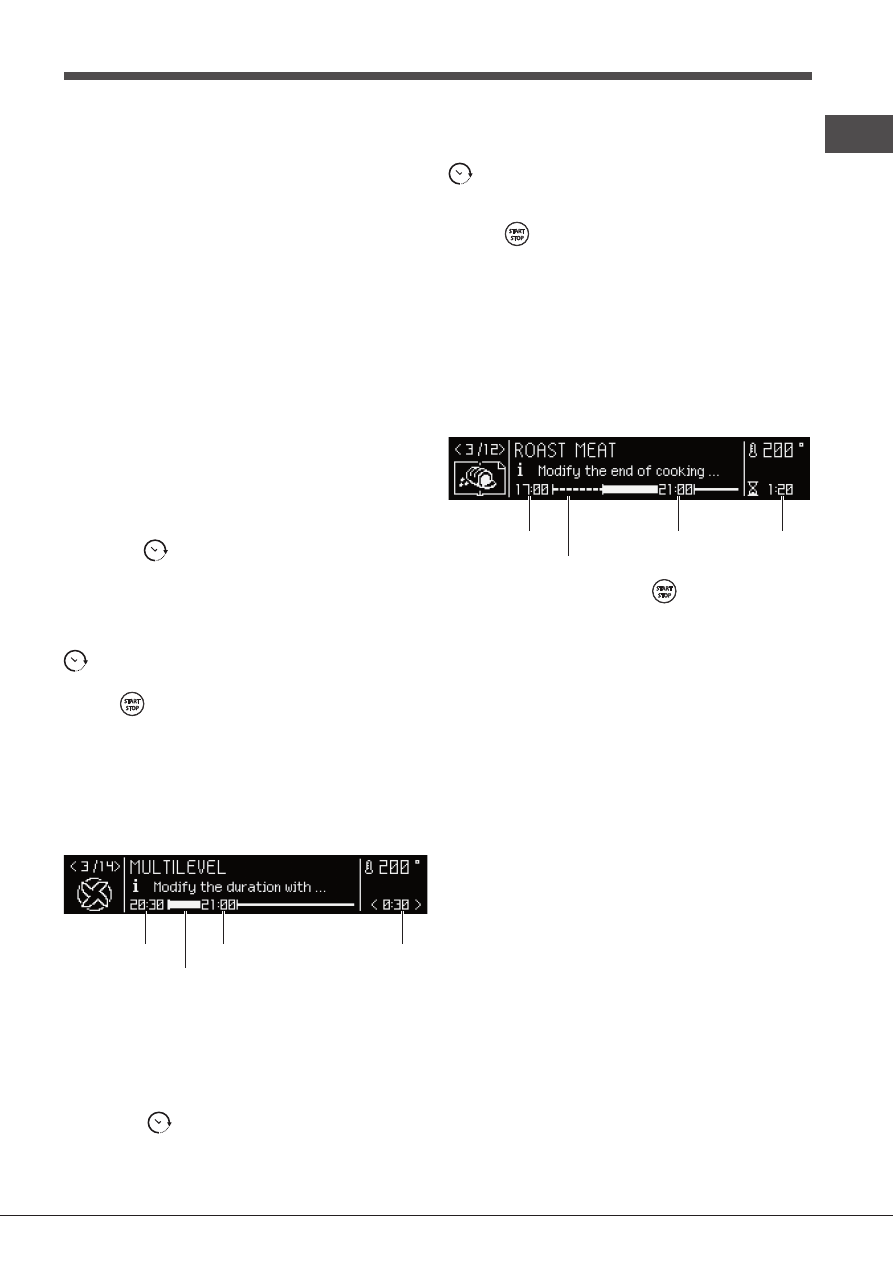
Programming the duration

1. Press the 

 icon.

2. Turn the control dial to set the duration; hold the dial in this 

position to scroll through the numbers more quickly and make the 

setting process easier. The display will show a graphic indicating 

the duration in bar format.

3. Once you have reached the desired duration, press the 

 icon again. The duration bar will show the current time, 

the duration and the end of cooking time as a graphic.
4. Press 

 to begin cooking.

5. The display will indicate the remaining time by filling the 

duration bar.

6. When cooking has finished, “COOKING FINISHED” 

appears on the display and a buzzer sounds.

•  For example: it is 9:00 a.m. and a duration of 1 hour and 

15 minutes is programmed. The programme will stop 

automatically at 10:15 a.m.

Current time

indicator

End 

of cooking time

Duration

bar

Cooking

duration

Programming delayed cooking

!

 A cooking duration must be set before the end of cooking 

time can be scheduled.

!

 For the delayed programming to work properly, the clock 

should be set to the correct time.

1. Follow steps 1 to 3 to set the duration as detailed above.
2. Press the 

 icon twice; the end of cooking time will 

begin to flash.

3. Turn the control dial to adjust the end of cooking time; hold 

the dial in this position to scroll through the numbers more 

quickly and make the setting process easier. The display will 

show a graphic indicating the delayed start in bar format.

4. Once you have reached the desired end time, press the 

 icon again. The delayed start bar will show the current 

time, the time remaining until the start of cooking, the 

duration and the end of cooking time as a graphic.
5. Press 

 to begin the pyrolysis schedule.

6. The text “POSTPONED COOKING START” and the time 

remaining will appear on the display, moving the delayed 

start bar backwards.

7. Once cooking has begun, the display will indicate the 

remaining time by filling the duration bar.

8. When the time has elapsed, “COOKING FINISHED” 

appears on the display and a buzzer sounds.

•  For example: it is 9:00 a.m. and a time of 1 hour and 15 

minutes is programmed, while the end time is set to 12:30. 

The programme will start automatically at 11:15 a.m.

Current time

indicator

End of cooking

time

Delayed 

start bar

Cooking

duration

To cancel a schedule, press the 

 icon.

Practical cooking advice

!

 Do not place racks in position 1 and 5 during fan-assisted 

cooking. This is because excessive direct heat can burn 

temperature sensitive foods.

!

 In the GRILL and FAN GRILLING cooking modes, 

particularly when using the rotisserie spit, place the dripping 

pan  in  position  1  to  collect  cooking  residues  (fat  and/or 

grease).

MULTILEVEL

•  Use positions 2 and 4, placing the food which requires 

more heat on 2.

•  Place the dripping pan on the bottom and the rack on 

top.

BARBECUE

•  Place the rack in position 3 or 4. Position the food in the 

centre of the rack.

•  We  recommend  that  the  temperature  is  set  to  its 

maximum level. The top heating element is regulated by 

a thermostat and may not always operate constantly.

PIZZA

•  Use a lightweight aluminium pizza pan. Place it on the 

rack provided. 

  For a crispy crust, do not use the dripping pan as this 

extends the total cooking duration and prevents the crust 

from forming.

•  If the pizza has a lot of toppings, we recommend adding 

the mozzarella cheese to the top of the pizza halfway 

through the cooking process.

1
2
3
4
5
6
7
8
9
10
11
12
13
14
15
16
17
18
19
20
21
22
23
24
25
26
27
28
29
30
31
32
Оглавление инструкции
  • Страница 1 из 33
    7OFK 1049L X RU/HA 7OFK 1049LS X RU/HA English Operating Instructions OVEN Contents Operating Instructions,1 Warnings,2 Assistance,3 Description of the appliance,4 Description of the appliance,5 Installation,6 Start-up and use,8 Modes,10 Precautions and tips,16 Maintenance and care,16
  • Страница 2 из 33
    Warnings WARNING: The appliance and its accessible parts become hot during use. Care should be taken to avoid touching heating elements. Children less than 8 years of age shall be kept away unless continuously supervised. This appliance can be used by children aged from 8 years and above and
  • Страница 3 из 33
    Assistance Warning: The appliance is fitted with an automatic diagnostic system which detects any malfunctions. Malfunctions are signalled through messages of the following type: “F—” followed by numbers. Call for technical assistance in the event of a malfunction. Before calling for Assistance: •
  • Страница 4 из 33
    Description of the appliance Описание изделия Overall view Общии вид 1 2 3 4 5 6 7 8 9 1 2 3 4 5 6 7 8 9 POSITION 1 POSITION 2 POSITION 3 POSITION 4 POSITION 5 GUIDES for the sliding racks DRIPPING PAN GRILL Control panel ПОЛОЖЕНИЕ 1 ПОЛОЖЕНИЕ 2 ПОЛОЖЕНИЕ 3 ПОЛОЖЕНИЕ 4 ПОЛОЖЕНИЕ 5 ВЫДВИЖНЫЕ
  • Страница 5 из 33
    11 Символ ПОДТВЕРЖДЕНИЕ НАСТРОЕК 12 ВКЛЮЧЕНИЕ КОНСОЛИ УПРАВЛЕНИЯ Description of the appliance Control panel 1 SETTINGS icon 2 MANUAL COOKING MODES icon 3 Display 4 TEMPERATURE icon 5 CONTROL PANEL LOCK icon 6 START / STOP 7 MINUTE MINDER icon 8 TIME icon 9 SELECTOR control dial 10 AUTOMATIC COOKING
  • Страница 6 из 33
    Installation ! Please keep this instruction booklet in a safe place for future reference. If the appliance is sold, given away or moved, please make sure the booklet is also passed on to the new owners so that they may benefit from the advice contained within it. ! Please read this instruction
  • Страница 7 из 33
    Electrical connection Ovens equipped with a three-pole power supply cable are designed to operate with alternating current at the voltage and frequency indicated on the data plate located on the appliance (see below). Fitting the power supply cable 1. Open the terminal board by inserting a
  • Страница 8 из 33
    GB Start-up and use pull (2). WARNING! The oven is provided with a stop system to extract the racks and prevent them from coming out of the oven (1). As shown in the drawing, to extract them completely, simply lift the racks, holding them on the front part, and ! The first time you use your
  • Страница 9 из 33
    Setting the minute minder ! The minute minder may be set regardless of whether the oven is switched on or off. It does not switch the oven on or off. When the set time has elapsed, the minute minder emits a buzzer that will automatically stop after 30 seconds or when any active button on the
  • Страница 10 из 33
    GB Mode symbol appears on the display to indicate standby mode. As soon as interaction with the machine resumes, system operation is restored. the heating elements through the forced circulation of the air throughout the oven. This helps prevent food from burning on the surface and allows the heat
  • Страница 11 из 33
    stored for longer in the refrigerator; • organisational: thanks to the longer storage period, dishes may be prepared well in advance; • diet-related: this type of cooking limits the amount of fatty substances used and therefore means that the food is lighter and easier to digest; • financial: the
  • Страница 12 из 33
    GB BEEF/VEAL/LAMB mode Use this function to cook beef, veal and lamb. Place the food inside the oven while it is still cold. The dish may also be placed in a preheated oven. Some of the ROAST modes offer the option of selecting the desired cooking level: 1. Press the icon. 2. Use the control dial
  • Страница 13 из 33
    of 50°C is ideal for preparing yoghurt. Basic recipe for one litre of yoghurt: one litre of whole UHT milk, one pot of natural yoghurt Method: • Heat the milk in a steel pan until it reaches boiling point. • Remove the layer of cream on the surface and leave to cool. • Stir 3 or 4 tablespoons of
  • Страница 14 из 33
    GB Cooking advice table Modes Foods Weight (in kg) Standard guide rails Manual Multilevel* Pizza on 2 racks Pies on two racks/cakes on 2 racks Sponge cake on 2 racks (on the dripping pan) Roast chicken + potatoes Lamb Mackerel Lasagne Cream puffs on 3 racks Biscuits on 3 racks Cheese puffs on 2
  • Страница 15 из 33
    Cooking advice table Modes Foods Weight (in kg) Automatic** Bread*** Bread (see recipe) Rack position Standard guide rails Sliding guide rails 1 2 or 3 2 no Beef Roast beef 1-1,5 2 or 3 2 no Veal Roast veal 1-1,5 2 or 3 2 no Lamb Leg of lamb 1-1,5 2 or 3 2 no Pork Roast pork 1,2-1,5 2 or 3 2 no
  • Страница 16 из 33
    GB Precautions and tips ! This appliance has been designed and manufactured in compliance with international safety standards. The following warnings are provided for safety reasons and must be read carefully. General safety • The appliance was designed for domestic use inside the home and is not
  • Страница 17 из 33
    • The inside of the oven should ideally be cleaned after each use, while it is still lukewarm. Use hot water and detergent, then rinse well and dry with a soft cloth. Do not use abrasive products. • All accessories - with the exception of the sliding racks - can be washed like everyday crockery,
  • Страница 18 из 33
    GB Troubleshooting Problem A programmed cooking mode does not start. The display shows ECO Mode. An automatic mode has been selected. “Hot” appears on the display and cooking does not start. Fan-assisted cooking has been selected and the food looks burnt. 18 Possible cause Solution The appliance is
  • Страница 19 из 33
    Установка ! Важно сохранить данное руководство для его последующих консультации. В случае продажи, передачи изделия или при переезде на новое место жительства необходимо проверить, чтобы руководство оставалось вместе с изделием, для того чтобы его новыи владелец мог ознакомиться с правилами
  • Страница 20 из 33
    RS Подсоединение сетевого кабеля 1. Откройте зажимную коробку, нажав при помощи отвертки на выступы с боков крышки: потяните и откройте крышку (см. схему). L N 2. Порядок подсоединения сетевого кабеля: отвинтите винт кабельного сальника и три винта контактов L-Nи затем прикрепите провода под
  • Страница 21 из 33
    Включение и эксплуатация ВНИМАНИЕ! Духовой шк аф ук омплек то ва н системой бл окировки решеток, позволяющей вынимать их из духовки не полностью (1). Для полного вынимания р е ш ет о к д о с т а т о ч н о поднять их, как показано на схеме, взяв их за передний край, и потянуть на себя (2). ! При
  • Страница 22 из 33
    RS или найдите при помощи рукоятки ESCI и нажмите символ . - изменить температуру , нажав на символ , поверните рукоятку и подтвердите , вновь нажав на духовке, нажав на символ и выполнив операции, описанные выше в пунктах 2 - 4 . символ (только для программ приготовления в ручном режиме); -
  • Страница 23 из 33
    Духовой шкаф может работать в режиме DEMO: отключаются все нагревательные элементы, остаются включенными только управления. Для активации режима DEMO выключите духовку, оставьте рукоятку повернутой по часовой стрелке и одновременно нажмите на символ на 10 секунд. Раздается звуковой сигнал, на
  • Страница 24 из 33
    RS Программа РАССТОЙКА Включаются круглый нагревательныйе элемент и только в процессе нагрева - вентилятор. Температура духового шкафа является оптимальной для расстойки дрожжевого теста. В процессе расстойки держите дверцу духовки закрытой. Программа КОНДИТЕРСКАЯ ВЫПЕЧКА Включается задний
  • Страница 25 из 33
    ДУХОВКА”, и начать приготовление невозможно; подождать охлаждения духовки. На дисплее символ выбранной программы сменяется символом, рекомендующим нужный уровень. желаемую степень готовности: ! В начале фазы начала приготовления духовой шкаф включает звуковой сигнал. 3. вновь нажмите на символ ! Не
  • Страница 26 из 33
    RS Программа КОНДИТЕРСКАЯ ВЫПЕЧКА Эта программа идеально подходит для выпечки тортов из дрожжевого, недрожжевого теста и бисквитов. Изделия помещаются в холодную духовку. Тем не менее Вы можете разогреть духовку перед помещением в нее выпечки. Программа ПАЭЛЬЯ Этот режим специально предназначен для
  • Страница 27 из 33
    Практические советы по приготовлению Индикатор текущего времени ! В режиме вентилируемого приготовления не используйте 1-ый и 5-ый уровни: они подвергаются прямому воздействию горячего воздуха, который может сжечь деликатные продукты. Время Время окончания приготовления приготовления Шкала
  • Страница 28 из 33
    RS Таблица приготовления Программы Продукты Вес (кг) Гриль* Запеканка* Пицца (на 2-х уровнях) Песочный торт на 2-х уровнях/торты на 2-х уровнях Бисквит (на 2-ух уровнях) Жареная курица с картошкой Баранина Скумбрия Лазанья Эклеры на 3-х уровнях Печенье на 3-х уровнях Печенья из слоеного теста с
  • Страница 29 из 33
    Таблица приготовления Программы Продукты Вес (кг) Хлеб (см. рецепт) 1 2 или 3 2 нет Говядина Жаркое из говядины 1-1,5 2 или 3 2 нет Телятина Жаркое из телятины 1-1,5 2 или 3 2 нет Баранина Баранья нога 1-1,5 2 или 3 2 нет Свинина Жаркое из свинины 1,2-1,5 2 или 3 2 нет Курица Жареная курица 1-1,5 2
  • Страница 30 из 33
    RS Предосторожности и рекомендации ! Изделие спроектировано и изготовлено в соответствии с международными нормативами по безопасности. Необходимо внимательно прочитать настоящие предупреждения, составленные в целях вашеи безопасности. Общие требования к безопасности • Данное изделие предназначается
  • Страница 31 из 33
    Техническое обслуживание и уход RS F Отключение электропитания Перед началом какой-либо операции по обслуживанию или чистке отсоедините изделие от сети электропитания. Чистка изделия • Причиной незначительных различий в оттенках на фасаде духового шкафа является использование разных материалов:
  • Страница 32 из 33
    195114258.00 05/2013 - XEROX FABRIANO 2. Выберите уровень, на который будет установлена выдвижная направляющая. Проверив направление вык атывания самой направляющей, установите на раму сначала крепление В, а затем С. RS D 3. Закрепите две рамы с установленными направляющими в специальных отверстиях
  • Страница 33 из 33