18
GB
Installation
!
Please keep this instruction booklet in a safe place for future reference. If
the appliance is sold, given away or moved, please make sure the booklet is
also passed on to the new owners so that they may benefit from the advice
contained within it.
!
Please read this instruction manual carefully: it contains important information
concerning the safe operation, installation and maintenance of the appliance.
Positioning
!
Do not let children play with the packaging material; it should be disposed
of in accordance with local separated waste collection standards (see
Precautions and tips).
!
The appliance must be installed by a qualified professional in accordance
with the instructions provided. Incorrect installation may damage property or
cause harm to people or animals.
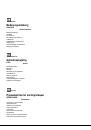
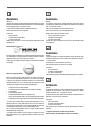
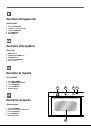
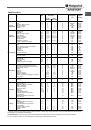
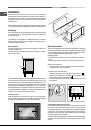
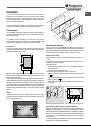
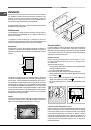
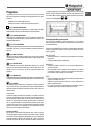
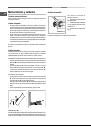
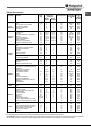
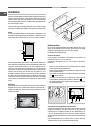
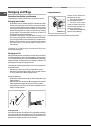
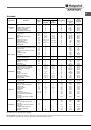
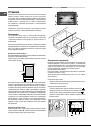
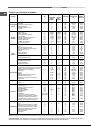
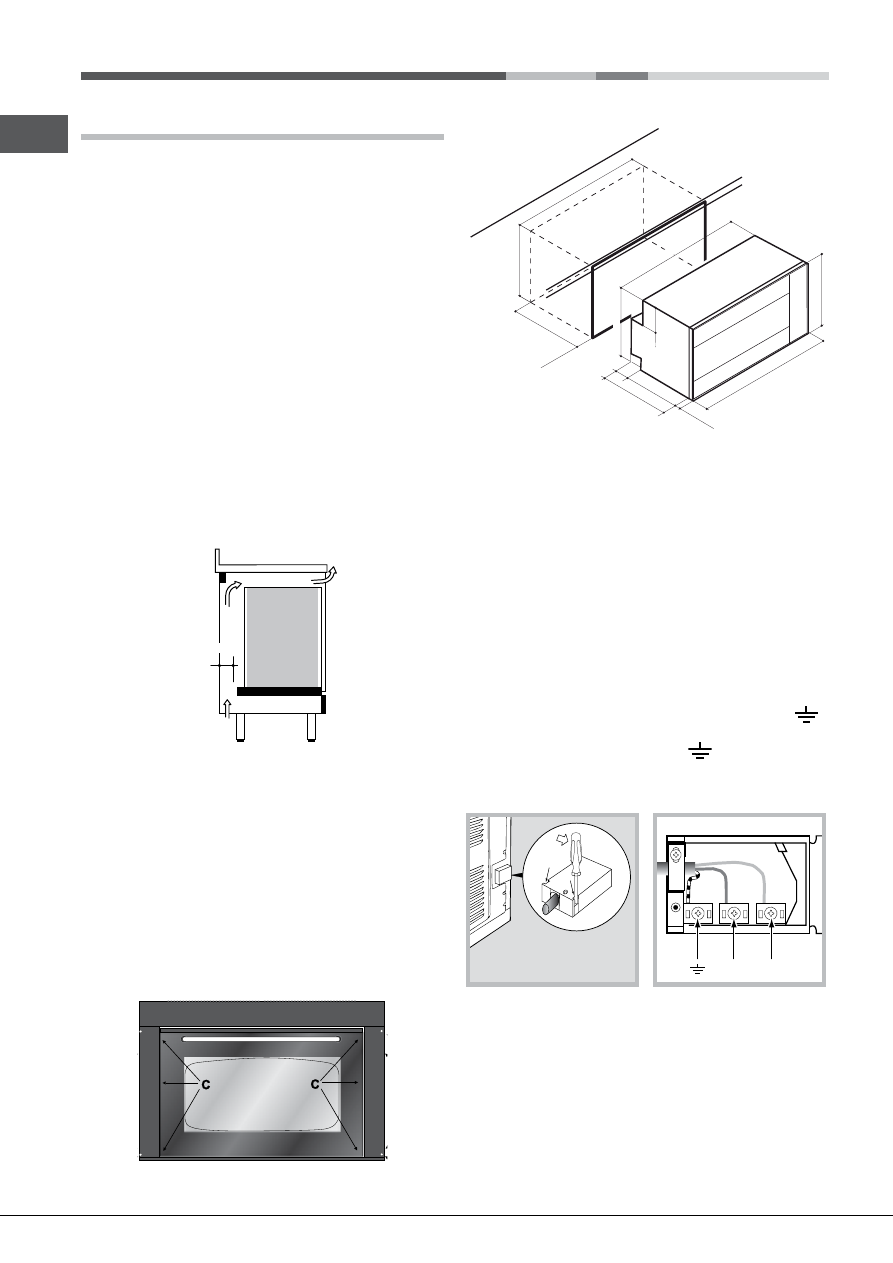
Built-in appliances
To ensure the proper working order of the built-in appliance, the kitchen unit
must be of a suitable size.
The sizes of the unit for installing the cooker under a worktop or in a column
unit are shown in figure.
min. 45 mm.
To provide adequate ventilation, there must be appropriate ventilation openings
in the front bottom and the top part of the cabinet (an intake opening on the
bottom of at least 200 cm2, and an exhaust opening of at least 90 cm2). The
unit panels next to the cooker must be heat resistant. In the case of veneered
wood units, glues must be resistant to a temperature of 120 °C. In accordance
with safety standards, once the appliance has been mounted, there must be
no possible contact with electrical parts. Any protective parts must be secured
so that they can only be removed with the use of tools.
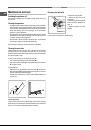
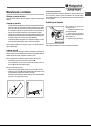
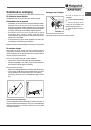
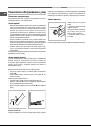
Fastening the oven
Insert the appliance into the compartment; open the oven door and fasten
the oven to the cabinet using the four screws “
A
”, remembering to place the
special spacers provided between the hole and the screw itself.
447
m
m
78
min.
550
mm
16
2
mm
585
mm
595
mm
860
mm
22
mm
895
mm
525
m
m
580
mm
840
mm
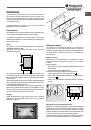
Electrical connection
Those ovens equipped with a three-pole power supply cable are designed to
operate with an alternating current with the voltage and frequency indicated
on the data plate (located on the appliance) and in the instruction manual.
The wire for earthing the appliance is yellow-green in colour.
Replacing the cable
Use a rubber cable of the type H05VV-F with a suitable cross section 3 x
1.5 mm².
The yellow-green earth wire must be 2-3 cm longer than the other wires.
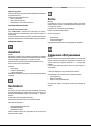
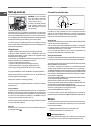
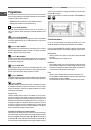
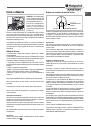
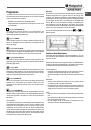
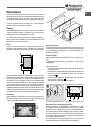
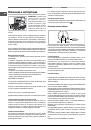
Opening the terminal board:
• Using a screwdriver, prise on the side tabs of the terminal board cover;
• Pull open the cover of the terminal board.
To install the cable, proceed as follows:
• Remove the wire clamp screw and the three contact screws L-N-
• Fasten the wires beneath the screwheads using the following colour
scheme: Blue (N) Brown (L) Yellow-Green
• Fasten the supply cable in place with the clamp and close the cover of the
terminal board.
N L
Connecting the supply cable to the mains
Install a standardised plug corresponding to the load indicated on the data
plate. When connecting the cable directly to the mains, install an omnipolar
circuit-breaker with a minimum contact opening of 3 mm between the appliance
and the mains. The omnipolar circuit breaker should be sized according to
the load and should comply with current regulations (the earth wire should
not be interrupted by the circuit breaker).
The supply cable should be positioned so that it does not reach a temperature
of more than 50°C with respect to the room temperature, anywhere along
its length.