Инструкция для HOTPOINT-ARISTON LFT 21677.R

(скачивание инструкции бесплатно)
Формат файла: PDF
Доступность: Бесплатно как и все руководства на сайте. Без регистрации и SMS.
Дополнительно: Чтение инструкции онлайн
background image

EN

21

Rinse aid and refined salt

Only use products which have been specifically

designed for dishwashers.
Do not use table salt or industrial salt, or washing up
liquid.
Follow the instructions given on the packaging.

If using a multi-functional product it is not necessary to

add rinse aid; however, 

we recommend that you add salt,

especially if you live in an area where the water is hard
or very hard.

 Follow the instructions given on the

packaging.

If you do not add salt or rinse aid, the LOW SALT

*

and LOW RINSE AID

*

 indicator lights remain lit.

Measuring out the rinse aid

Rinse aid makes it easier for the crockery to dry, as water
runs off surfaces more readily and therefore does not leave
streaks or marks.
The rinse aid dispenser should be filled:
• When the LOW RINSE AID

*

 indicator light on the control

panel is illuminated;

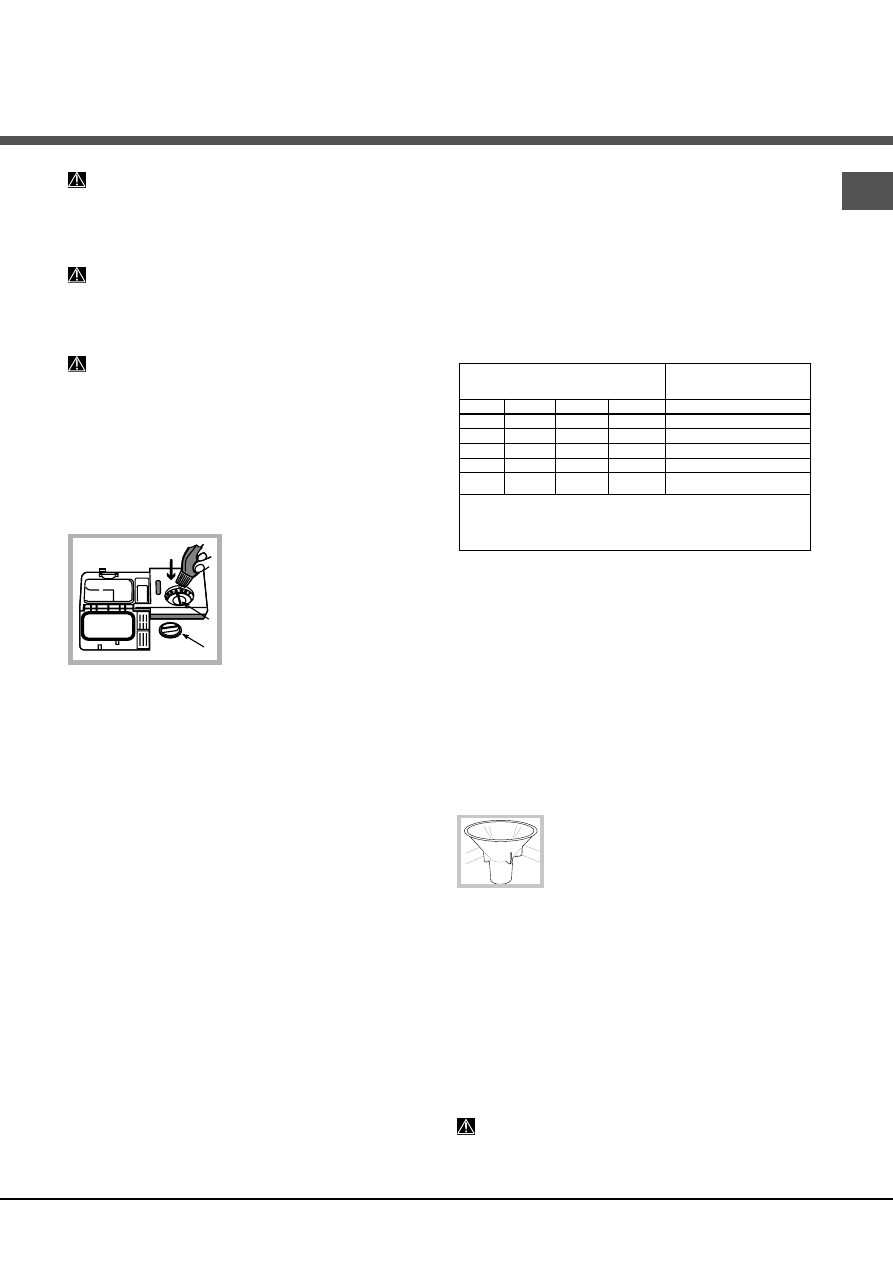
1. Open the dispenser by turning the
lid (G) in an anticlockwise direction.
2. Pour in the rinse aid, making sure
it does not overflow from the
dispenser. If this happens, clean the
spill immediately with a dry cloth.
3. Screw the lid back on.

NEVER pour the rinse aid directly

into the appliance tub.

Adjusting the amount of rinse aid

If you are not completely satisfied with the drying results,
you may adjust the quantity of rinse aid used. Use a
screwdriver to turn the dosage adjuster (F) to one of the 6
pre-set positions (the default position is set to 4):
• If there are streaks on the crockery, set the adjustment

device to a lower number (1-3).

• If drops of water remain on the crockery or if there are

limescale marks present after the cycle has finished, set
the adjuster to a higher number (4-6).

Setting the water hardness

Every dishwasher is equipped with a water softener which,
by using refined salt designed especially for this type of
appliance, supplies water without limescale which is then used
to wash the crockery.

This dishwasher offers a setting which helps to reduce
pollution and optimises washing performance in accordance
with the water hardness level in your area. This information
can be obtained from the organisation which supplies your
household with water.- Open the door and switch on the
machine by pressing the ON/OFF button.
- Press the P button and hold for approximately 5 seconds;
two short beeps will sound and the indicator light
corresponding to the set degree of hardness will flash slowly
on the control panel  (the water softening system is set to
number 3).
- Press the P button repeatedly until the desired hardness
level has been reached (1-2-3-4-5

*


see Water hardness

table

).

E.g. hardness 1 (indicator light 1 flashing)
hardness 2 (indicator light 1 illuminated, indicator light 2
flashing).
hardness 3 (indicator lights 1 and 2 illuminated, indicator light
3 flashing and so on).
- To exit the function, wait approximately few seconds or press
another option

*

 button, or switch off the machine using the

ON/OFF

 button.

Even if using multi-functional tablets, the salt dispenser should
still be filled.

(°dH = hardness measured in German degrees - °f = hard-
ness measured in French degrees - mmol/l = millimoles per
litre)

Measuring out the refined salt

In order to achieve the best possible results using a wash
cycle, make sure that the dispenser is never empty. Refined
salt removes limescale from the water, thus avoiding the
formation of deposits on crockery.
The salt dispenser is located in the lower part of the
dishwasher (

see Description

) and should be filled:

• When the green float

*

 cannot be seen by simply looking

at the cap of the salt dispenser.

• When the LOW SALT

*

 indicator light on the control panel is

illuminated;

1. Remove the lower rack and unscrew the
container cap (anticlockwise).
2. The first time you do this: fill the water tank
right up to its edge.
3. Position the funnel

*

  (

see figure)

 and fill

the salt container right up to its edge (this should hold
approximately 1 kg); it is not unusual for a little water to leak
out.
4. Remove the funnel

*

 and wipe any salt residue away from

the opening; rinse the cap under running water and then screw
it on, the head facing downwards so as to let the water flow
out of the four cracks which are arranged in a star shape on
the lower part of the cap. (Salt cap with green float

*

)

It is advisable to perform this procedure every time you
add salt to the container.

Make sure the cap is screwed on tightly, so that no detergent
can get into the container during the wash cycle (this could
damage the water softener beyond repair).

 When necessary, measure out the salt before a wash

cycle so that any saline solution which has leaked out of the
salt dispenser is removed.

Only available in selected models.

G

F


Water Hardness Table 

Average salt container 

capacity duration

**


Level


°dH


°fH


mmol/l


months


0 - 6 

0 - 10 

0 - 1 

7 months 

6 - 11 

11 - 20 

1,1 - 2 

5 months 

3  12 - 17  21 - 30 

2,1 - 3 

             3 months 

4  17 - 34  31 - 60 

3,1 - 6 

2 months 

5

*


34 - 50 


61 - 90 


6,1 - 9 


2/3 weeks 

For values between 0°f and 10°f, we do not recommend the  

use of salt

.

 * 

this setting may cause a slight increase in the 

duration of


the cycles. 

**

 for 1 wash cycle per day.


1
2
3
4
5
6
7
8
9
10
11
12
13
14
15
16
17
18
19
20
21
22
23
24
25
26
27
28
29
30
31
32
33
34
35
36
Оглавление инструкции
  • Страница 1 из 37
    Рук ов одств о по Руков ово дство эк сплу ат ации эксплу сплуа EN RU ПОС УДОМОЕЧНАЯ МАШИНА ПОСУ Содержание Монтаж, 2-3-4 Русский, 1 English,14 KZ Қазақша, 25 Расположение и нивелировка Водопроводное и электрическое подсоединение Предупреждения по первому использованию машины Ecodesign Regulation
  • Страница 2 из 37
    Монтаж RU Важно сохранить данное руководство для его последующих консультации. В случае продажи, передачи или переезда проверьте, чтобы данное техническое руководство сопровождало изделие. Внимательно прочитайте инструкции: в них содержатся важные сведения об установке изделия, его эксплуатации и
  • Страница 3 из 37
    Пленка защиты от конденсата * ВНИМАНИЕ: ОПАСНОЕ НАПРЯЖЕНИЕ! Категорически запрещается обрезать шланг подачи воды, так как вдоль него проходят элементы под напряжением. После установки посудомоечной машины в нишу кухонного элемента откройте ее дверцу и наклейте прозрачную самоклеящуюся полоску снизу
  • Страница 4 из 37
    RU Изделие: Посудомоечная машина Торг ов оргов овая ая марк а: овый знак изг о т овит е ля: Торг орговый изго овите Модель: LFT 21677 Изготовитель: Indesit Company Страна-изготовитель: Сделано в Польше (made in Poland) Загрузка 12 столовых наборов Размеры ширина 59,5 см высота 82 см глубина 57 см
  • Страница 5 из 37
    Описание из де лия изде делия Общий вид RU 1. 2. 3. 4. 5. 6. 7. 8. 9. 10. 11. 12. Верхняя корзина Верхний ороситель Откидные полки Регулятор высоты корзины Нижняя корзина Нижний ороситель Корзинка для столовых приборов Фильтр мойки Бачок соли Дозаторы моечного средства и дозатор ополаскивателя
  • Страница 6 из 37
    Загр узк ор зин Загрузк узка орзин а ккор RU Перед загрузкой корзин удалите с посуды остатки пищи, вылейте оставшееся содержимое из стаканов и чашек. Загр узив посу ду пров ерь чт обы л опасти Загрузив посуду ду,, проверь ерьтт е, чтобы оросителей могли свободно вращаться. Верхняя корзина В эту
  • Страница 7 из 37
    Вк лю Вклю лючение чение и эксплуатация Запу домое чной машины Запуск посудомое домоечной ск посу 1. Откройте водопроводный кран. 2. Откройте дверцу и нажмите кнопку ВКЛ.-ВЫКЛ ВКЛ.-ВЫКЛ.: вы услышите короткий звуковой сигнал, индикатор ВКЛ./ВЫКЛ ВКЛ./ВЫКЛ. и индикаторы программ загорятсяна
  • Страница 8 из 37
    Программы Описание ДОПОЛНИТЕЛЬНЫХ ФУНКЦИЙ смотрите в таблице Дополнительных функций на странице разделов Запуск и эксплуатация. RU Количество и тип программ и дополнительных функций варьирует в зависимости от модели посудомоечной машины. Рекомендации по выбору программы Экологическая мойка с низки
  • Страница 9 из 37
    Опо ласкив атель и Ополаскив ласкива регенерирующая соль Используйте только специальные средства для посудомоечных машин. Не используйте поваренную или промышленную соль и моющие средства для ручного мытья посуды. Следуйте инструкциям, приведенным на упаковке моющего средства. Если вы используете
  • Страница 10 из 37
    Техническ ое хническое обслуживание и уход RU Отключение воды и электрического тока • Перекрывайте водопроводный кран после каждой мойки во избежание опасности утечек. • Выньте штепсельную вилку машины из электророзетки перед началом чистки и технического обслуживания. Чистка посудомое домоечной
  • Страница 11 из 37
    Пре дупре ждения и рек омендации Предупре дупреждения рекомендации Изделие спроектировано и изготовлено в соответствии с международными нормативами по безопасности. Необходимо внимательно прочитать настоящие предупреждения, составленные в целях вашей безопасности. Экономия электроэнергии и охрана
  • Страница 12 из 37
    Неисправности и методы их устранения RU В случае обнаружения аномалий в работе изделия проверьте следующие пункты перед тем, как обратиться в Сервис технического обслуживания. Неисправности: Возможные причины / Методы устранения: Посудомоечная машина не запуска • Выключите м ашин у при п омощи кноп
  • Страница 13 из 37
    Сервисное обслуживание Мы забо тимся о св оих пок упа араемся сде ла слу жив ание наибо лее заботимся своих упатт е лях и ст стараемся сдела лать обслу служив живание наиболее ть сервисное об у ем наши про дук обы сде ла ение с к а честв енным. Мы пост оянно с ов ершенств чественным. постоянно
  • Страница 14 из 37
    Operating instructions DISHWASHER EN English,14 Contents Installation, 15-16 Positioning and levelling Connecting the water and electricity supplies Advice regarding the first wash cycle Technical data Ecodesign Regulation Description of the appliance, 17 Overall view Control panel Loading the
  • Страница 15 из 37
    Installation Keep this instruction manual in a safe place for future reference. If the appliance is sold, given away or moved, please ensure the manual is kept with the machine, so that the new owner may benefit from the advice contained within it. Please read this instruction manual carefully: it
  • Страница 16 из 37
    EN Electrical connection Anti-condensation strip* Before inserting the plug into the electrical socket, make sure that: • The socket is earthed and complies with current regulations. • The socket can withstand the maximum load of the appliance, which is indicated on the data plate located on the
  • Страница 17 из 37
    Description of the appliance Overall view EN 1. 2. 3. 4. 5. 6. 7. 8. 9. 10. 11. 12. Upper rack Upper sprayer arm Tip-up compartments Rack height adjuster Lower rack Lower sprayer arm Cutlery basket Washing filter Salt dispenser Detergent and rinse aid dispensers Data plate Control Panel*** Control
  • Страница 18 из 37
    Loading the racks EN Before loading the racks, remove all food residue from crockery and empty liquids from glasses and cups. After loading the appliance, make sure that the sprayer arms can rotate freely. Upper rack Load this rack with delicate and lightweight crockery: glasses, cups, saucers and
  • Страница 19 из 37
    Start-up and use Starting the dishwasher Measuring out the detergent 1. Turn the water tap on. 2. Open the door and press the ON/OFF button: you will hear a short beep and the ON/OFF and wash cycle indicator lights switch on for a few seconds. 3. Measure out the detergent (see below). 4. Load the
  • Страница 20 из 37
    Wash cycles EN If the crockery is only lightly soiled or if it has been rinsed with water before being placed in the dishwasher, reduce the amount of detergent used accordingly. The number and type of wash cycles and options may vary depending on the dishwasher model. Wash cycle selection
  • Страница 21 из 37
    Rinse aid and refined salt Only use products which have been specifically designed for dishwashers. Do not use table salt or industrial salt, or washing up liquid. Follow the instructions given on the packaging. If using a multi-functional product it is not necessary to add rinse aid; however, we
  • Страница 22 из 37
    Care and maintenance EN Shutting off the water and electricity supplies • Turn off the water tap after every wash cycle to avoid leaks. • Always unplug the appliance when cleaning it and when performing maintenance work. Cleaning the dishwasher • The external surfaces of the machine and the control
  • Страница 23 из 37
    Precautions and advice, Assistance This appliance was designed and manufactured in compliance with current international safety standards. The following information has been provided for safety reasons and should therefore be read carefully. General safety • This appliance is not intended for use
  • Страница 24 из 37
    Troubleshooting EN Whenever the appliance fails to work, check for a solution from the following list before calling for Assistance. Problem: Possible causes / Solutions: The dishwasher does not start or cannot be controlled • Switch off the appliance by pressing the ON/OFF button, switch it back
  • Страница 25 из 37
    Пайдалану нұсқаулығы ЫДЫС ЖУУ МАШИНАСЫ KZ Қазақша, 25 Мазмұны Орнату, 26-27-28 Орнату және түзулеу Су мен токты қосу Бірінші жуу циклына қатысты кеңес Техникалық деректері - Ecodesign Regulation Құрылғы сипаттамасы, 29 Жалпы шолу Басқару тақтасы Тартпаларды жүктеу, 30 Төменгі тартпа Ыдыс-аяқ себеті
  • Страница 26 из 37
    Орнату KZ Бұл нұсқаулықты кейін қарау үшін жоғалып қалмайтындай бір жерге сақтап қойыңыз. Құрылғы сатылса, тегін берілсе немесе жылжытылса, нұсқаулық машинамен бірге болатынын қамтамасыз етіңіз, солайша оның жаңа иесі нұсқаулықтың ішіндегі кеңестерді пайдалана алады. Осы нұсқаулықты мұқият оқып
  • Страница 27 из 37
    Су алып кетуден қорғау Су алып кетуіне жол бермеу үшін, ыдыс жуу машинасы: - қалыпсыз жағдайларда немесе құрылғының ішінен су ағып кеткен кезде су көзін бұғаттайтын арнайы жүйемен жабдықталған. Сондай-ақ, кейбір үлгілер New Acqua Stop* деп аталатын қосымша қауіпсіздік құралымен жабдықталған, ол
  • Страница 28 из 37
    KZ Құрал: Ыдыс жуу машинасы Сауда атауы Өндірушінің сауда белгісі Үлгі Дайындаған Өндірілген елі Сыйымдылығы Өлшемдері Ток желісіндегі кернеудің немесе кернеулер ауқымының номиналды мәні Электр токтың стандартты түрі немесе айнымалы токтың номиналды жиілігі Су қысымы Сақтандырғыш Жуу сыныбы Кептіру
  • Страница 29 из 37
    Құрылғы сипаттамасы Жалпы шолу KZ 1. 2. 3. 4. 5. 6. 7. 8. 9. 10. 11. 12. Жоғарғы тартпа Жоғарғы тозаңдатқыш өзекше Қайырмалы бөлімшелер Тартпаның биіктігін реттеу құралы Төменгі тартпа Төменгі тозаңдатқыш өзекше Ыдыс-аяқ себеті Жуу сүзгісі Тұз диспенсері Жуғыш зат пен шаюға көмекші зат
  • Страница 30 из 37
    Тартпаларды жүктеу KZ Тартпаларды жүктемес бұрын, ыдыс-аяқтан барлық тамақ қалдықтарын тазалаңыз және стақандар мен шыныаяқтан сұйықтықтарды төгіңіз. Құрылғыны жүктегеннен кейін, тозаңдатқыш өзекшелер еркін жылжи алатынын тексеріңіз. Жоғарғы тартпа Бұл тартпаға нәзік және жеңіл ыдыс-аяқты салыңыз:
  • Страница 31 из 37
    Қосу және пайдалану Ыдыс жуу машинасын іске қосу Жуғыш затты өлшеу 1. Шүмекті ашыңыз. 2. Есікті ашып, ҚОСУ/ӨШІРУ түймесін басыңыз: қысқа сигнал естіледі және ҚОСУ/ӨШІРУ мен жуу циклы индикатор шамдары бірнеше секундқа жанады. 3. Жуғыш затты өлшеңіз (төменнен қараңыз). 4. Тартпаларды жүктеңіз
  • Страница 32 из 37
    Жуу циклдары KZ Ыдыс-аяқ аз ластанған болса немесе ыдыс жуу машинасына салынбас бұрын шайылған болса, жуғыш заттың мөлшерін азайтыңыз. Ыдыс жуу машинасының үлгісіне байланысты жуу циклдарының саны мен түрі және опциялар әртүрлі болуы мүмкін. Жуу циклын таңдау нұсқаулары Кастрөлдер мен табақтарға
  • Страница 33 из 37
    Шаюға көмекші зат және тазаланған тұз Ыдыс жуу машиналарына арналып жасалған өнімдерді ғана қолданыңыз. Ас тұзын, өндіріс тұзын немесе қолмен ыдыс жууға арналған сұйықтықты пайдаланбаңыз. Орамада берілген нұсқауларды орындаңыз. Бірнеше функциясы бар өнімді қолданатын болсаңыз, шаюға көмекші затты
  • Страница 34 из 37
    Күтім көрсету және техникалық қызмет көрсету KZ Су мен токты өшіру • Су ағып кетпеуі үшін әрбір жуу циклынан кейін су шүмегін жауып отырыңыз. • Құрылғыны тазалаған кезде және техникалық қызмет көрсету жұмыстарын орындаған кезде оны токтан ажыратыңыз. Ыдыс жуу машинасын тазалау • Құрылғының сыртқы
  • Страница 35 из 37
    Сақтық шаралары, кеңес және көмек Бұл құрылғы ағымдағы халықаралық қауіпсіздік стандарттарына сай құрылған және өнідірілген. Төмендегі ақпарат қауіпсіздік мақсатында берілген, сондықтан оны мұқият оқып шығу қажет. Жалпы қауіпсіздік • Бұл құрылғы қауіпсіздіктеріне жауапты адам құрылғыны қолдану
  • Страница 36 из 37
    Ақаулықтарды жою KZ 195082778.03 01/2013 pb - Xerox Fabriano Құрылғы жұмыс істемей қалған кезде, Көмек қызметіне телефон соқпас бұрын төмендегі тізімнен шешімді іздеңіз. Ақаулық: Ыдыс жуу машинасы іске қосылмайды немесе оны басқару мүмкін емес Есік жабылмайды Ыдыс жуу машинасынан су ағызылмайды.
  • Страница 37 из 37