19
How To Use Your Appliance
The various features of cooker are controlled through the
knobs and buttons located on the control panel.
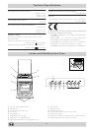
Control Knobs for the Gas Burners on the Hob (N)
The position of the gas burner controlled by each one of the
knobs is shown by a solid ring
•
. To light one of the burners,
hold a lighted match or lighter near the burner and, at the
same time, press down and turn the corresponding knob
counter clockwise to the maximum
E
setting. Each burner
can be operated at its maximum, minimum or intermediate
power. Shown on the knob are the different symbols for off
•
(the knob is on this setting when the symbol corresponds
with the reference mark on the control panel), for maximum
E
and minimum
C
.
To obtain these settings, turn the knob counter clockwise
with respect to the off position. To turn off the burner, turn the
knob clockwise until it stops (corresponding again with the
•
symbol).
Electronic Ignition for the Gas Hob
Some of the models are provided with instant electronic light-
ing of the hob gas burners; these models are identified by
the presence of a lighting device (see detail C). This device
operates when a slight pressure is applied to the “T”
button
marked with
symbol. To light a specific burner just press
the button labelled “T” while pushing the corresponding knob
all the way in and turning it counter-clockwise until it lights.
For immediate lighting, first press the button and then
turn the knob.
Important:
Should the burner flames accidentally go
out, turn off the control knob and wait at least 1 minute
before trying to relight.
Models with Flame Failure Device for Hob Burners
These models are identified by the presence of a flame de-
tection device (see detail H).
Important: Since the top burners are equipped with a safety
device, after lighting the burner keep the knob pressed in
for about 3 seconds to allow the gas to pass until the safety
thermocouple is heated.
Attention: The first time you use the oven we recommend
that you set the thermostat on the highest setting and leave
the oven on for about a half of an hour with nothing in it.
Then, open the oven door and let the room air. The odour
that is often detected during this initial use is due to the
evaporation of substances used to protect the oven dur-
ing storage and until it is installed.
Attention: Only use the bottom shelf of the oven when
using the rotisserie to cook (where present). For all other
types of cooking, never use the bottom shelf and never
place anything on the bottom of the oven when it is in
operation because this could damage the enamel. Always
place your cookware (dishes, aluminium foil, etc. etc.) on
the grate provided with the appliance inserted especially
along the oven guides.
Attention: to use the oven in manual mode without the
cooking control timer, match the indicator on the control
panel with the
symbol on the timer knob.
The Oven Control Knobs
This multi-function oven combines the advantages of tra-
ditional convection ovens with those of the more modern
fan assisted models in a single appliance.
It is an extremely versatile appliance that allows you to
choose easily and safely between 5 different cooking
modes. The various features offered by the oven are se-
lected by means of selector knob “L” and thermostat “M”
situated on the control panel.
Notice: The first time you use your appliance, we recom-
mend that you set the thermostat to the highest setting
and leave the oven on for about half an hour with nothing
in it, with the oven door shut. Then, open the oven door
and let the room air. The odour that is often detected dur-
ing this initial use is due to the evaporation of substances
used to protect the oven during storage and until it is in-
stalled.
Notice: Place the dripping pan provided on the bottom
shelf of the oven to prevent any sauce and/or grease from
dripping onto the bottom of the oven only when grilling
food or when using the rotisserie (only available on cer-
tain models). For all other types of cooking, never use the
bottom shelf and never place anything on the bottom of
the oven when it is in operation because this could dam-
age the enamel. Always place your cookware (dishes, alu-
minium foil, etc. etc.) on the grid provided with the appli-
ance inserted especially along the oven guides
Attention: to use the oven in manual mode without the
cooking control timer, match the indicator on the control
panel with the
symbol on the timer knob.
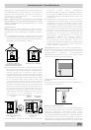
“Defrosting” Mode
Position of thermostat knob “M”: any
The fan located on the bottom of the oven makes the air
circulate at room temperature around the food. This is
recommended for the defrosting of all types of food, but in
particular for delicate types of food which do not require
heat, such as for example: ice cream cakes, cream or
custard desserts, fruit cakes. By using the fan, the
defrosting time is approximately halved. In the case of
meat, fish and bread, it is possible to accelerate the
process using the “multi-cooking” mode and setting the
temperature to 80° - 100°C.
Convection Mode
Position of thermostat knob “M”: between 60°C and Max.
On this setting, the top and bottom heating elements come
on. This is the classic, traditional type of oven which has
been perfected, with exceptional heat distribution and re-
duced energy consumption. The convection oven is still
unequalled when it comes to cooking dishes made up of
several ingredients, e.g. cabbage with ribs, Spanish style
cod, Ancona style stockfish, tender veal strips with rice,
etc. Excellent results are achieved when preparing veal
or beef-based dishes as well (braised meats, stew, gou-
lash, wild game, ham etc.) which need to cook slowly and