Инструкция для INDESIT WI 60 X

(скачивание инструкции бесплатно)
Формат файла: PDF
Доступность: Бесплатно как и все руководства на сайте. Без регистрации и SMS.
Дополнительно: Чтение инструкции онлайн
background image

14

GB

Keep this instruction manual in a safe place for

future reference. Should the appliance be sold,

transferred  or  moved,  make  sure  the  instruction

manual  accompanies  the  washing  machine  to  inform

the  new  owner  as  to  its  operation  and  features.

Read  these  instructions  carefully:  they  contain  vital

information  on  installation,  use  and  safety.

Unpacking and levelling

Unpacking

1.  Unpack  the  washing  machine.

2.  Check  whether  the  washing  machine  has  been

damaged during transport. If this is the case, do not

install it and contact your retailer.

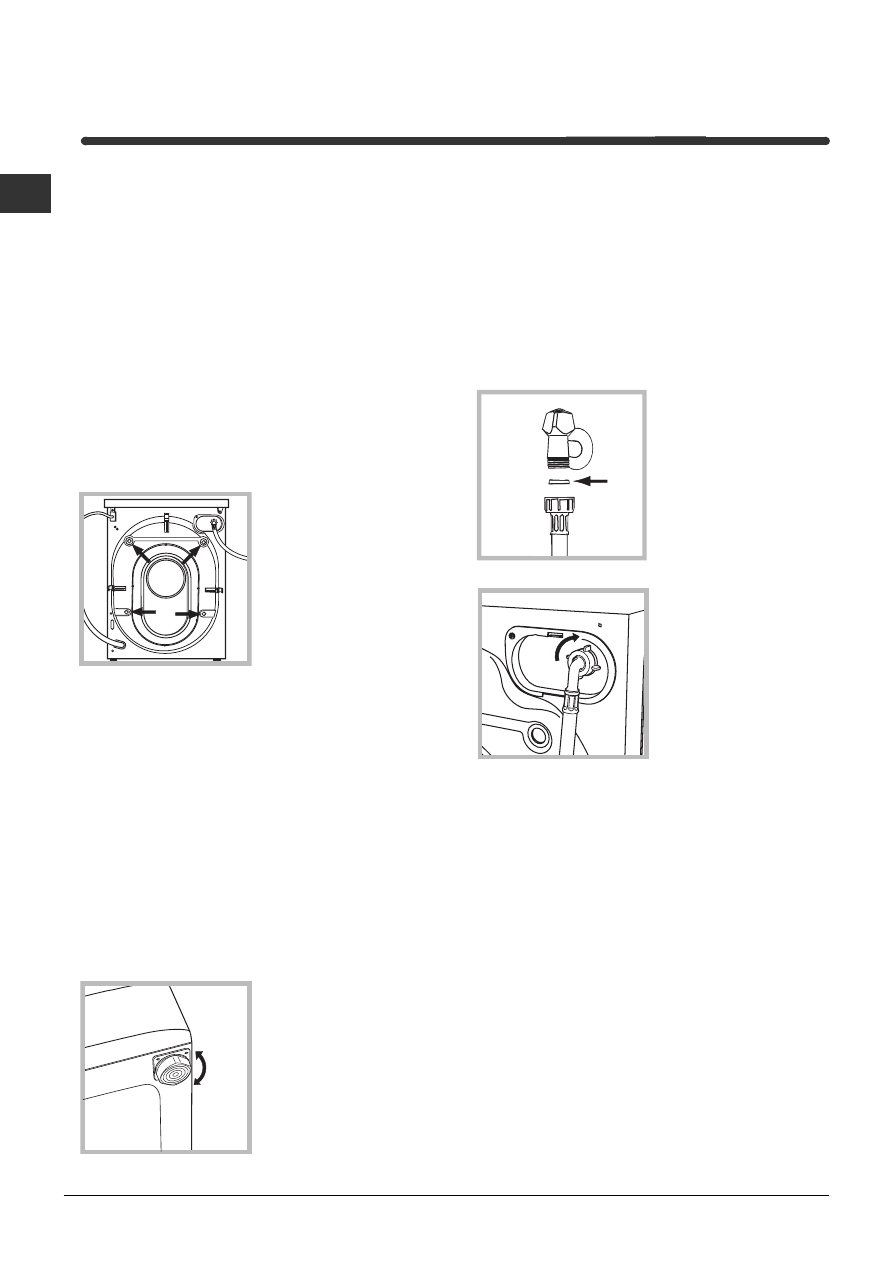
3.  Remove  the  4

protective  screws  and

the  rubber  washer  with

the  respective  spacer,

situated on the rear of

the  appliance 

(see

figure)

.

4. Seal the gaps using the plastic plugs provided.

5. Use the plug provided to seal the three holes

where the plug was housed, situated on the lower

right-hand side on the rear of your appliance.

6. Keep all the parts: you will need them again if the

washing  machine  needs  to  be  moved  to  another

location.

Packaging  materials  are  not  children's  toys.

Levelling

1. Install the washing machine on a flat sturdy floor,

without resting it up against walls, furniture cabinets

or  other.

2. If the floor is not

perfectly  level,  compen-

sate  for  any  unevenness

by tightening or

loosening the adjustable

front feet 

(see figure)

;

the angle of inclination,

measured  according  to

the  worktop,  must  not

exceed  2°.

Levelling your appliance correctly will provide it with

stability and avoid any vibrations, noise and shifting

during operation. If it is placed on a fitted or loose

carpet, adjust the feet in such a way as to allow

enough  room  for  ventilation  beneath  the  washing

machine.

Electric and water connections

Connecting the water inlet hose

1. Insert seal A into the

end of the inlet hose

and  screw  the  latter

onto a cold water tap

with a 3/4 gas threaded

mouth 

(see figure)

.

Before  making  the

connection,  allow  the

water to run freely until

it is perfectly clear.

2. Connect the other end

of the water inlet hose to

the  washing  machine,

screwing  it  onto  the

appliance's  cold  water

inlet, situated on the top

right-hand  side  on  the

rear  of  the  appliance

(see figure)

.

3. Make sure there are no kinks or bends in the

hose.

The water pressure at the tap must be within the

values indicated in the Technical details table

(on the next page)

.

If the water inlet hose is not long enough, contact

a  specialist  store  or  an  authorised  serviceman.

Installation

A

1
2
3
4
5
6
7
8
9
10
11
12
13
14
15
16
17
18
19
20
21
22
23
24
Оглавление инструкции
  • Страница 1 из 25
    Ðóêîâîäñòâî ïî ýêïóàòàöèè ÑÒÈÐÀËÜÍÀß ÌÀØÈÍÀ Ñîäåðæàíèå CIS ÐÓÑÑÊÈÉ, 1 GB English, 13 CIS Óñòàíîâêà, 2-3 Ðàñïàêîâêà è âûðàâíèâàíèå, 2 Ïîäêëþ÷åíèå ê âîäîïðîâîäíîé è ýëåêòðè÷åñêîé ñåòè, 2-3 Ïðîáíûé öèêë ñòèðêè, 3 Òåõíè÷åñêèå õàðàêòåðèñòèêè, 3 Îïèñàíèå ñòèðàëüíîé ìàøèíû, 4 Ïàíåëü óïðàâëåíèÿ, 4 Çàïóñê
  • Страница 2 из 25
    Óñòàíîâêà +15  Ñîõðàíèòå äàííîå ðóêîâîäñòâî. Îíî äîëæíî áûòü â êîìïëåêòå ñî ñòèðàëüíîé ìàøèíîé â ñëó÷àå ïðîäàæè, ïåðåäà÷è îáîðóäîâàíèÿ èëè ïðè ïåðååçäå íà íîâóþ êâàðòèðó, ÷òîáû íîâûé âëàäåëåö îáîðóäîâàíèÿ ìîã îçíàêîìèòüñÿ ñ ïðàâèëàìè åãî ôóíêöèîíèðîâàíèÿ è îáñëóæèâàíèÿ.  Âíèìàòåëüíî ïðî÷èòàéòå
  • Страница 3 из 25
    Ïîäñîåäèíåíèå ñëèâíîãî øëàíãà Ïî çàâåðøåíèè óñòàíîâêè, ïåðåä íà÷àëîì ýêñïëóàòàöèè íåîáõîäèìî ïðîèçâåñòè îäèí öèêë ñòèðêè ñî ñòèðàëüíûì ïîðîøêîì, íî áåç áåëüÿ, ïî ïðîãðàììå 90°C áåç ïðåäâàðèòåëüíîé ñòèðêè. Òåõíè÷åñêèå õàð àêòåð èñòèêè Ðàçìåðû øèðèíà 59,5 ñì âûñîòà 85 ñì ãëóáèíà 53,5 ñì Çàãð óçêà 1 -
  • Страница 4 из 25
    Îïèñàíèå ñòèðàëüíîé ìàøèíû Ïàíåëü óïðàâëåíèÿ +15 Êíîïêè âûáîðà ÔÓÍÊÖÈÈ Êíîïêà ÂÊËÞ×ÅÍÈÅ/ ÂÛÊËÞ×ÅÍÈÅ Èíäèêàòîð ÂÊËÞ×ÅÍÈÅ/ ÂÛÊËÞ×ÅÍÈÅ Ðàñïðåäåëèòåëü ìîþùèõ ñðåäñòâ Ðàñïðåäåëèòåëü ìîþùèõ ñðåäñòâ äëÿ çàãðóçêè ñòèðàëüíîãî ïîðîøêà è ñìÿã÷èòåëåé (ñì. ñ. 7). Èíäèêàòîð ÂÊËÞ×ÅÍÈÅ/ÂÛÊËÞ×ÅÍÈÅ ãîðèò, êîãäà
  • Страница 5 из 25
    Çàïóñê ìàøèíû. Ïðîãðàììû Êðàòêèå èíñòðóêöèè: Ïîðÿäîê çàïóñêà ïðîãðàììû 5. Ïî îêîí÷àíèè ñòèðêè ïîäîæäèòå ïðèìåðíî 3 ìèíóòû. Âûêëþ÷èòå ñòèðàëüíóþ ìàøèíó íàæàòèåì êíîïêè . Îòêðîéòå äâåðöó ìàøèíû. Âûíóâ áåëüå, îñòàâüòå äâåðöó ìàøèíû ïðèîòêðûòîé, ÷òîáû äàòü èñïàðèòüñÿ îñòàâøåéñÿ âëàãå. Ïåðåêðîéòå êðàí
  • Страница 6 из 25
    Ïåðñîíàëèçàöèÿ ñòèðêè Ôóíêöèè Ðàçëè÷íûå ôóíêöèè ñòèðêè ìàøèíû ïîçâîëÿþò äîñòè÷ü æåëàåìîé ÷èñòîòû è áåëèçíû âàøåãî áåëüÿ. Äëÿ âêëþ÷åíèÿ äîïîëíèòåëüíûõ ôóíêöèé íàæìèòå êíîïêó íóæíîé ôóíêöèè â ñîîòâåòñòâèè ñ ïðèâåäåííîé íèæå òàáëèöåé. +15 Ôóíêöèè Kíîïêà ýêñòðàýêîíîìèè Kíîïêà èñêëþ÷åíèÿ îòæèìà
  • Страница 7 из 25
    Ìîþùèå ñðåäñòâà è áåëüå Ðàñïðåäåëèòåëü ìîþùèõ ñðåäñòâ 3 Ïðîãðàììû Ìîþùèå ñðåäñòâà Îòäåëåíèå 1: ìîþùåå ñðåäñòâî äëÿ ïðåäâàðèòåëüíîé ñòèðêè (ïîðîøîê) Îòäåëåíèå 2: ìîþùåå ñðåäñòâî äëÿ ñòèðêè (ïîðîøîê èëè æèäêîå) Æèäêîå ñðåäñòâî äëÿ ñòèðêè çàëèâàåòñÿ íåïîñðåäñòâåííî ïåðåä çàïóñêîì ìàøèíû. Îòäåëåíèå 3:
  • Страница 8 из 25
    Ïðåäóïðåæäåíèÿ è ðåêîìåíäàöèè +15  Ñòèðàëüíàÿ ìàøèíà ñïðîåêòèðîâàíà è èçãîòîâëåíà â ñîîòâåòñòâèè ñ ìåæäóíàðîäíûìè íîðìàìè áåçîïàñíîñòè. Âíèìàòåëüíî ïðî÷èòàéòå íàñòîÿùèå ïðåäóïðåæäåíèÿ, ñîñòàâëåííûå â öåëÿõ âàøåé áåçîïàñíîñòè. Óòèëèçàöèÿ Îáùèå ïðàâèëà áåçîïàñíîñòè • Óòèëèçàöèÿ ñòàðîé ñòèðàëüíîé
  • Страница 9 из 25
    Îáñëóæèâàíèå è óõîä ×èñòêà íàñîñà • Ïåðåêðûâàéòå âîäîïðîâîäíûé êðàí ïîñëå êàæäîé ñòèðêè. Òàêèì îáðàçîì ñîêðàùàåòñÿ èçíîñ âîäîïðîâîäíîé ñèñòåìû ñòèðàëüíîé ìàøèíû è óñòðàíÿåòñÿ âåðîÿòíîñòü ïðîòå÷åê. Ñòèðàëüíàÿ ìàøèíà èìååò ñëèâíîé íàñîñ ñàìîî÷èùàþùåãîñÿ òèïà, êîòîðûé íå òðåáóåò î÷èñòêè èëè îñîáîãî
  • Страница 10 из 25
    Íåèñïðàâíîñòè è ìåòîäû èõ óñòðàíåíèÿ +15  ñëó÷àå íåóäîâëåòâîðèòåëüíûõ ðåçóëüòàòîâ ñòèðêè èëè âîçíèêíîâåíèÿ íåèñïðàâíîñòåé, ïðåæäå ÷åì îáðàòèòüñÿ â Àâòîðèçîâàííûé Ñåðâèñíûé öåíòð (ñì. ñ. 11), ïðî÷èòàéòå ýòîò ðàçäåë.  áîëüøèíñòâå ñëó÷àåâ Âû ìîæåòå ðåøèòü âîçíèêøèå ïðîáëåìû ñàìè. Îáíàðóæåííàÿ
  • Страница 11 из 25
    Ñåðâèñíîå îáñëóæèâàíèå  Íå ïîëüçóéòåñü óñëóãàìè ëèö, íå óïîëíîìî÷åííûõ Ïðîèçâîäèòåëåì. Ïðè ðåìîíòå òðåáóéòå èñïîëüçîâàíèÿ îðèãèíàëüíûõ çàïàñíûõ ÷àñòåé. Îïèñàíèå Ïðè îáðàùåíèè â Àâòîðèçîâàííûé Ñåðâèñíûé öåíòð ñîîáùèòå: • òèï íåèñïðàâíîñòè; • íîìåð ãàðàíòèéíîãî äîêóìåíòà (ñåðâèñíîé êíèæêè,
  • Страница 12 из 25
    +15 
  • Страница 13 из 25
    Instructions for use WASHING MACHINE Contents GB English GB Installation, 14-15 Unpacking and levelling, 14 Electric and water connections, 14-15 The first wash cycle, 15 Technical details, 15 Washing machine description, 16 Control panel, 16 Starting and Programmes, 17 Briefly: how to start a
  • Страница 14 из 25
    Installation  Keep this instruction manual in a safe place for future reference. Should the appliance be sold, transferred or moved, make sure the instruction manual accompanies the washing machine to inform the new owner as to its operation and features. GB  Read these instructions carefully:
  • Страница 15 из 25
     Do not use extensions or multiple sockets. Connecting the drain hose  The power supply cable must never be bent or dangerously compressed.  The power supply cable must only be replaced by an authorised serviceman. GB Installation 65 - 100 cm Connect the drain hose, without bending it, to a
  • Страница 16 из 25
    Washing machine description Control panel GB FUNCTION Buttons ON-OFF Button ON-OFF Led Detergent dispenser Knob Detergent dispenser: to add detergent and fabric softener (see page 19). ON/OFF led, to find out whether the washing machine is on. FUNCTION buttons: to select the functions available.
  • Страница 17 из 25
    Starting and Programmes Briefly: starting a programme 1. Set the desired programme. 2. Load your laundry into the appliance and shut the door. 3. Add the detergent and any fabric softener (see page 19). . 4. Turn the appliance on by pressing button Type of fabric and degree of soil Programmes Cycle
  • Страница 18 из 25
    Personalisations Functions To enable the functions, press the button corresponding to the desired function, according to the table below. GB Function Effect C omm ents Half load Reduces water cons umption during the rins e cycles . W e recommend that you use this function only with small laundry
  • Страница 19 из 25
    Detergents and laundry Good washing results also depend on the correct dose of detergent: adding too much detergent won't necessarily make for a more efficient wash, and may in fact cause build up on the interior of your appliance and even pollute the environment. Curtains: fold curtains and place
  • Страница 20 из 25
    Precautions and advice GB  The washing machine was designed and built in compliance with the applicable international safety regulations. The following information is provided for your safety and should consequently be read carefully. Disposal General safety • Disposing of an old washing machine:
  • Страница 21 из 25
    Care and maintenance Cutting off the water or electricity supply • Unplug your appliance when cleaning it and during all maintenance operations. The exterior and rubber parts of your appliance can be cleaned with a soft cloth soaked in lukewarm soapy water. Do not use solvents or abrasives. To
  • Страница 22 из 25
    Troubleshooting Your washing machine could fail to work. Before calling for Assistance (see page 23), make sure the problem can't easily be solved by consulting the following list. GB Problem Possible causes/Solution: The washing machine won't start. • The appliance is not plugged into the socket,
  • Страница 23 из 25
    Service  Always request the assistance of authorised servicemen. Description Notify the operator of: • the type of problem; • the appliance model (Mod.); • the serial number (S/N). This information can be found on the data plate situated on the rear of the washing machine. GB Installation Before
  • Страница 24 из 25
    195041450.00 11/2003 - Xerox Business Services GB 24
  • Страница 25 из 25