32
Batteriewechsel
Informationen über entsprechende Annahmestellen erhalten Sie
bei Ihrer örtlichen Kommunalbehörde, Entsorgungsbetrieb oder
der Verkaufsstelle dieses Gerätes.
– GB – Battery change
A weak or an extinguished computer display makes a battery
change necessary. The computer is equipped with two batteries.
Perform the battery change as described below:
■
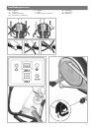
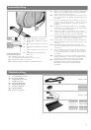
Remove the lid of the battery compartment and replace the
batteries by two new batteries of type AA 1,5V.
■
Unscrew the back of the cockpit and replace the battery with
the correct type: 3VLithium CR2032.
■
When inserting the batteries pay attention to the designation
an the bottom of the battery compartment.
■
Should there be any misoperation after switching on the com-
puter again, shortly disconnect the batteries once again and
re-insert them.
IImportant: The guarantee does not cover worn-out batteries.
Disposal of used batteries and storage batteries
This symbol tells you that batteries and storage batteries
must not be disposed of with the normal household wa-
ste.
The symbols Hg (mercury) and Pb (lead) underneath the
crossed-out rubbish bin also tell you that the battery or storage
battery contains more than 0.0005% mercury or more than
0.004% lead.
Improper disposal damages the environment and can damage
people’s health. Recycling of materials conserves precious raw
materials. When disposing of the appliance, remove all batteries
and storage batteries from the product and hand them over to the
collection point for the recycling of batteries or electrical or elec-
tronic appliances. Information about the appropriate collection
points can be obtained from your local authorities, your waste
disposal team or in the outlet where this appliance was sold.
– F – Changement de piles
Un affichage de l'ordinateur faible ou éteint impose un change-
ment des piles. L'ordinateur est équipé de deux piles. Effectuez le
changement comme suit:
■
Enlevez le couvercle du logement des piles et remplacez-les
par deux piles neuves du type AA 1,5V.
■
Dévissez l’envers du cockpit et changez la pile. Utilisez tou-
jours des piles du type 3V Lithium CR 2032.
■
Veillez au marquage au fond du logement lors de la mise en
place des piles.
■
En cas de dysfonctionnement après la remise en marche, en-
levez brièvement les piles et remettez-les ensuite.
Important: Les piles usées sont exclues des dispositions de garan-
tie.
Elimination des piles et des accumulateurs usagés.
Ce symbole indique que les piles et les accumulateurs
ne doivent pas être éliminés avec les déchets ménagers
ordinaires.
Les lettres Hg (mercure) et Pb (plomb) situées sous la pou-
belle barrée indiquent en outre que la pile/l’accumulateur conti-
ent une part de plus de 0,0005 % de mercure ou de 0,004% de
plomb.
Une mauvaise élimination nuit à l’environnement et à la santé ; le
recyclage des matériaux épargne de précieuses matières pre-
mières. Enlevez toutes les piles/accumulateurs lorsque ce produit
Pb
Pb
est mis hors service et remettez-les dans un dépôt afin de recycler
les piles ou les appareils électriques et électroniques.
Vous trouverez des informations concernant les dépôts corre-
spondants auprès de votre commune, d’une entreprise de traite-
ment ou dans le point de vente où l’appareil a été acheté.
– NL – Verwisselen van de batterijen
Een zwakke of weggevallen computerweergave maakt een bat-
terijwisseling noodzakelijk. De computer werkt op 2 batterijen.
Verwisselen van de batterijen gaat als volgt:
■
Verwijder het deksel van het batterijenvak en vervang de bat-
terijen door twee nieuwe van het type AA 1,5V.
■
Verwijder het deksel van het batterijenvak en vervang de bat-
terij door een nieuwe van het type 3V Lithium CR2032.
■
Let bij het verwisselen van de batterijen op de tekens in het
batterijenvak.
■
Treden er na het verwisselen nog foutieve functies op, haalt u
dan de batterijen nogmaals uit het vak en duw ze weer terug.
Belangrijk: batterijen vallen niet onder de garantie.
Verwijderen van gebruikte batterijen en accu’s.
Dit symbool attendeert erop dat batterijen en accu’s niet
met het normale huisvuil verwijderd mogen worden.
De letters Hg (kwikzilver) en Pb (lood) onder de doorge-
streepte vuilcontainer geven tevens aan dat de batterij /
accu een aandeel van meer dan 0,0005% kwikzilver of 0,004%
lood bevat.
Foutieve verwijdering schaadt het milieu en de gezondheid, ma-
teriaalrecycling ontziet kostbare grondstoffen.
Verwijder na het stilleggen van het product alle batterijen /
accu’s en geef ze bij het afgeefpunt voor recycling van batterijen
en elektrische en elektronische apparaten af.
Informatie over genoemde afgeefpunten kunt u bij uw plaatselijke
gemeente-instanties, het recyclingbedrijf of het verkooppunt van
dit apparaat verkrijgen.
– E – Cambio de la pilas
Una indicación debil o inexistente en el monitor hace necesario
un cambio de pilas. El ordenador dispone de dos pilas. Efectúe
el cambio de pilas de la siguiente forma:
■
Retire la tapa de la caja de pilas y cambie las pilas usadas
por nuevas del tipo AA, 1,5V
■
destornille la parte trasera de la cabina de pilotaje y cambie
la batería por una nueva de tipo 3V Lithium CR2032.
■
Al poner las pilas observe la caracterización en el fondo de
la caja de las pilas.
■
Si después de ser puesto de nuevo en funcionamiento se pro-
dujeran errores, desconecte brevemente las pilas y vuelva a
conectarlas.
Importante: Las pilas gastadas no est·n incluidas en la garantÌa.
Eliminación de baterías y pilas usadas
Este símbolo indica que las baterías y pilas no se deben
eliminar con los residuos domésticos normales.
Las letras Hg (mercurio) y Pb (plomo) debajo de un cubo
de basura tachado indican adicionalmente que las ba-
terías y pilas tienen un contenido de más de 0,0005% de mer-
curio o de 0,004% de plomo.
Una eliminación incorrecta perjudica al medio ambiente y a la
salud; el reciclaje de materiales ahorra valiosas materias primas.
En la puesta fuera de servicio de este producto, saque todas las
baterías y pilas y deséchelas en un punto de recogida para el re-
Pb
Pb