34
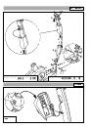
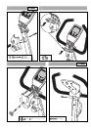
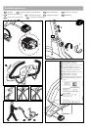
Demontage der Pedalarme
parafuso M12 (não está incluído nas peças fornecidas) no furo da
rosca (B). Depois de dar algumas voltas, pode levantar o braço do
pedal (C).
Демонтаж рычагов педалей
Для снятия рычага педали сначала удалите защитный
колпачок и винт (A). Удерживая рычаг педали, вкрутите
винт M12 (не входит в комплект поставки) в резьбовое
отверстие (B). Сделав несколько оборотов, можно снять
рычаг педали (C).
RUS
B
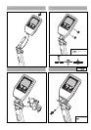
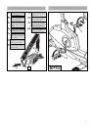
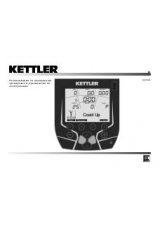
Batteriewechsel
A
– D – Batteriewechsel
Eine schwache oder erloschene Computeranzeige macht einen
Batterie wechsel erforderlich. Der Computer ist mit zwei Batterien
ausgestattet. Nehmen Sie den Batteriewechsel wie folgt vor:
■
Nehmen Sie den Batteriefachdeckel ab und ersetzen Sie die
Batterien durch zwei neue vom Typ AA 1,5V.
■
Achten Sie beim Einsatz der Batterien auf die Kennzeichnung
im Batteriefachboden.
■
Sollte es nach dem Wiedereinschalten zu Fehlfunktionen kommen,
klem men Sie die Batterien noch einmal kurz ab und wieder an.
Wichtig:
Aufgebrauchte Batterien fallen nicht unter die
Garantiebestimmungen.
Entsorgung von gebrauchten Batterien und Akkus.
Dieses Symbol weist darauf hin, dass Batterien und Akkus
nicht mit dem normalen Hausmüll entsorgt werden dürfen.
Die Buchstaben Hg (Quecksilber) und Pb (Blei) unter der
durchgestrichenen Mülltonne weisen zusätzlich darauf
hin, dass in der Batterie/dem Akku ein Anteil von mehr als
0,0005% Quecksilber oder 0,004% Blei enthalten ist.
Falsches Entsorgen schädigt Umwelt und Gesundheit,
Materialrecycling schont kostbare Rohstoffe.
Entfernen Sie bei der Stillegung dieses Produktes alle Batterien/Akkus
und geben Sie sie an einer Annahmestelle für das Recycling von
Batterien oder elektrischen und elektronischen Geräten ab.
Informationen über entsprechende Annahmestellen erhalten Sie bei
Pb
Ihrer örtlichen Kommunalbehörde, Entsorgungsbetrieb oder der
Verkaufsstelle dieses Gerätes.
– GB – Battery change
A weak or an extinguished computer display makes a battery
change necessary. The computer is equipped with two batteries.
Perform the battery change as described below:
■
Remove the lid of the battery compartment and replace the bat-
teries by two new batteries of type AA 1,5V.
■
When inserting the batteries pay attention to the designation an
the bottom of the battery compartment.
■
Should there be any misoperation after switching on the com-
puter again, shortly disconnect the batteries once again and re-
insert them.
Important: The guarantee does not cover worn-out batteries.
Disposal of used batteries and storage batteries
This symbol tells you that batteries and storage batteries
must not be disposed of with the normal household waste.
The symbols Hg (mercury) and Pb (lead) underneath the
crossed-out rubbish bin also tell you that the battery or
storage battery contains more than 0.0005% mercury or more than
0.004% lead.
Improper disposal damages the environment and can damage
people’s health. Recycling of materials conserves precious raw mate-
rials. When disposing of the appliance, remove all batteries and
storage batteries from the product and hand them over to the
collection point for the recycling of batteries or electrical or elec-
tronic appliances. Information about the appropriate collection
points can be obtained from your local authorities, your waste dis-
posal team or in the outlet where this appliance was sold.
– F – Changement de piles
Un affichage de l'ordinateur faible ou éteint impose un chan-
gement des piles. L'ordinateur est équipé de deux piles. Effectuez
le changement comme suit:
■
Enlevez le couvercle du logement des piles et remplacez-les par
deux piles neuves du type AA 1,5V.
■
Veillez au marquage au fond du logement lors de la mise en place
des piles.
■
En cas de dysfonctionnement après la remise en marche, enlevez
brièvement les piles et remettez-les ensuite.
Important: Les piles usées sont exclues des dispositions de garantie.
Elimination des piles et des accumulateurs usagés.
Ce symbole indique que les piles et les accumulateurs ne
doivent pas être éliminés avec les déchets ménagers ordi-
naires.
Les lettres Hg (mercure) et Pb (plomb) situées sous la pou-
belle barrée indiquent en outre que la pile/l’accumulateur contient
une part de plus de 0,0005 % de mercure ou de 0,004% de plomb.
Une mauvaise élimination nuit à l’environnement et à la santé ; le
recyclage des matériaux épargne de précieuses matières pre-
mières. Enlevez toutes les piles/accumulateurs lorsque ce produit
est mis hors service et remettez-les dans un dépôt afin de recycler
les piles ou les appareils électriques et électroniques.
Vous trouverez des informations concernant les dépôts corre-
spondants auprès de votre commune, d’une entreprise de trai-
tement ou dans le point de vente où l’appareil a été acheté.
Pb
Pb
C
Batteriewechsel