6
7
СТИРАЛЬНАЯ МАШИНА АВТОМАТ
AUTOMATIC WASHING MACHINE
СТИРАЛЬНАЯ МАШИНА АВТОМАТ
AUTOMATIC WASHING MACHINE
ИНСТРУКЦИЯ ПО ЭКСПЛУАТАЦИИ • USEr GUIdE
ИНСТРУКЦИЯ ПО ЭКСПЛУАТАЦИИ • USEr GUIdE
Установка и регулировка положения стиральной машины
ВНИМАНИЕ!
Не ставьте машину на ковер или ковровые по-
крытия. мягкое покрытие пола (ковер, покрытие на
полиуретановой основе и др.) способствует вибра-
ции и ухудшению вентиляции машины!
Пол должен быть ровным, прочным и не иметь
наклона!
- Установите машину по уровню строго горизон-
тально на ровном и прочном полу.
- Слегка ослабьте контргайки на ножках ключом.
- отрегулируйте положение машины путем отвинчивания/завинчивания ножек.
- Снова затяните контргайки ключом.
После установки стиральной машины необходимо обязательно проверить
горизонтальность ее положения и устойчивость. Для этого нужно надавить на
каждый угол машины и убедиться, что она ни на одном из углов не качается!
Подсоединение к водопроводной сети
для подсоединения стиральной машины к водопроводу используйте только но-
вые, цельные шланги, входящие в комплект поставки. запрещается использовать
шланги, бывшие в употреблении. Наливной шланг с уплотнением находится в ба-
рабане стиральной машины. машина подключается только к сети холодного водо-
снабжения через кран подачи воды с резьбовым патрубком 3/4 дюйма.
давление воды: мин. 0,05 мПа (0,5 бар), макс. 1 мПа (10 бар).
- Убедитесь, что шланг не перекручен и не пережат.
- Проверьте герметичность соединения наливного шланга и крана.
- Регулярно проверяйте состояние наливного шланга!
Подключение к канализации
Сливной шланг находится сзади стиральной машины. закрепите сливной шланг
таким образом, чтобы он был неподвижен во время работы стиральной машины.
Сливной шланг должен находиться на высоте от 60 до 100 см от уровня пола.
При несоблюдении этого требования машина не будет работать.
ВНИМАНИЕ!
Перед первым включением необходимо выровнять стиральную машину
по уровню в разных плоскостях и снять транспортировочные блокировки.
ВНИМАНИЕ!
Неправильная установка по уровню, а в особенности неустойчивое положение
стиральной машины, может стать причиной вибраций при работе машины.
Не разрешайте без надзора пользоваться прибором детям и лицам с ограничен-
ными физическими, мануальными и умственными способностями, не имеющим
опыта и умения, до тех пор, пока они не будут обучены и ознакомлены с инструк-
цией по эксплуатации прибора.
Утилизация
Перед утилизацией стиральную машину следует для безопасности
привести в полную негодность. Предварительно следует вынуть штекер
из гнезда электросети, а затем отрезать кабель питания. В дальней-
шем следует действовать в соответствии с местными предписаниями,
касающимися утилизации отходов и мусора.
УСТАНОВКА СТИРАЛЬНОЙ МАШИНЫ
- освободите машину от упаковочных материалов. Снимите защитную пленку
с дисплея (при наличии).
ВНИМАНИЕ!
Чтобы не повредить машину, не перемещайте её, взявшись за лоток, дверцу
или уплотнитель!
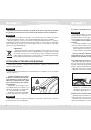
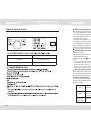
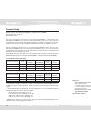
- Удалите блокировочные болты
и приспособления, предохраняю-
щие машину на время транспор-
тировки (сохраните их на случай
переезда или перевозки стираль-
ной машины).
- отвинтите при помощи ключа
4 блокировочных болта. Выньте ре-
зиново-пластиковые распорки вме-
сте с прокладками и болтами.
- закройте отверстия заглушками,
которые прилагаются в комплекте.
ВНИМАНИЕ!
Перед включением стиральной машины необходимо обязательно снять все
транспортировочные блокировки!
P.08
P.09
Install Washing Machine
Install Washing Machine
3.Ensure the positioning status of washing machine. Loosen the lock nut with spanner
and turn the leg with hand until it closely contacts with the floor. Press the leg with one
hand and fasten the nut closely to the cabinet with the other hand.
4.After being locked properly, press four corners again to make sure that they has been
adjusted properly. If it is still unstable, it has to repeat Steps 2 and 3.
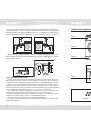
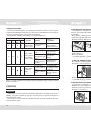
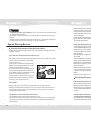
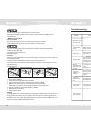
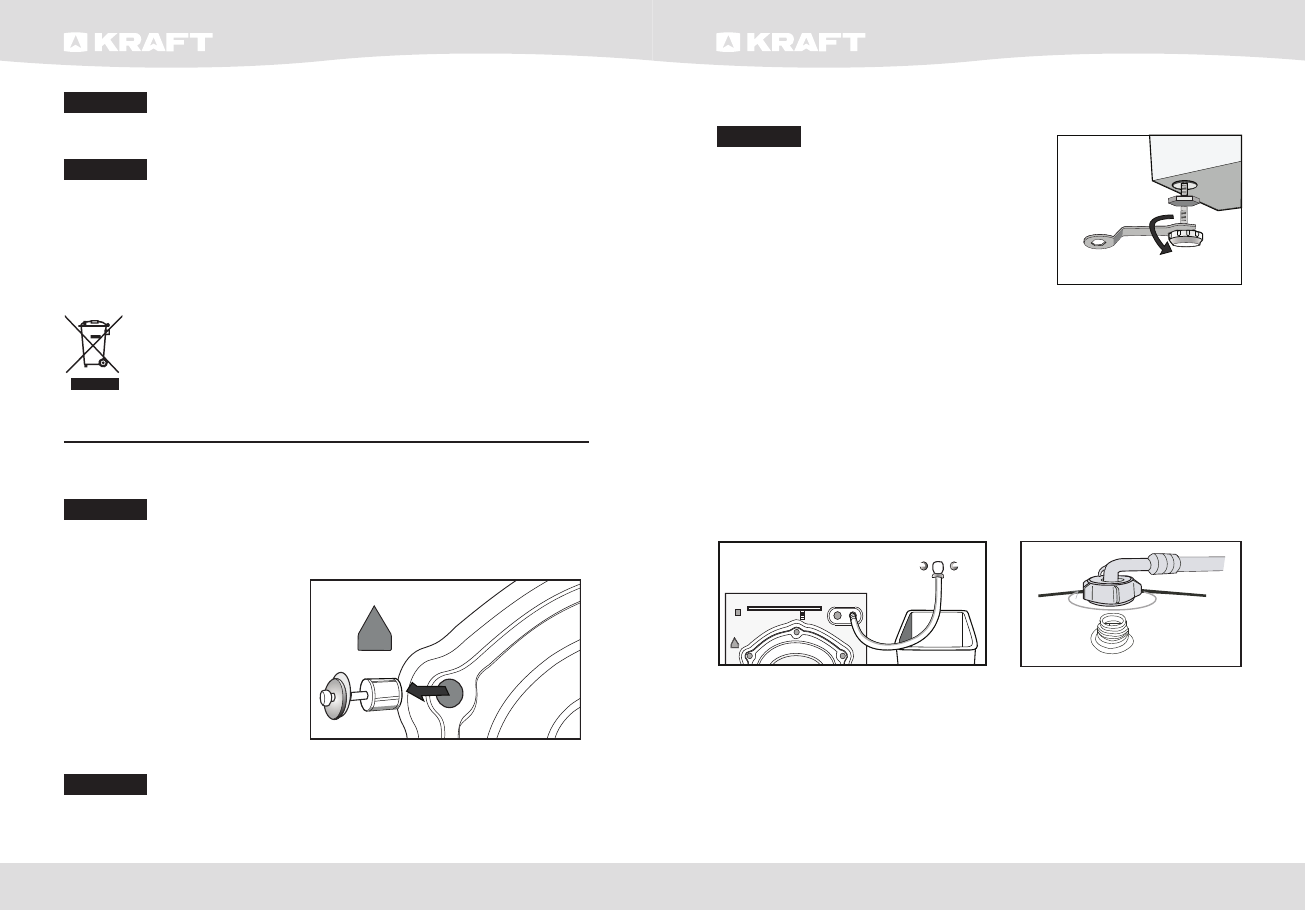
Connect inlet pipe
Connect the inlet pipe as indicated in the figure.
For the model which has hot valve , please connect
the hot vale to hot water tap. Energy will decrease
automatically for some program.
Install inlet pipe
1.Connect the elbow to tap and fasten it
clockwise.
2.Connect the other end of inlet pipe to the inlet
valve at the backside of washing machine and
fasten the pipe tightly clockwise.
Notes: after connection, if there is any leakage
with hose, then repeat the steps to connect inlet
pipe. The most common type of tap shall be
used to supply water. If tap is square or too big,
then standard tap shall be changed.
Place outlet hose
There are two ways to place the end of outlet hose:
1.Put it beside the water trough.
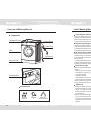
Unpacking the washing machine
Unpack your washing machine and check if there is any damage during the transportation.
Also make sure that all the items (as shown in Page 5) in the attached bag are received.
If there is any damage to the washing machine during the transportation, or any item is
missing, please contact the local dealer immediately.
Dispose the packing materials
The packing materials of this machine may be dangerous to kids. Please dispose them
properly and avoid easy touch by kids. Please dispose the related packing materials
according to the relevant local regulations. Please do no throw the packing materials
away together with the other daily living rubbishes.
Remove transport bolts
Before using this washing machine, transport bolts
must be removed from the backside of
this machine. Please take the following steps to
remove the bolts:
1.Loosen all bolts with spanner and then remove them.
2.Stop the holes with transport hole plugs.
3.Keep the transport bolts properly for future use.
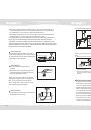
Select the location
Before installing the washing machine, the location characterized as follows shall be
selected:
- Rigid, dry, and level surface (if not level, please make it level with reference to the
following figure “Adjust Leg”)
- Avoid direct sunlight
- Sufficient ventilation
- Room temperature is above 0 C
- Keep far away from the heat resources such as coal or gas.
Make sure that the washing machine will not stand on power cord.
Do not install the washing machine on the carpet floor.
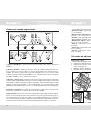
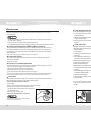
Adjust Leg
1.When positioning the washing machine, please
first check if the legs are closely attached to the
cabinet. If not, please turn them to their original
positions with hand or spanner and tighten the
nuts with spanner.
2.After positioning the washing machine, press
four corners on top cover of washing machine
in sequence. If the washing machine is not
stable when being pressed, this leg shall be
adjusted.
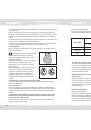
5.Put a solid cylinder (e.g. pop cans) oppositely on the top cover of the washing machine from in
the left, right, front and back directions. If the cylinder keeps stable, the washing machine is
positioned level. If it rolls, the washing machineis positioned unlevel. The rolling direction is the
direction of lower ground surface.Then, the two legs in this direction shall be raised at the same time
until the washing machine is level. Steps 1~3 are repeated to make the bottom legs closely against
the ground and the nuts shall be locked tightly.
P.08
P.09
Install Washing Machine
Install Washing Machine
3.Ensure the positioning status of washing machine. Loosen the lock nut with spanner
and turn the leg with hand until it closely contacts with the floor. Press the leg with one
hand and fasten the nut closely to the cabinet with the other hand.
4.After being locked properly, press four corners again to make sure that they has been
adjusted properly. If it is still unstable, it has to repeat Steps 2 and 3.
Connect inlet pipe
Connect the inlet pipe as indicated in the figure.
For the model which has hot valve , please connect
the hot vale to hot water tap. Energy will decrease
automatically for some program.
Install inlet pipe
1.Connect the elbow to tap and fasten it
clockwise.
2.Connect the other end of inlet pipe to the inlet
valve at the backside of washing machine and
fasten the pipe tightly clockwise.
Notes: after connection, if there is any leakage
with hose, then repeat the steps to connect inlet
pipe. The most common type of tap shall be
used to supply water. If tap is square or too big,
then standard tap shall be changed.
Place outlet hose
There are two ways to place the end of outlet hose:
1.Put it beside the water trough.
Unpacking the washing machine
Unpack your washing machine and check if there is any damage during the transportation.
Also make sure that all the items (as shown in Page 5) in the attached bag are received.
If there is any damage to the washing machine during the transportation, or any item is
missing, please contact the local dealer immediately.
Dispose the packing materials
The packing materials of this machine may be dangerous to kids. Please dispose them
properly and avoid easy touch by kids. Please dispose the related packing materials
according to the relevant local regulations. Please do no throw the packing materials
away together with the other daily living rubbishes.
Remove transport bolts
Before using this washing machine, transport bolts
must be removed from the backside of
this machine. Please take the following steps to
remove the bolts:
1.Loosen all bolts with spanner and then remove them.
2.Stop the holes with transport hole plugs.
3.Keep the transport bolts properly for future use.
Select the location
Before installing the washing machine, the location characterized as follows shall be
selected:
- Rigid, dry, and level surface (if not level, please make it level with reference to the
following figure “Adjust Leg”)
- Avoid direct sunlight
- Sufficient ventilation
- Room temperature is above 0 C
- Keep far away from the heat resources such as coal or gas.
Make sure that the washing machine will not stand on power cord.
Do not install the washing machine on the carpet floor.
Adjust Leg
1.When positioning the washing machine, please
first check if the legs are closely attached to the
cabinet. If not, please turn them to their original
positions with hand or spanner and tighten the
nuts with spanner.
2.After positioning the washing machine, press
four corners on top cover of washing machine
in sequence. If the washing machine is not
stable when being pressed, this leg shall be
adjusted.
5.Put a solid cylinder (e.g. pop cans) oppositely on the top cover of the washing machine from in
the left, right, front and back directions. If the cylinder keeps stable, the washing machine is
positioned level. If it rolls, the washing machineis positioned unlevel. The rolling direction is the
direction of lower ground surface.Then, the two legs in this direction shall be raised at the same time
until the washing machine is level. Steps 1~3 are repeated to make the bottom legs closely against
the ground and the nuts shall be locked tightly.