7
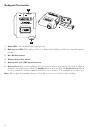
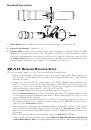
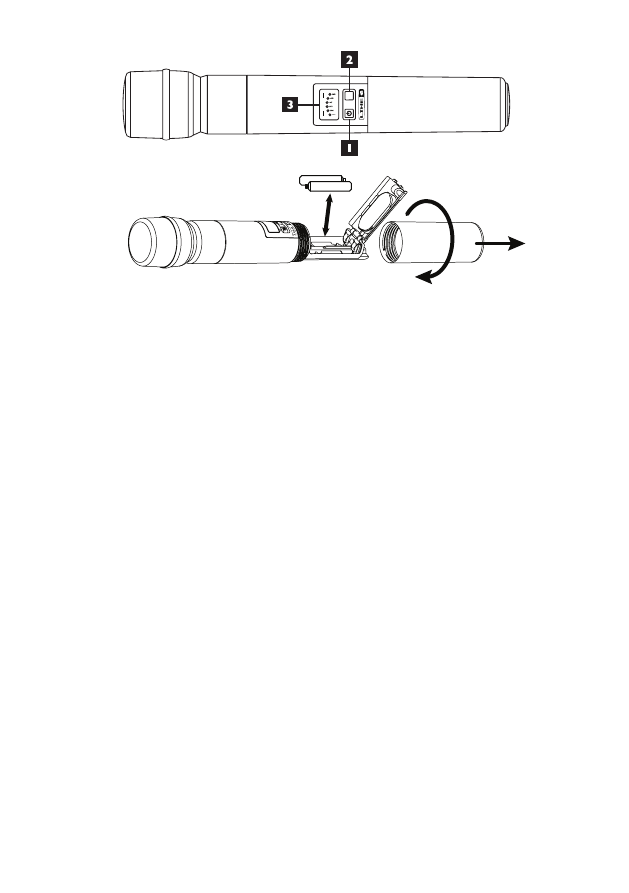
Handheld Transmitter
CHANNEL
SELECT
AA BATTERY
1. Power Button –
Press briefly to turn on; press and hold for two seconds to turn off
2. Channel Select Button –
Channels 1 – 6
3. Channel LEDs –
Lights blue to show current active transmission channel; Channel 6 LED
illuminates red when battery life is low, and blinks red when less than 40 minutes remain.
Unscrew the transmitter base and insert two AA batteries. Push the On button to turn on. Press
the
Channel Select
button to set the channel, indicated by LED position on display; match the
channel number with the receiver channel. The transmitter is ready to use.
Xd-V35 R
eceiVeR
d
etailed
s
etuP
The receiver is quite simple to set up. This section adds a few useful details.
• When used stand-alone, position the receiver on a surface that provides line of sight (or at
least near line of sight) with the location where the transmitters will be used. This will help
maximize the range.
• Connect the provided DC-1G power supply to the 9VDC 200mA connector on the rear
panel; to secure, press a loop of the cable through the cable holder located to the left of the
connector to prevent accidental disconnection. Plug the power supply into an available AC
outlet that provides voltage from 90 – 240 VAC at 50 or 60 Hz.
• The blue
Power
LED on the front panel will light and the receiver is on.
• Turn the
Channel Select
knob to point to channel 1 through 6. The channel number on the
receiver and its associated transmitter must match. When using multiple receivers, set each
one to a different channel number.
• With the associated transmitter turned on, you will see – depending on the distance between
the transmitter and receiver – all three or the bottom one or two RF LEDs lit green, on the
right side of the
Trans Status
window.
• Depending on the condition of the transmitter batteries, you will see all three or the bottom
one or two battery status LEDs lit green, on the left side of the
Trans Status
window. If the
battery level is low, the bottom LED will turn red, and it will flash red when 40 minutes or
less remain.
• When you speak or sing into the microphone, the green
Audio
LED will light.
• Connect to the audio system using the rear-panel
Balanced XLR Audio Output
or
Unbalanced
1/4-Inch Audio Output
.
Note,
the signal output from either of these connectors is mic level, and