Инструкция для Line 6 XD-V35L, XD-V30, XD-V35

(скачивание инструкции бесплатно)
Формат файла: PDF
Доступность: Бесплатно как и все руководства на сайте. Без регистрации и SMS.
Дополнительно: Чтение инструкции онлайн
background image

8

the receiver has no gain or attenuation controls.   Do not use TRS connectors with the XD-

V35 Receiver as the Ring portion of the connector is used for firmware updates and may cause 

computer generated noise in your audio outputs.

Note:

 When the associated transmitter is off, and moderate to strong interfering frequencies not coming 

from a Line 6 transmitter are present on the selected receiver channel, one or more of the RF LEDs on 

the right side of 

Trans Status

 will turn red.  Higher levels of interference will light more red LEDs.  Use 

in high interference conditions will result in reduced range for the system.  Either move the receiver 

away from the source of the interference – such as a nearby WiFi modem or computer with a WiFi 

transceiver – or select another channel not showing interference.
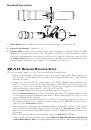
tHH06 H

andHeld

 t

RansmitteR

 d

etailed

 s

etuP

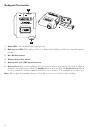
• Twist the bottom section of the THH06 transmitter counterclockwise, unscrew, and remove 

it.  Lightly pull the battery cover tab down with a thumbnail, and open the cover by pulling 

back; it is hinged at the base of the transmitter.

• Insert two AA batteries, noting the polarity markings shown in the battery compartment.  Use 

alkaline batteries, or rechargeable NiMH batteries in the 2400 – 2800 mAh range.  Close the 

battery cover and replace the bottom section of the transmitter.

• Press and briefly hold the left button below the 

Channel

 display to turn on.  A small blue LED 

will light above the currently selected channel.

• Press the right 

Select

 button to change to the next channel; the blue LED above the number 

will light.  Each press of the button will go to the next channel.  The channel is selected 

and active immediately. 

Note, 

the transmitter buttons are recessed to prevent accidental 

activation, so press them down firmly below the recessed surface, until you feel a click.

• When the transmitter is on the same channel number as the receiver, the receiver 

Trans 

Status

 LEDs will light green, and when you speak in the mic the receiver 

Audio

 LED will 

light green.

Note:

 When the transmitter battery level is low, the LED over the number 6 on the display will light 

red, and it will flash red when less than 40 minutes remain.  Line 6 transmitter battery-life meters are 

calibrated for use with alkaline batteries, so when NiMH rechargeable batteries are used the remaining 

life will not be as accurate – however, the basic indication is to insert fresh batteries soon after the LED 

shows red.  Carbon-zinc batteries are not recommended.
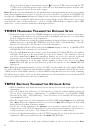
tBP06 B

eltPack

 t

RansmitteR

 d

etailed

 s

etuP

• With a thumbnail, slide down the latch on the battery door located on the right side of the 

transmitter.  

• Open the hinged door and insert two AA batteries, noting the polarity markings shown on 

the top plate of the battery compartment.  Use alkaline batteries, or rechargeable NiMH 

batteries in the 2400 – 2800 mAh range.  Close the battery cover and slide the latch up with 

your thumbnail to lock.

• Slide the switch on the top of the transmitter to ON; the LED marked 

Batt

 (battery) will light 

blue. 

Note,

 When the transmitter battery level is low, the 

Batt

 LED will light red, and it will 

flash red when less than 40 minutes remain.

• On the face of the transmitter, the 

Channel

 select provides a metal slide switch to set a 

channel from 1 to 6.  Slide the metal button to the desired channel number; it has detents so 

it will stop in the correct place.  The channel is selected and active immediately.

• Connect the lavalier microphone to the 1/4” TRS (tip-ring-sleeve) jack on the bottom of the 

transmitter.  When you speak in the mic, the 

Audio

 LED will light.

• When the transmitter is on the same channel number as the receiver, the receiver 

Trans 

1
2
3
4
5
6
7
8
9
10
11
12
Оглавление инструкции
  • Страница 1 из 13
    ® XD-V35 Digital Wireless Pilot’s Handbook Manuel de pilotage Pilotenhandbuch Pilotenhandboek Manual del Piloto 取扱説明書 40-00-0335 also available @ www.line6.com/manuals Rev C
  • Страница 2 из 13
    Important Safety Instructions C A UT I O N RISK OF ELECTRIC SHOCK DO NOT OPEN WARNING : TO REDUCE THE RISK OF FIRE OR ELECTRIC SHOCK, DO NOT REMOVE SCREWS. NO USER-SERVICEABLE PARTS INSIDE. REFER SERVICING TO QUALIFIED SERVICE PERSONNEL. WARNING : TO REDUCE THE RISK OF FIRE OR ELECTRIC SHOCK, DO
  • Страница 3 из 13
    You should read these Important Safety Instructions. Keep these instructions in a safe place Before using your XD-V35 Digital Wireless System, carefully read the applicable items of these operating instructions and the safety suggestions. 1. Obey all warnings in the XD-V35 manual. 2. Do not perform
  • Страница 4 из 13
    Thank you for your purchase of the XD-V35 wireless microphone system. It is a high quality digital wireless system, in a simple format that is virtually plug-and-play. With its fully digital transmission, the system provides features and benefits that differ in some ways from previous generations
  • Страница 5 из 13
    XD-V35 Digital Wireless Quick Setup Receiver 1 2 3 trans status 4 5 audio 2.4GHz DIGITAL WIRELESS SYSTEM XDpower CHANNEL UNBALANCED OUT BAL OUT RXT06 RECEIVER + 9Vdc 200mA 6 7 8 1. 6-Position Channel Select Knob 2. Battery Level Indicator LEDs – Lights green, with all lit indicating full
  • Страница 6 из 13
    Bodypack Transmitter 3 1 2 6 4 5 1. Audio LED – Green when audio signal present 2. Battery Level LED – Blue with good level, red when low, flashing red when less than 40 minutes remain 3. On / Off Slide Switch 4. Channel Select Slide Switch 5. Quarter-Inch (1/4”) TRS Input Connector 6. Battery Door
  • Страница 7 из 13
    SELECT CHANNEL Handheld Transmitter AA BATTERY 1. Power Button – Press briefly to turn on; press and hold for two seconds to turn off 2. Channel Select Button – Channels 1 – 6 3. Channel LEDs – Lights blue to show current active transmission channel; Channel 6 LED illuminates red when battery life
  • Страница 8 из 13
    the receiver has no gain or attenuation controls. Do not use TRS connectors with the XDV35 Receiver as the Ring portion of the connector is used for firmware updates and may cause computer generated noise in your audio outputs. Note: When the associated transmitter is off, and moderate to strong
  • Страница 9 из 13
    Status LEDs will light green, and when you speak in the mic the receiver Audio LED will light green. Connecting the XD-V35 Receiver The receiver features a balanced XLR and unbalanced (tip-sleeve) quarter-inch connector. To connect to a mixing board or powered mixer, use a microphone cable between
  • Страница 10 из 13
    APPENDICES Troubleshooting Problem Solution No Audio Transmitter off or battery out of power Batteries put into transmitter out of polarity Transmitter and receiver on different channels Receiver off / unplugged or not connected Can’t Turn Off Transmitter Change Channels Transmitter in locked mode
  • Страница 11 из 13
    XD-V35 Digital Wireless System Specifications System Frequency Band 2.4GHz ISM Band Compatible Channels 6 Spatial Diversity with Digital Buffering Yes Frequency Diversity Yes (2 Frequencies per channel) Compander-Free Design Yes Frequency Response THD % 10 Hz (-0.5 dB) - 20kHz (-2.5 dB) 0.03%
  • Страница 12 из 13
  • Страница 13 из 13