9
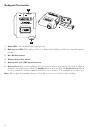
Status
LEDs will light green, and when you speak in the mic the receiver
Audio
LED will
light green.
c
onnecting
tHe
Xd-V35 R
eceiVeR
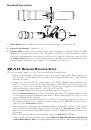
The receiver features a balanced XLR and unbalanced (tip-sleeve) quarter-inch connector. To connect
to a mixing board or powered mixer, use a microphone cable between the receiver output and the
mixer’s mic-level input – in the same way as you would connect a wired microphone. The output of the
XD-V35 receiver is virtually identical to that of the microphone on the transmitter, or other standard
wired mic.
To connect to an instrument amplifier or other audio equipment with a quarter-inch connector such
as a signal processor or effects unit, use a 1/4” to 1/4” instrument cable. This output is also mic level.
Microphone Usage Tips
Try to maintain a constant distance and relationship between the user’s mouth and the microphone. In
live theatre this is often done by placing a small mic in the hairline toward the front side of the head or
right above the ear. With mic placement on the collar or shoulder area, changes in level can occur as
the user’s head turns; experiment with the location of the mic to minimize this effect. Mic placement in
the center of the chest can help with the level changes, but is farther from the voice and quite shielded
from the direct energy of the voice, so typically provides a hollow midrange or “chest” sound to the
voice.
The V35 Belt Pack transmitter includes a built in roll-off filter.
Walk-Testing the Performance Area
When first setting up a wireless system in a new location, it is good practice to position the receivers
where they will remain during the event, and then walk the entire performing area with the audio
system on and the transmitter active. Talk and listen for signal dropouts or other problems, and note
where they are with respect to your receiver placement.
If possible, reposition the receiver to obtain better coverage and improve or eliminate areas with lower
signal strength – by improving line-of-sight to the transmitter.