BluTechVision 3D
- 15 -
Instructions for Use
Deutsch
English
Français
Italiano
Español
Nederlands
Português
Magyar
Polski
Č
eština
Network Menu
Your
BluTechVision 3D
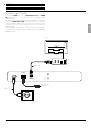
can be connected to a home network with
an Internet connection via the LAN connection on the rear (page
8) or via
WiFi
.
Wired network
If your home network has a DHCP server (e.g. a DSL router),
BluTech-
Vision 3D
can set up all the network parameters automatically.
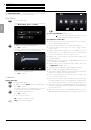
Call up
Settings
Menu.
5
6
Select the
Network
option.
45
6
Select the option
Connection Setting
.
Press
OK
to confirm.
The
Network Setting
Menu appears.
5
6
Select the option
Start
.
Press
OK
to confirm.
Your
BluTechVision 3D
searches for available LAN/
WiFi connections in your home network and
automatically selects one of the LAN connections
that is present.
If the connection test was successful, a correspond-
ing message will be displayed.
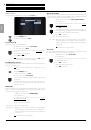
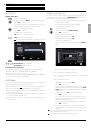
Connection Status Menu
You can display the network parameters currently set.
Call up
Settings
Menu.
5
6
Select the
Network
option.
45
6
Select the option
Connection Status
.
Press
OK
to confirm.
The
Connection Status
Menu appears
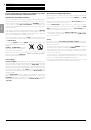
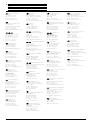
Test Perform connection test
Setting Display
Connection Setting
menu
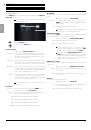
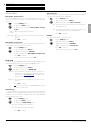
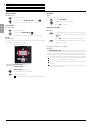
Network Setting
For wired network,
please connect LAN cable.
For wireless network, please install the
router.
Start
Close
Advanced Setting
To connect to the network, please follow the guide.
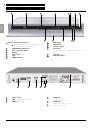
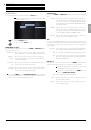
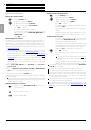
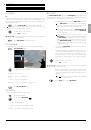
: e8:5b:5b:c1:ad:ab
: 192.168.0.10
: 255.255.255.0
: 192.168.0.5
: 192.168.0.5
: 192.168.1.5
Network Setting
Wired Network
MAC Adress
IP
Subnet Mask
Gateway
Primary DNS
Secondary DNS
Setting
Test
Close
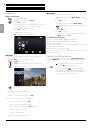
Manually set up the network connection
The network parameters can be set manually (e.g. if there is no DHCP
server in your home network).
Call up
Settings
Menu.
5
6
Select the
Network
option.
45
6
Select the option
Connection Setting
.
45
6
Select the option
Advanced Setting
.
Press
OK
to confirm.
45
6
Select the option
Wired.
The
IP Address & DNS Setup
Menu appears.
5
634
Select the option
IP Mode: Static.
5
634
Input the
IP Address
,
Subnet Mask
and
Gateway
using the numerical buttons on the Assist
remote control.
5
634
Select the option
DNS Server: Manual.
5
634
Enter the
Primary
and poss.
Secondary
DNS server
address using the numerical buttons on
the Assist remote control.
5
634
Select the option
OK
.
Press
Next
to confirm.
Your
BluTechVision 3D
will now use the given
parameters to attempt to establish a connection to
the Internet router in your home network.
If the connection test was successful, a correspond-
ing message will be displayed in the
Connection
Status
Menu.
192
255
192
192
192
168
255
168
168
168
0
0
0
10
0
5
5
5
0
1
Network Setting
IP Mode
DNS Server
IP Adress
Subnet Mask
Primary
Gateway
Secondary
Dynamic
Auto
Manual
Static
Set an IP address & DNS.
Next
Previous
Close
: e8:5b:5b:c1:ad:ab
: 192.168.0.10
: 255.255.255.0
: 192.168.0.5
: 192.168.0.5
: 192.168.1.5
Network Setting
Wired Network
MAC Adress
IP
Subnet Mask
Gateway
Primary DNS
Secondary DNS
Setting
Test
Close
n
Start-up
Network Menu
Continued on the next page
→