4
8JD, ENGLAND
GEB021-1
SPECIFIC SAFETY RULES
DO NOT let comfort or familiarity with product
(gained from repeated use) replace strict adherence
to sander safety rules. If you use this tool unsafely
or incorrectly, you can suffer serious personal
injury.
1.
Hold power tools by insulated gripping
surfaces when performing an operation where
the cutting tool may contact hidden wiring or
its own cord.
Contact with a "live" wire will make
exposed metal parts of the tool "live" and shock
the operator.
2.
Always use safety glasses or goggles.
Ordinary eye or sun glasses are NOT safety
glasses.
3.
Hold the tool firmly.
4.
Do not leave the tool running. Operate the tool
only when hand-held.
5.
This tool has not been waterproofed, so do not
use water on the workpiece surface.
6.
Ventilate your work area adequately when you
perform sanding operations.
7.
Some material contains chemicals which may
be toxic. Take caution to prevent dust
inhalation and skin contact. Follow material
supplier safety data.
8.
Use of this tool to sand some products, paints
and wood could expose user to dust
containing hazardous substances. Use
appropriate respiratory protection.
9.
Be sure that there are no cracks or breakage
on the pad before use. Cracks or breakage
may cause a personal injury.
SAVE THESE INSTRUCTIONS.
WARNING:
MISUSE or failure to follow the safety rules stated in
this instruction manual may cause serious personal
injury.
FUNCTIONAL DESCRIPTION
CAUTION:
•
Always be sure that the tool is switched off and
unplugged before adjusting or checking function on
the tool.
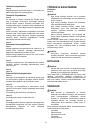
Switch action
Fig.1
CAUTION:
•
Before plugging in the tool, always be sure that the
tool is switched off.
To start the tool, press the "I (ON)" side of the switch. To
stop, press the "O (OFF)" side of the switch.
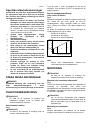
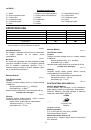
Speed adjusting dial
For BO5031 only
Fig.2
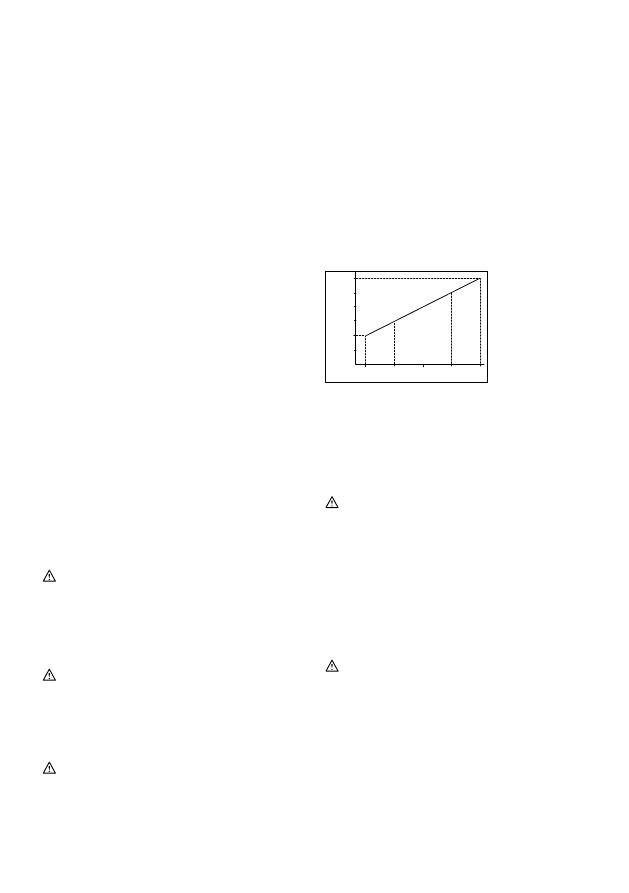
The tool speed can be infinitely adjusted between 4,000
and 12,000 orbit per minute by turning the adjusting dial.
Higher speed is obtained when the dial is turned in the
direction of number 5; lower speed is obtained when it is
turned in the direction of number 1.
Refer to the figure for the relationship between the
number settings on the adjusting dial and the kind of
work.
A range: For polishing
B range: For finish sanding
C range: For regular sanding
1
2
3
Dial setting
Orbits per minute
4000
12000
4
5
A
B
C
003291
NOTE:
•
The figure shows standard applications. They may
differ under certain conditions.
ASSEMBLY
CAUTION:
•
Always be sure that the tool is switched off and
unplugged before carrying out any work on the
tool.
Installing or removing abrasive disc
Fig.3
To install the abrasive disc, first remove all dirt or foreign
matter from the pad. Then peel off the backing paper
from the abrasive disc and attach the abrasive disc to
the pad. Be careful to align the holes in the abrasive disc
with those in the pad.
CAUTION:
•
If you peel off the abrasive disc from the pad, its
adhesion will become poor. Never attempt to stick
it onto the pad for further use.
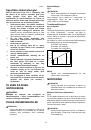
Installing dust bag
Fig.4
Install the dust bag on the tool so that the Makita logo on
the dust bag will be upright (not upside down).
Emptying dust bag
Fig.5
When the dust bag is about half full, switch off and