the left-hand sides of the handlebar. To attach
the drink-holder, slip the attachment onto the
handlebar, and push downwards until it clicks into
place. Do not place hot drinks in the drink-holder.
Do not place anything heavier than 1 Kg. (2.2 lbs.)
in the drink-holder.
BABY CARRIAGE AND/OR STROLLER
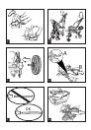
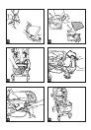
23• A) BABY CARRIAGE: Venezia becomes a baby
carriage when the backrest is lowered to the last
position, with the footrest raised, the handlebar
positioned opposite the backrest, and the wheels
on the same side as the backrest set to swivel.
•
B) STROLLER: Venezia becomes a stroller when
the backrest is raised, with the footrest lowered,
the handlebar positioned on the same side as the
backrest, and the wheels opposite the backrest set
to swivel.
HOOD
24• To attach the hood, insert the tabs into the special
notches on the stroller armrests as shown in the
figure, and fasten the hood to the back of the
backrest.
25• Fasten the hood to the inner sides of the armrests,
stretch out the hood, and press down on the side
braces as shown in the figure.
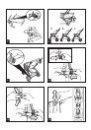
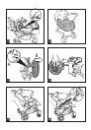
26• To turn the hood into a canopy to shield the child
from the sun, open the zipper as shown in the
figure and undo the rest of the hood.
COVER
•
To transform Uno into the carriage version, first
extend the front bar to the second position and
lift the footrest
27• Slip off the lower part of the hood from under the
footrest sack.
28• Insert the tabs on the lower part of the cover into
the slots in the front bar. (The slots on the front
bar flip out when the front bar is extended. If the
slots slide back into their housing, pull the two
little levers under the front bar towards you.)
29• Insert the side eyelets into the armrests.
30• Baby carriage without cover.
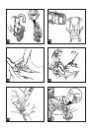
31• Zip the upper part of the cover to the lower part
and button to the armrests as indicated in the
figure.
32• Carriage version with cover.
WHEEL
REMOVAL
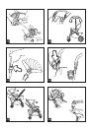
33• To remove the big wheels press the button (A) as
indicated in the figure and slip the wheel (B) off.
34• To remove the small wheels push the lever (A)
inward and simultaneously slip the wheel (B) off.
CLOSING THE STROLLER
Before closing the stroller, check to make sure
that the handlebar is positioned on the same side
as backrest. If the hood is attached, pull the side
braces upwards. Make sure the four wheels are
fixed.
35• To close the stroller, lower the right-hand lever
(marked "1") until it clicks into place.
36• Lower the left-hand lever (marked "2"), and lift the
handlebar upwards.
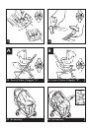
37• Lower the handlebar to finish closing the stroller,
and close the catches as shown in the figure.
TRANSPORT
38• The stroller has a handle on each side, which
together allow you to transport it when open (as
when going down stairs) or closed.
REMOVABLE LINING
39• To remove the lining from the stroller, remove the
flaps on the sack from the armrests and unfasten
the buttons.
40• Remove the sack flap from the backrest.
41• Loosen the safety belt from both sides, and slip
the sack off the stroller.
42• To wash the part below the cover, undo
attachments from fittings found on the footrest
chassis as indicated in the figure.
GANCIOMATIC SYSTEM
The Ganciomatic system, thanks to the Ganciomatic
connections, is the quick and practical system which
allows fastening the Primo Viaggio car seat, also
equipped with the Ganciomatc system and sold
separately, to the stroller. Primo Viaggio unfastens
from its base (which remain in the car) and fastens
to the stroller, allowing you to carry the child without
disturbing him/her.
With the Uno stroller you can fasten the car seat in
two different positions (“A” and “B”).
STROLLER GANCIOMATIC CONNECTIONS
43• To raise the stroller Ganciomatic connections, lift
the sack in the seat corners and rotate the two
connectors upward which automatically move
outward.
44• To lower the stroller Ganciomatic connections,
pull the lever upwards and simultaneously lower
the hook as indicated in the figure.
•
Uno can be closed with the Ganciomatic
connections raised.
UNO + PRIMO VIAGGIO
45• To fasten the car seat to the stroller in “A”
position:
-
block the stroller with brakes;
-
remove the stroller hood;
-
lower the stroller backrest to the second to the
lowest position;
-
raise the stroller Ganciomatic connections;
-
rotate the handle until it is opposite the backrest;
-
place the car seat facing the handle;
-
fasten the car seat, pushing it down until you
hear a click.
46• To fasten the car seat to the stroller in “B”
position:
-
block the stroller with brakes;
-
remove the stroller hood;
-
lower the stroller backrest to the second to the
lowest position;
-
raise the stroller Ganciomatic connections;
-
check that the handle is placed on the backrest
side;
- extend the front bar to the first click;
- place the car seat facing the backrest;
-
fasten the car seat, pushing it down until you
hear a click.
•
To unfasten the car seat from the stroller see the
instruction manual.
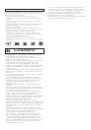
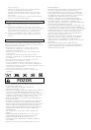
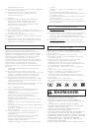
LINE OF ACCESSORIES
47• Cover All Rain Canopy: Rain canopy in clear PVC
covers the entire stroller.
48• This rain canopy has been designed for use with
the Primo Viaggio car seat as well attached to the
Venezia stroller, to guarantee total protection.
49• Diaper-Changing Bag: Satchel with pad for
changing babyʼs diaper. Attaches to the stroller.