3
E60900-MODU’LED_E60913-D
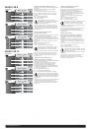
MODU’LED 8 DUO E60900
MODU’LED 14 DUO E60970
For all DUO, DUOBELT, headlamps except for the DUO ATEX.
Conforms to the electromagnetic compatibility requirements of the
89/336/CEE directive.
Petzl current regulation system
The 8 and 14 LED modules have an electronic current regulation
system that maintains a constant lighting level. When the batteries
are nearly spent, the module switches automatically to reserve power
mode, providing low-level proximity lighting.
In addition, the 8 and 14 LED modules offer 3 different lighting levels.
Level 1. OPTIMUM: best balance between power and burn time.
Level 2. MAXIMUM: maximum power.
Level 3. ECONOMICAL: maximum burn time.
You can choose the right amount of light for your activity.
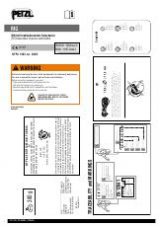
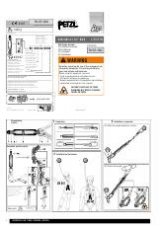
Installing the LED modules
Unscrew the DUO bezel. Replace the existing refl ector with the one
supplied with the 8 or 14 LED module. Turn the switch to the «off»
position. Install the module; take care to avoid bending the LEDs, and
check their alignment (it’s OK to touch the LEDs with your fi ngers).
Do not use a tool to install the module: you can damage the electronic
circuits.
Test the light by operating the switch. See malfunction.
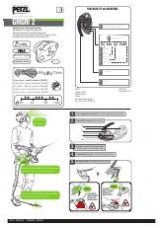
Operation
Move the switch down (on) to turn on the LED module. The light
always starts at the OPTIMUM lighting level. To select the next lighting
level (MAXIMUM), turn the switch off, then quickly back on. Each
consecutive off-on movement of the switch selects the next lighting
level in order: 1-2-3-1, and so on. If the off-on switching is not done
quickly enough, the lamp will light up at level 1.
When the batteries are nearly spent, the module switches automatically
to reserve power mode, providing low-level proximity lighting.
Warning
These modules can cause interference with an avalanche beacon that
is set to receive (search) mode. In case of interference (indicated by
static noise from the beacon), move the beacon away from the lamp,
or turn off the LED module and use the halogen bulb.
Mapping/navigation
WARNING : the electronics in the 8 or 14 LED module can interfere
with the normal operation of a compass.
In case of malfunction
Water in the circuits can create a malfunction. Remove the module and
the halogen bulb from the lamp. Dry the lamp.
MODU’LED 8 DUO
If the module does not light, remove it and replace it with the contacts
reversed (give it a half turn). Close the lamp.
MODU’LED 14 DUO
NOTE: the 14 LED module may be incompatible with DUO and
DUOBELT lamps made before January 1, 2004. If the module does not
light, you can fi x the problem by reversing the polarity of each battery.
Note that in this case the 14 LED module may not be used with the
Petzl ACCU DUO rechargeable battery. If your light does not work,
contact PETZL After Sales Service.
Protecting the environment
Lamps, bulbs, and batteries should be recycled and not thrown in the
regular trash. Dispose of these items by recycling them in accordance
with applicable local regulations. By doing so you play a part in
protecting the environment and public health.
PETZL guarantee
This product is guaranteed for 3 years against any faults in materials
or manufacture. Exclusions from the guarantee: normal wear and tear,
modifi cations or alterations, incorrect storage, poor maintenance,
damage due to accidents,
to negligence, or to improper or incorrect usage.
Responsibility
PETZL is not responsible for the consequences, direct, indirect or
accidental, or any other type of damage befalling or resulting from the
use of its products.
(EN) ENGLISH
Instructions for use
MODU’LED 8 DUO E60900
MODU’LED 14 DUO E60970
Pour DUO, DUOBELT sauf la DUO ATEX.
Conforme aux exigences de la directive 89/336/CEE concernant la
compatibilité électromagnétique.
Système électronique Petzl
Les modules 8 et 14 LED sont régulés. Le dispositif électronique de
régulation maintient un niveau de lumière constant. Lorsque les piles
sont presque déchargées, la lumière diminue rapidement vers un
niveau d’éclairage minimum de survie.
D’autre part, ces modules 8 et 14 LED offrent 3 puissances différentes
d’éclairage au choix dans un ordre de priorité d’usage.
Niveau 1. OPTIMAL : meilleur rapport puissance/autonomie.
Niveau 2. MAXIMAL : puissance maximale.
Niveau 3. ÉCONOMIQUE : grande autonomie.
Vous choisissez la puissance d’éclairage adaptée à votre activité.
Mise en place des modules LED
Dévissez la bague DUO. Remplacez le réfl ecteur de la bague par
les réfl ecteurs spécifi ques vendus avec les modules 8 ou 14 LED.
Positionnez l’interrupteur sur 0ff. Installez le module, attention à ne
pas plier les LED, vérifi ez leur alignement (on peut toucher les LED
avec les doigts). N’utilisez pas un outil pour mettre en place le module,
risque d’endommager les circuits électroniques.
Testez le fonctionnement en actionnant l’interrupteur. Voir le
paragraphe dysfonctionnement.
Allumer, éteindre, sélectionner
Pour allumer le foyer LED, basculez l’interrupteur de la DUO vers le
bas (on).
L’éclairage commence toujours par le niveau OPTIMAL.
Pour sélectionner le niveau d’éclairage suivant (MAXIMAL), effectuez
rapidement le mouvement de bascule de l’interrupteur (on-off-on).
On passe ainsi au niveau 2 puis au niveau 3, à nouveau au niveau 1 et
ainsi de suite.
Si le mouvement de bascule n’est pas assez rapide, le module s’allume
au niveau 1.
Lorsque les piles sont usées, le module offre un mode unique
d’éclairage faible.
Attention
Votre ARVA (Appareil de recherche de victimes sous avalanche)
en réception (recherche) peut être perturbé par ces modules. En
cas d’interférences (bruit parasite), éloignez l’ARVA de la lampe ou
éteignez le foyer LED et passez sur le foyer halogène.
Topographie
Attention, l’électronique des modules 8 ou 14 LED peut perturber une
boussole à visée.
En cas de dysfonctionnement
De l’eau dans les circuits peut créer un dysfonctionnement. Retirez
l’ampoule halogène et le module. Séchez la lampe.
MODU’LED 8 DUO
Si le module ne s’allume pas, retirez-le et recommencez l’installation
en inversant les contacts (tournez-le d’un demi-tour). Refermez votre
lampe.
MODU’LED 14 DUO
ATTENTION le module 14 LED peut ne pas être compatible avec les
DUO et DUOBELT fabriquées avant le 1er janvier 2004. Si le module ne
s’allume pas, vous pouvez l’utiliser en inversant la polarité de toutes
les piles. Par contre, dans ce cas le module 14 LED ne peut pas être
utilisé avec l’ACCU DUO Petzl.
Si votre lampe ne fonctionne pas, contactez le Service Après Vente
PETZL pour une remise en état.
Protection de l’environnement
Les lampes, ampoules, piles et accumulateurs mis au rebut
doivent être recyclés. Ne les jetez pas avec les ordures ménagères.
Déposez-les dans les bacs de recyclage conformément aux différents
règlements locaux applicables. Vous participez ainsi à la protection de
l’environnement et de la santé humaine.
Garantie PETZL
Ce produit est garanti pendant 3 ans contre tout défaut de matière ou
de fabrication. Limite de la garantie : l’usure normale, les modifi cations
ou retouches, le mauvais stockage, les dommages dus aux accidents,
aux négligences, aux utilisations pour lesquelles ce produit n’est pas
destiné.
Responsabilité
PETZL n’est pas responsable des conséquences directes, indirectes,
accidentelles ou de tout autre type de dommages survenus ou
résultant de l’utilisation de ce produit.
(FR) FRANCAIS
Prescriptions d’utilisation
MODU’LED 8 DUO E60900
MODU’LED 14 DUO E60970
Für alle DUO- und DUOBELT-Stirnlampen mit Ausnahme der
DUO ATEX.
Entspricht den elektromagnetischen Kompatibilitätsanforderungen der
89/336/CEE-Richtlinie.
Petzl-Stromregulierungssystem
Die Module mit 8 oder 14 LEDs sind mit einem
Stromregulierungssystem ausgestattet, das für eine konstante
Lichtintensität sorgt. Wenn die Batterien fast verbraucht sind,
wechselt das Modul automatisch in den Energiesparmodus, damit
auch weiterhin ein Minimum an Licht für den Nahbereich bei weitaus
längerer Brenndauer zur Verfügung steht.
Die Module mit 8 bzw. 14 LEDs bieten drei Leuchtstärken:
Stufe 1. OPTIMAL: Das günstigste Verhältnis von Leistung und
Leuchtdauer.
Stufe 2. MAXIMAL: Maximale Leistung.
Stufe 3. ECONOMIC: Maximale Leuchtdauer.
Wählen Sie die für Ihre Anforderungen passende Einstellung.
Installieren der LED-Module
Drehen Sie den DUO-Ring von der Lampe ab. Ersetzten Sie den
vorhandenen Refl ektor mit dem des 8- oder 14 LED-Moduls. Stellen
Sie den Schalter auf AUS. Setzen Sie das Modul ein. Achten Sie darauf,
die LEDs nicht zu verbiegen und überprüfen Sie deren Ausrichtung (Sie
können die LEDs bedenkenlos mit dem Finger berühren). Verwenden
Sie zum Einsetzen des Moduls kein Werkzeug, um zu vermeiden, dass
die Stromkreise versehentlich beschädigt werden.
Überprüfen Sie die Funktion der Lampe, indem Sie den Schalter
betätigen. Sehen Problembehebung.
Betrieb
Bewegen Sie den Schalter nach unten (EIN), um das LED-Modul
einzuschalten. Die Lampe wird stets mit der Leuchtstärke OPTIMAL
gestartet. Um die nächste Leuchtstärke auszuwählen (MAXIMAL),
schalten Sie den Schalter schnell aus und wieder ein. Mit jedem
aufeinanderfolgenden EIN-AUS des Schalters wird die nächste
Leuchtstärke in der Reihenfolge 1-2-3-1 usw. ausgewählt. Wird der
EIN-AUS-Schalter nicht schnell genug betätigt, wird die Lampe mit
Stufe 1 gestartet.
Wenn die Batterien fast verbraucht sind, wechselt das Modul
automatisch in den Energiesparmodus, damit auch weiterhin ein
Minimum an Licht für den Nahbereich bei weitaus längerer Brenndauer
zur Verfügung steht.
Warnung
Diese Module können bei einem VS-Gerät im Empfangs- bzw.
Suchmodus Interferenzen verursachen. Im Falle von solchen
Interferenzen (Nebengeräusche) vergrößern Sie die Entfernung
zwischen VS-Gerät und Lampe oder schalten Sie das LED-Modul
vorübergehend aus und verwenden Sie die Halogenbirne.
Topographie / Navigation
WARNUNG: Der Stromkreis des 8- oder 14 LED-Moduls kann die
normale Funktionsweise eines Kompasses beeinträchtigen.
Problembehebung
Wasser oder Feuchtigkeit in den Stromkreisen kann zu einer
Fehlfunktion führen. Entfernen Sie das Modul und die Halogenbirne
aus der Lampe. Trocknen Sie die Lampe.
MODU’LED 8 DUO
Leuchtet das Modul nicht auf, entfernen Sie es und setzen Sie es um
180° gedreht wieder ein (i.e. Kontakte vertauschen). Schließen Sie
die Lampe.
MODU’LED 14 DUO
HINWEIS: Das 14 LED-Modul ist möglicherweise inkompatibel mit
DUO- und DUOBELT-Lampen, die vor dem 1. Januar 2004 hergestellt
wurden. Wenn das Modul nicht funktioniert, beheben Sie das Problem,
indem Sie die Polarität der Batterien umkehren. In diesem Fall kann
das 14 LED-Modul jedoch nicht mit den wiederaufl adbaren Petzl
ACCU DUO-Batterien betrieben werden. Wenn die Lampe gar nicht
funktioniert, wenden Sie sich an den PETZL-Kundendienst.
Umweltschutz
Lampen, Glühbirnen und Batterien sollten recycled und nicht mit dem
Restmüll entsorgt werden. Recyceln Sie diese Gegenstände gemäß der
geltenden Richtlinien an Ihrem Wohnort. Auf diese Weise schützen Sie
die Umwelt und die Gesundheit der Bevölkerung.
PETZL-Garantie
PETZL gewährt für dieses Produkt für Material- und Herstellungsfehler
eine Garantie von 3 Jahren. Ausgeschlossen von der Garantie
sind normale Abnutzung, Modifi zierungen oder Änderungen,
unsachgemäße Aufbewahrung sowie durch Unfälle, Vernachlässigung
und Verwendung zu einem nicht produktspezifi schen Zweck
entstandene Schäden.
Verantwortlichkeit
PETZL ist nicht verantwortlich für jegliche Konsequenzen, direkt,
indirekt oder unfallbedingt, sowie jegliche andere Art von Schäden, die
aus der Verwendung seiner Produkte entstehen.
(DE) DEUTSCH
Gebrauchsanweisung