Инструкция для President HARRISON

(скачивание инструкции бесплатно)
Формат файла: PDF
Доступность: Бесплатно как и все руководства на сайте. Без регистрации и SMS.
Дополнительно: Чтение инструкции онлайн
background image

27

Welcome to the world of the new generation of CB
radios. The new PRESIDENT range gives you access to
top performance CB equipment. With the use of up-to-
date technology, which guarantees unprecedented
quality, your PRESIDENT HARRISON ASC  is a new step in
personal communications and is the surest choice for
the most demanding of professional CB radio users. To
ensure that you make the most of all its capacities, we
advise you to read carefully this manual before installing
and using your PRESIDENT HARRISON ASC.

A) INSTALLATION:

1) WHERE AND HOW TO MOUNT YOUR MOBILE CB RADIO:

a)

You should choose the most appropriate setting from a simple and practical

point of view.

b)

Your CB radio should not interfere with the driver or the passengers.

c)

Remember to provide for the passing and protection of different wires (e.g.
power, antenna, accessory cabling) so that they do not in any way interfere
with the driving of the vehicle.
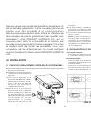
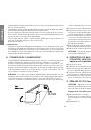
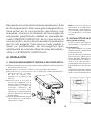
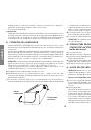
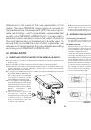
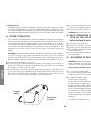
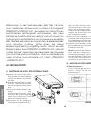
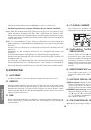
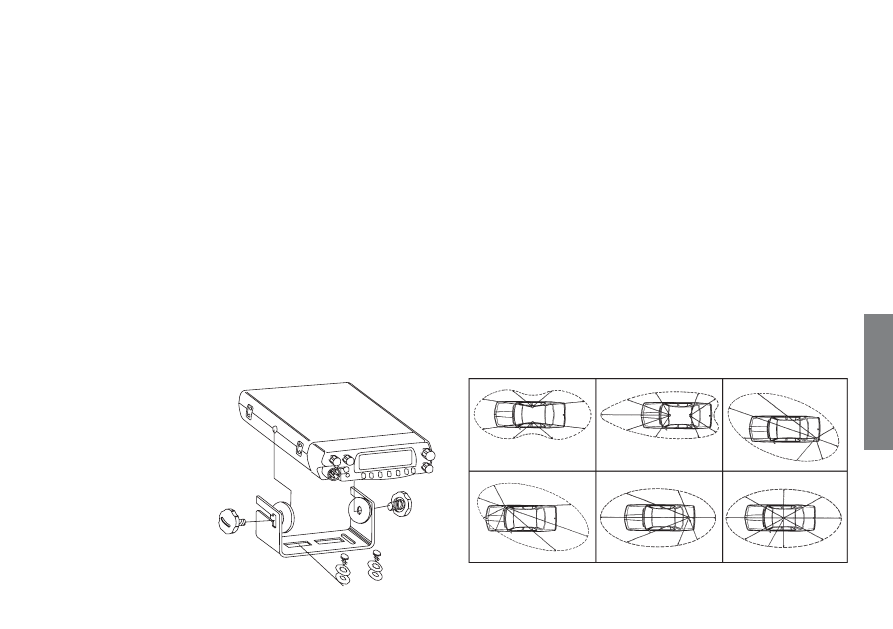
d) 

To install your equipment, use the cradle (

1

) and the self-tapping screws [

2

]

provided (drilling diameter 3.2
mm). Take care not to damage
the vehicle’s electrical system
while drilling the dash board.

e)

 Do not forget to insert the rubber

joints [

3

] between the CB and its

support as these have a shock-
absorbing effect which permits
gentle orientation and
tightening of the set.

f)

Choose where to place the
microphone support and
remember that the microphone
cord must stretch to the driver
without interfering with the
controls of the vehicle.
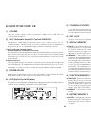
- N.B.:

 As the transceiver has a frontal microphone socket, it can be set  into the

dash board. In this case, you will need to add an external loud speaker to
improve the sound quality of communications (connector EXT.SP situated on
the back panel: 

D

). Ask your dealer for advice on mounting your CB radio.

2) ANTENNA INSTALLATION:

a) Choosing your antenna:

- For CB radios, the longer the antenna, the better its results. Your dealer  will

be able to help you with your choice of antenna.

b) Mobile antenna:

- Must be fixed to the vehicle where there is a maximum of metallic surface

(ground plane), away from windscreen mountings.

- If you already have a radio-telephone antenna installed, the CB antenna

should be higher than this.

-

There are two types of antenna: pre-regulated

 which should be used on a

good ground plane (e.g. car roof or lid of the boot), 

and

.

adjustable

 which offer a much larger range and can be used on a smaller

ground plane (see p 27 § 5, Adjustment of SWR).

- For an antenna which must be fixed by drilling, you will need a good contact

between the antenna and the ground plane. To obtain this, you should lightly
scratch the surface where the screw and tightening star are to be placed.

- Be careful not to pinch or flatten the coaxial cable (as this runs the risk of break

down and/or short circuiting).

- Connect the antenna (

B

).

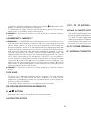
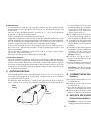
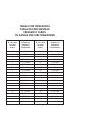
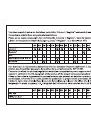
OUTPUT RADIUS PATTERNS

English

1
2
3
4
5
6
7
8
9
10
11
12
13
14
15
16
17
18
19
20
21
22
23
24
25
26
27
28
29
30
31
32
33
34
35
36
37
38
39
40
41
42
43
44
45
46
47
Оглавление инструкции
  • Страница 1 из 48
    HARRISON Manuel d'utilisation / Manual del usuario Owner's manual / Handbuch
  • Страница 2 из 48
    Votre PRESIDENT HARRISON ASCD en un coup d'oeil Your PRESIDENT HARRISON ASC at a glance Un vistazo a vuestro PRESIDENT HARRISON ASC Ihr PRESIDENT HARRISON ASC auf einen Blick
  • Страница 3 из 48
    is ol SOMMAIRE França INSTALLATION 5 INSTALACIÓN 15 UTILISATION 7 UTILIZACIÓN 17 CARACTÉRISTIQUES TECHNIQUES 9 CARACTERÍSTICAS TÉCNICAS 21 SUMARIO Españ GUIDE DE DÉPANNAGE 10 GUÍA DE PROBLEMAS 21 COMMENT ÉMETTRE/RECEVOIR UN MESSAGE 10 COMO EMITIR O RECIBIR UN MENSAJE 21 GLOSSAIRE 10 LÉXICO 22
  • Страница 4 из 48
    Français ATTENTION ! Avant toute utilisation, prenez garde de ne jamais émettre sans avoir branché l'antenne (connecteur "B" situé sur la face arrière de l'appareil), ni réglé le TOS (Taux d'Ondes Stationnaires)! Sinon, vous risquez de détruire l'amplificateur de puissance, ce qui n'est pas couvert
  • Страница 5 из 48
    2) INSTALLATION DE L’ANTENNE : a) Choix de l’antenne : - En CB, plus une antenne est grande, meilleur est son rendement. Votre Point Conseil saura orienter votre choix. b) Antenne mobile : - Il faut l’installer à un endroit du véhicule où il y a un maximum de surface métallique (plan de masse), en
  • Страница 6 из 48
    Français - Les préréglées s’utilisent de préférence avec un bon plan de masse (pavillon de toit ou malle arrière). - Les réglables offrent une plage d’utilisation beaucoup plus large et permettent de tirer parti de plans de masse moins importants - Pour une antenne à fixation par perçage, il est
  • Страница 7 из 48
    amenez le poste sur le canal 20, positionnez le commutateur du Tos-mètre en position CAL ou FWD appuyez sur la pédale du micro pour passer en émission, amenez l’aiguille sur l’index ▼ à l’aide du bouton de calibrage, basculez le commutateur en position SWR (lecture de la valeur du TOS). La valeur
  • Страница 8 из 48
    Français 2ème canal à surveiller. La double veille démarre. Il est possible de modifier le 2ème canal sans interrompre la procédure de double veille. c) fonction 3ème niveau En association avec la touche R/M (7) cette touche vous permet de stocker en mémoire le canal de votre choix. a) Cette
  • Страница 9 из 48
    18)PEDALE D’EMISSION DU MICRO : Appuyer pour parler et relâcher pour recevoir un message. A) ALIMENTATION (13,2 V) B) PRISE D’ANTENNE (SO-239) C) PRISE POUR HAUT-PARLEUR EXTERIEUR (8 Ω, Ø 3,5 mm) 15)RF GAIN : C) CARACTÉRISTIQUES TECHNIQUES : Réglage de la sensibilité en réception. Position maximum
  • Страница 10 из 48
    - Consommation : 550 mA nominal / 1500 mA max interlocuteur, il est d'usage de choisir un autre canal disponible afin de ne pas encombrer le canal d'appel. Français D) GUIDE DE DÉPANNAGE : F) GLOSSAIRE 1) VOTRE POSTE N’ÉMET PAS OU VOTRE ÉMISSION EST DE MAUVAISE QUALITÉ : Au fil de l’utilisation de
  • Страница 11 из 48
    Indique aussi l’émission. : Ultra-haute fréquence : Up Side Band (bande latérale supérieure) : Very high Frequency (très haute fréquence) QRA QRA Familial QRA PRO QRB QRD QRE QRG QRH QRI QRJ QRK QRL QRM QRM DX QRM 22 QRN QRO QRP QRPP QRPPette QRQ QRR QRRR QRS QRT QRU QRV QRW QRX QRZ QSA QSB QSJ QSK
  • Страница 12 из 48
    VOLET A CONSERVER CONDITIONS GENERALES DE GARANTIE Ce poste est garanti 2 ANS pièces et main d'oeuvre dans son pays d'achat Vous venez de faire confiance à la qualité et à l'expérience de PRESIDENT et nous vous remercions. Pour que vous soyez pleinement satisfait de votre achat, nous vous
  • Страница 13 из 48
    VOLET A RENVOYER QUESTIONNAIRE CB CONFIDENTIEL SOUS ENVELOPPE Nom......................................................Prénom ................................... Adresse ................................................................................................
  • Страница 14 из 48
    Español ¡ ATENCÍON ! Antes de la utilizacíon tengan cuidado de nunca emitir sin haber previamente conectado la antena (conector B situado en la parte trasera de su equipo), ajustado el ROE (Relación de Ondas estacionarias)! Sinó, se expone a dañar el amplificador de potencia, no cubierto por la
  • Страница 15 из 48
    - NOTA: Su emisora móvil posee una toma de micro frontal que puede empotrarse en el salpicadero. En este caso es recomendable ajustar un altavoz externo para una mejor escucha de las comunicaciones (conectar EXT.SP situado sobre la parte superior del aparato: D). Infórmese dirigiéndose a su
  • Страница 16 из 48
    - Cuando pase el cable de conexión, tener en cuenta de no pinzarlo o aplastarlo (hay riesgo de ruptura o de cortocircuito). - Conectar la antena (B). a cada iniciación del vehículo. Les aconsejamos enchufar directamente el cable de alimentación en la bateria (el enchufe sobre el cable del autoradio
  • Страница 17 из 48
    - Es aconsejable recalibrar, entre cada operación de regulación de la antena. Ahora, su emisora está lista para funcionar. B) UTILIZACIÓN: 1) Volumen: Para conmutar a canales superiores haga girar el control en el sentido horario. Para conmutar a canales inferiores, hágalo en sentido contrario.
  • Страница 18 из 48
    c) Dual Watch: La función Dual Watch permite al usuario la posibilidad de monitorizar y comunicarse en dos canales virtualmente de manera simultánea. Una aplicación de ésta función puede darse cuando Vd. desea ser capaz de comunicarse con un canal “silencioso” (por ejemplo el 28), mientras que al
  • Страница 19 из 48
    función simplemente presione el botón M7 de nuevo. b) BEEP: Da al usuario confirmacióna acústica a través de un corto pitido de que el President Harrison ha sido encendido. El equipo viene con ésta función establecida por defecto. Si desea desactivarla pulse el botón “M1”. La indicación “BATT, DW,
  • Страница 20 из 48
    proceso descrito en los pasos anteriores. 13. Aún en ausencia de alimentación las funciones almacenadas en el micrófono serán mantenidas. Si Vd. resetea su President Harrison puede recuperar las funciones almacenadas en el micrófono en fábrica que son «P1-M2», «P2-M5» y «P3-M5». micro.16) Funciones
  • Страница 21 из 48
    C) ALTAVOZ EXTERIOR (8 Ω, Ø 3,5 mm) - Tasa de rechazo frecuencia imagen - Tasa de rechazo frecuencia inter. - Consumo C) CARACTERÍSTICAS GENERALES: : : : : : : : : 40 AM / FM. (A32 / F3E) 26,965 a 27,405 Mhz 50 Ohms 13,2 Vcc ± 10% 150x170x45mm 1.2 Kgs 1 micrófono UP/DOWN y su soporte 1 soporte de
  • Страница 22 из 48
    y la potencia de su señal y debe provocar una contestación de tipo: «fuerte y claro la estación». Suelten el pedal y esperen una contestacion. Si utilizan un canal de llamada (19.27), y la comunicación se establece, es preciso elejir otro canal disponible para no obstruir el canal de llamada. DOS
  • Страница 23 из 48
    : : : : QRL QRM QRO QRP QRT QRV QRX QRY QRZ : : : : : : : : : QSA QSB : : QSL QSO : : QSP QSY QTC QTH QTR QUT : : : : : : Distancia aproximada en línea recta entre dos estaciones Frecuencia exacta Tonalidad de una emisión valorada de 1 a 3 Legibilidad, comprensibilidad de una señal. En CB, Radio
  • Страница 24 из 48
    CONDICIONES GENERALES DE GARANTÍA EN ESPAÑA • Consulte con su vendedor quien le aconsejará y se ocupará del seguimiento de su aparato, por intermedio nuestro si ha lugar. • Para toda intervención, fuera de garantía, cuyo importe se juzgue elevado en relación al valor del aparato, se hará un
  • Страница 25 из 48
    A REMITIR CUESTIONARIO CB CONFIDENCIAL RESPUESTA VIA CORREO Nombre.......................................................Apellidos ...........................................
  • Страница 26 из 48
    WARNING ! English Before using, be careful never to transmit without first having connected the antenna (connection "B" situated on the back panel of the equipment) or without having set the SWR (Standing Wave Ratio) ! Failure to do so may result in destruction of the power amplifier, which is not
  • Страница 27 из 48
    - N.B.: As the transceiver has a frontal microphone socket, it can be set into the dash board. In this case, you will need to add an external loud speaker to improve the sound quality of communications (connector EXT.SP situated on the back panel: D). Ask your dealer for advice on mounting your CB
  • Страница 28 из 48
    c) Fixed antenna: - A fixed antenna should be installed in a clear a space as possible. If it is fixed to a mast, it will perhaps be necessary to stay it, according to the laws in force (you should seek professional advice). All PRESIDENT antennas and accessories are designed to give maximum
  • Страница 29 из 48
    5) CHANNEL UP/DOWN B) HOW TO USE YOUR CB: To go up the channel, turn the channel switch to the right-handed. To go down the channel, turn the channel switch counterclockwise. Otherwise, you can go up/down the channel with “▲/▼” button on the MIC. 1) VOLUME Turn the rotary volume switch clockwise to
  • Страница 30 из 48
    English b) MEMORY 2 : This button is used to store the channel you want at memory mode. d) MEMORY 3 : This button is used to store the channel you want at memory mode. 10)SCAN, DUAL WATCH, MEMORY 3 11)AUTO-Q, MEMORY 4 a) SCAN : The channel Scan feature allows the radio to scan automatically through
  • Страница 31 из 48
    17)P1 / P2 / P3 BUTTONS : User define. on the LCD. After that, simply press “M6” button until the disappear from the display. The beep tone will now be turned off. To reactivate the “Beep” function, repeat the above process. By the way, beep tone is controled by rotary volume switch. b) MEMORY 6 :
  • Страница 32 из 48
    C ) EXTERNAL SPEAKER JACK (8 Ω, Ø 3,5 mm) C) TECHNICAL CHARACTERISTICS: - Frequency image rejection rate - Intermediate frequency rej. rate - Drain mum 1) GENERAL: D) TROUBLE SHOOTING: - Channels Modulation modes Frequency ranges Antenna impedance Power supply Dimensions (in mm) Weight Accessories
  • Страница 33 из 48
    UHF USB VHF stations, transmission testing» which will allow you to check the clearness and the power of your signal. Release the switch and wait for a reply. You should receive a reply like, «Strong and clear». If you use a calling channel (19, 27) and you have established communication with
  • Страница 34 из 48
    Mayday Meat wagon Midnight shopper Modulation Negative copy Over your shoulder Part your hair Pull your hammer back Rat race Rubberbander Sail boat fuel Smokey dozing Smokey with a camera Spaghetti bowl Stinger Turkey Up one Wall to wall What am I putting to you? : : : : : : : : : : : : : : : : : :
  • Страница 35 из 48
    ACHTUNG ! Deutsch Bevor Sie das Gerät benutzen geben Sie acht, daß eine Antenne angeschloßen ist. (Stecker B auf der hinteren Seite des Gerät). Vergessen Sie nicht das Stehwellenverhältnis einzustellen (SWR). Sonst ist das Risiko den Verstärker zu zerstören, was nicht von der Garantie anerkannt
  • Страница 36 из 48
    Abb. auf der nächsten Seite) mit den selbstschneidenden Schrauben (2) (Durchmesser des Bohrloches: 3,2 mm). Vergewissern Sie sich vorher, ob durch die Befestigung keine Leitungen innerhalb des Autos beschädigt werden! Der Montage-bügel! sollte an einer passenden Stelle angebracht werden, die einen
  • Страница 37 из 48
    älteren Wagen kann auch der Pluspol auf Masse liegen, während bei einigen Nutzfahrzeugen die Bordspannung nicht 12V, sondern 24V beträgt (A). Fragen Sie im Zweifelsfall Ihre Fachwerkstatt! Nachdem Sie sich hinsichtlich Spannung und Polarität versichert haben, gehen Sie wie folgt vor: a) Ihr
  • Страница 38 из 48
    frei stehen und bereits in ihrer endgültigen Position montiert sein. 4) LC-DISPLAY ANZEIGE * Abstimmung mit einem externen SWR-Meter (bei als Zubehör erhältlich) Alle Funktionen werden hier angezeigt. Der BARGRAPH zeigt den Empfangsstand und den Stand der Sendungsleistung. a) An Stelle des
  • Страница 39 из 48
    Tasten an. Wenn Sie das Funkgerät einschalten, erscheinen auf der Anzeige die erste Menüs: SCAN AUTO-Q MON BEEP EMG Drücken Sie M1 um die andere Menüs anzuzeigen (FUN blinkt auf der Anzeige) BATT DW LOCK und um die entsprechende Funktionen zu benutzen. b) Zweite Niveau Funktion In Verbindung mit
  • Страница 40 из 48
    Drücken Sie noch einmal M7 und das Gerät kommt wieder zum vorigen Gestaltung. EMG verschwindet von der Anzeige. b) Zweite Niveau Funktion In Verbindung mit der Taste R/M (14) erlaubt diese Taste den gewünschten Kanal zu speichern. Zum Senden drücken (um in das Mikrofon zu sprechen), zum Empfangen
  • Страница 41 из 48
    : : : Kanal frei ist. 2. Dazu die Rauschsperre öffnen, um schwächere Stationen nicht zu überhören. 3. Nur wenn der Kanal völlig frei ist, den eigenen Anruf starten. 4. Immer nur kurz rufen. 5. Nach jedem Anruf sorgfältig hören, ob eine Station antwortet. Erst dann den Anruf wiederholen. 6. Nach
  • Страница 42 из 48
    D E F G Delta Echo Foxtrott Golf L M N O Lima Mike November Oscar R/S-Code: R = Lesbarkeit 1 2 3 4 5 nicht lesbar, unverständlich zeit-oder teilweise lesbar schwer lesbar lesbar, verständlich gut lesbar S T U SV= 1 2 3 4 5 6 7 8 9 Sierra Tango Uniform Signalstärke Victor kaum hörbar sehr schwach
  • Страница 43 из 48
    TABLEAU DES FRÉQUENCES TABLA DE FRECUENCIAS FREQUENCY TABLES CB-KANÄLE UND IHRE FREQUENZEN N° du canal N° Canal Channel Kanal Fréquences Frecuencia Frequency Frequenzens N° du canal N° Canal Channel Kanal Fréquences Frecuencia Frequency Frequenzens 1 26,965 MHz 21 27,215 MHz 2 26,975 MHz 22 27,225
  • Страница 44 из 48
    44 Jean-Gilbert MULLER Directeur Général General Manager Director General Geschäftsführer Balaruc, le / the / el / den 23/04/2001 ETS 300 135 (1991) / EN 300 135-2 (2000) / ETS 300 433 (1995) / EN 300 433-2 (2000) est conforme aux exigences essentielles de la Directive 1999/5/CE (Article 3)
  • Страница 45 из 48
  • Страница 46 из 48
    NOTES 46
  • Страница 47 из 48
    0357/12-01 SIEGE SOCIAL/HEAD OFFICE - FRANCE - Route de Sète - BP 100 - 34540 BALARUC Site Internet : http://www.president-electronics.com E-mail : groupe@president-electronics.com
  • Страница 48 из 48