C:\#WORK\@DPF\DPF-A72N\Writer-OP\06_FinalDelivery\GB\4155760111\4155760111DPF-A.E.D.72NCEK\050C03.fm
Master:
Left
DPF-A72N/E72N/D72N 4-155-760-
11
(1)
36
GB
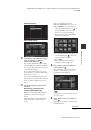
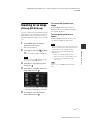
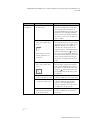
Deleting an image
1
Press MENU when an image is
displayed on the screen.
The menu is displayed.
2
Press
B
/
b
to select the
(Editing)
tab.
The screen used for editing is displayed.
3
Press
v
/
V
to select [Delete] and
then press
.
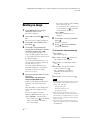
4
Press
v
/
V
to select [Delete this
image], [Selected images] or [Delete
all images] and then press
.
If you select [Delete this image], the
image currently displayed is deleted. Go
to step 6. (This item cannot be selected on
the slideshow display.)
If you select [Selected images], you can
select the image you want to delete from
the image list. Go to step 5.
If you select [Delete all images], the
image list is displayed. A check mark is
attached to the check box of all the
images. Go to step 6.
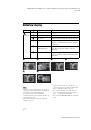
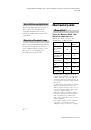
5
Specify the image to delete from the
image list.
About image searching in the
image list (DPF-D72N only)
During a search: Displays all the images
applicable to the criteria used for the
search.
Other than during a search: Displays all
images in the device displayed on the
screen.
Refer to “Searching for an image
(Filtering) (DPF-D72N only)” (page 39).
1
Press
B
/
b
/
v
/
V
to select the image to
delete and then press
. A check mark
will be attached to the check box of
each selected image.
Repeat this operation to delete multiple
images at the same time.
To cancel the selection, select images to
cancel and then press
to delete the
check mark in the check box.
2
Press MENU.
The delete confirmation screen is
displayed.
6
Press
v
/
V
to select [Yes] and then
press .
The image is deleted.
7
Press
when the confirmation
screen is displayed.
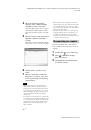
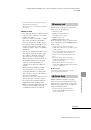
To format the internal memory
1
Press MENU.
The menu is displayed.
2
Press
v
/
V
to select the
(Settings) tab.
The settings screen is displayed.
3
Press
v
/
V
to select [Initialize] and then
press .
4
Press
v
/
V
to select [Format internal
memory] and then press
.
The confirmation screen used for
initializing the internal memory is
displayed.
5
Press
v
/
V
to select [Yes], then press
.
Notes
• Avoid doing the following while an image is being
deleted. Doing so may damage the photo frame,
memory card, or the data:
– Turning off the power
– Removing an memory card
– Inserting another card
• When the message [Cannot delete a protected
image.] appears on the screen, the image file was set
to Read Only on a computer. In this case, connect
the photo frame to a computer, and delete this file
using the computer.
• The total capacity of the internal memory is not
equal to the remaining capacity, even immediately
after initialization.