Инструкция для TELEFUNKEN TF-1625U

(скачивание инструкции бесплатно)
Формат файла: PDF
Доступность: Бесплатно как и все руководства на сайте. Без регистрации и SMS.
Дополнительно: Чтение инструкции онлайн
background image

4

Instruction manual

4

•  When fully charged, the course of charging 

stops automatically. Now the adaptor can be 
unplugged from the unit.

  To ensure safety, neither change the 

parts and fitments of the battery by yourself nor 
unwrap the battery. We suggest you use only 
the battery and the adapter supplied with the 
unit, so as not to do the damage to the unit.
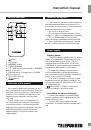
Additional power

•  Included are 2 AG13 batteries (1.5 V) 

which are to be inserted in the terminal inside 
the battery compartment. This is additional 
power is intended for operation of clock, alarm, 
calendar, thermometer and countdown timer. 
Without the additional power the time and 
alarm settings will not be stored if the unit is 
switched off.

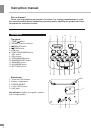
•  To install the batteries, unscrew the screw 

on the battery compartment on the back 
panel. Make sure to observe the polarity of the 
batteries

•  When the batteries are exhausted they 

should be replaced. New batteries should be 
aquired by user. Replace the batteries only 
with batteries of the same type.

ATTENTION

: AG13 batteries are 

consumables not covered by warranty, and 
their failure (discharge) is not a ground for 
addressing to service and repair centers
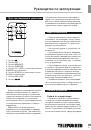
General operations

Power on/off

When the unit is connected to the current 

supply mains, slide POWER switch to ON 
position to switch the power on. To switch the 
power off, slide POWER switch to OFF position.

Clock and calendar

•  In clock mode (no ALARM indication) 

press and hold SET button to enable time 
setting mode. Press repeatedly SET button 
to go to setting of parameters in following 
sequence: minute => hour => 12/24-hour 

=> year => month => date. The selected 
parameter will blink meaning readiness for 
adjustment. The default time setting is 01-01, 
2014, THU, 12-hour, AM12:00.

•  Press TUNE/ 

 button to adjust the 

parameter up. Press 

/TUNE to adjust the 

parameter down.

•  Day of week will be set automatically.
•  In time setting mode, if no button is pressed 

within 10 seconds after a parameter is selected, 
the unit will automatically go to clock mode.

•  In time setting mode, press MODE button 

to return to clock mode.

Thermometer

The unit is equipped with a built-in 

thermometer. The current temperature is 
updated every 30 seconds and is shown on the 
display. In clock mode press SNOOZE button 
to select Celsius or Fahrenheit thermometer 
mode.

AUX input

To connect an external audio device (eg. 

MP3-player), please use a standard stereo 
cable with 3.5 mm to 3.5 mm plugs to connect 
the audio line-out of the external device to the 
AUX input socket of this unit.

Backlight

Hold the SET button for 2 seconds to 

switch on the backlight, repeatedly press for 2 
seconds to switch it off.

Radio operation

•  Radio reception is only available when the 

unit is powered by the rechargeable battery.

•  In clock mode press FUNCTION button to 

choose the radio mode.

•  For FM reception extend the telescopic 

antenna.

•  To adjust the frequency step by step 

press repeatedly TUNE/ 

/

/TUNE buttons. 

For automatic search of a station, press and 
hold TUNE/ 

/

/TUNE buttons; the unit will 

1
2
3
4
5
6
7
8
9
10
11
12
13
14
15
16
Оглавление инструкции
  • Страница 1 из 17
    PORTABLE RADIO RECEIVER / ПОРТАТИВНЫЙ РАДИОПРИЁМНИК TF-1625U Instruction manual Руководство по эксплуатации
  • Страница 2 из 17
    Instruction manual Dear customer! Thank you for purchasing our product. For safety, it is strongly recommended to read this manual carefully before connecting, operating and/or adjusting the product and keep the manual for reference in future. Description 2 1 3 4 5 6 Top panel 1. TUNE/ button 2.
  • Страница 3 из 17
    Instruction manual Remote controller Important safeguards 5 C/F SNZ 1 2 3 MEM REP 4 PWR FUN EQ ALM 6 7 8 • The instruction manual contains important operating and maintenance instructions. For your safety, it is necessary to refer the manual. Keep the manual for use in future. • Do not hit or drop
  • Страница 4 из 17
    Instruction manual • When fully charged, the course of charging stops automatically. Now the adaptor can be unplugged from the unit. To ensure safety, neither change the parts and fitments of the battery by yourself nor unwrap the battery. We suggest you use only the battery and the adapter
  • Страница 5 из 17
    Instruction manual look for the next available station and start its broadcast. Repeat the operation to search more stations. • To save a station, press and hold MEM/ REP button. The memory position will blink. Press MEM-UP/MEM-DN buttons to select a memory position. Press MEM/REP button to save
  • Страница 6 из 17
    Instruction manual Alarm operation Setting the alarm • Press and hold ALARM button, then press repeatedly AlARM button to go to setting of parameters in following sequence: alarm minute => alarm hour => alarm sound (OFF/ MP3/FM/Bibi). The selected parameter will blink meaning readiness for
  • Страница 7 из 17
    Instruction manual Specifications FM frequency range 64 - 108 MHz Supported storages USB/SD/MMC Lithium-ion battery 3.7 V / 1100 mA Adaptor input power 220 V ~ 50 Hz / 0.2 A Adaptor output power DC 5 V / 500 mA Nominal power consumption 2.5 W Output power 2W Nominal voltage (clock) 3 V (1.5 V x 2
  • Страница 8 из 17
    Руководство по эксплуатации Уважаемый покупатель! Благодарим Вас за покупку нашего изделия. Чтобы понять, как правильно и безопасно пользоваться Вашей моделью изделия, рекомендуется тщательно изучить настоящее руководство перед включением, регулировкой и эксплуатацией изделия. Сохраняйте
  • Страница 9 из 17
    Руководство по эксплуатации Пульт дистанционного управления 5 C/F SNZ 1 2 3 MEM REP 4 PWR FUN EQ ALM 6 7 8 1. Кнопка 2. Кнопка SET 3. Кнопка MEM/REP 4. Кнопка PWR/FUN 5. Кнопка C/F / SNZ (соответствует кнопке SNOOZE на устройстве) 6. Кнопка EQ/ALM (соответствует кнопке ALARM на устройстве) 7.
  • Страница 10 из 17
    Руководство по эксплуатации • Для поддержания батареи в наилучшем состоянии рекомендуется не реже раза в месяц полностью разряжать ее, то есть пользоваться устройством до тех пор, пока оно не отключится самостоятельно. • В процессе заряда батарея и устройство могут слегка нагреваться – признаком
  • Страница 11 из 17
    Руководство по эксплуатации перейдет в режим часов. • В режиме настройки времени нажмите кнопку MODE для возврата к режиму часов. Термометр Устройство оснащено встроенным термометром. Текущая температура обновляется каждые 30 секунд и отображается на дисплее. В режиме часов нажмите кнопку SNOOZE
  • Страница 12 из 17
    Руководство по эксплуатации Воспроизведение • Во время воспроизведения нажмите кнопку , чтобы установить воспроизведение на паузу. Нажмите эту кнопку еще раз для продолжения воспроизведения. • Во время воспроизведения нажимайте кнопки TUNE/ / /TUNE для перехода к предыдущему или следующему треку. •
  • Страница 13 из 17
    Руководство по эксплуатации устройству USB-носитель или карту памяти, включите режим USB/SD/MMC. Нажмите и удерживайте кнопку ALARM. На дисплее отобразится надпись AL SET («будильник установлен»). Не выбирайте USB/SD в качестве сигнала будильника если соответствующий носитель не подключен к
  • Страница 14 из 17
    Руководство по эксплуатации Технические характеристики FM-диапазон радиочастот 64 - 108 MГц Поддержка носителей USB/SD/MMC Литиево-ионный аккумулятор 3,7 В / 1100 мА/ч Входное напряжение адаптера 220 В ~ 50 Гц / 0,2 А Выходное напряжение адаптера 5 В постоянного тока / 500 мА Номинальная
  • Страница 15 из 17
    Руководство по эксплуатации
  • Страница 16 из 17
  • Страница 17 из 17