8
Operating the tiller
Ensure the machine is placed on a level surface
with the support wheels lowered prior to start.
Remove all foreign objects from the work area
before using the machine. Stones, glass, branches
and similar items may damage the tiller. Also check
the bolts on the tiller are tightened.
Start the motor as per the instructions below. Stand
clear of the machine’s moving parts.
Never attempt to move the machine in any way
other than intended for normal use while the motor
is running.
The tiller is designed for use in vegetable gardens and
flowerbeds. Ensure that you are familiar with these
instructions before operating the machine, in particular the
motor start and stop procedures.
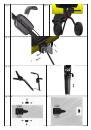
Fig 12: To use the black handle the control stick must first be
activated. By tilting the control stick to the right or left side
and then activate the black handle lever, the tiller will move
forward or backwards.
Pay attention while reversing. It is important that the area is
cleared, for any obstacle before reversing. Never reverse the
tiller against a wall, tree or any other fixed obstacle.
Operation zone
While the machine is being operated and the motor is
running, do not leave the operation zone marked fig 13B. If it
is necessary to leave the operation zone, for example to
attach an accessory, first stop the engine.
It is normally necessary to drive the tiller over a section of
earth 2-3 times from different directions. Do not till very wet
soil, as clods of earth will form that are difficult to break up.
Adjusting the handle
Fig 14.The handle angle can be adjusted. Use the two hand
wheels to set one of the 3 available positions. The handle
can be flipped forward during transport. NB: Ensure the
cables do not become trapped.
Adjusting the wheel/ depth skid
Fig 15.During operation, it may be necessary to raise the
wheel assembly, as it is connected to the depth skid.
Depress the pedal to the right of the support wheels to adjust
the wheel assembly/depth skid to one of the 3 available
positions.
The depth skid can be set to 3 different depths. The deeper it
extends into the soil, the deeper the tilling blades will work
and the slower the machine will advance. Setting the correct
tilling depth will significantly reduce the effort required. The
depth skid should always be adjusted to suit the ground
conditions. We recommend testing several depths to see
which works best.
Starting and stopping the engine
Remember: Always check the oil level prior to use!
The oil level must always be between the min. and max.
Mark on the dipstick. Always use SAE-30 oil. Use only
unleaded 95 octane gas. Never over-fill the gas tank.
Warning: Stay out of dashed zone, while starting the engine!
Always start the engine from dotted operation zone See
Figure 13A.
LX550TG
Starting the engine. See fig. 16.A
1. Pump the primer 5-10 times
2. Set the throttle control to max.
3. Pull the start cord to start the motor. Always feed the
start cord back into the motor by hand. Engage the
throttle slightly if required.
Stopping the engine
1. Set
the throttle control to “low” and let the motor run for
approx. 30 seconds.
2. When the motor idles, set the throttle control to full stop.
LX550B
Starting the engine See fig. 16.B
1. Set the throttle control on the handle to max.
2. Position the choke at max. Move the choke lever fully to
the left.
3. The choke is not required if the motor is hot.
4. Pull the start cord to start the motor. Always feed the
start cord back into the motor by hand.
5. When the motor is started, set the choke to minimum
(fully to the right) Engage the throttle slightly.
Stopping the engine
1.
Set the throttle control to “low” and let the motor run for
approx. 30 seconds.
2. When the motor idles, set the throttle control to full stop.
Vibrations may travel up into the handle during
use. We therefore recommend taking a break
every 2 hours.
Cleaning the tiller
The tiller should be cleaned after use. Use a garden hose to
wash off soil and dirt. Remove any grass, etc. from the rotor
shaft. The chassis number should only be cleaned with a
damp cloth to avoid unnecessary wear. Avoid using a high-
pressure washer during cleaning.
Changing the oil
The oil should initially be changed after the first 5 hours of
use, and thereafter once per year.
1. Let the motor run for 5 minutes to heat up the oil.
This allows the oil to run more freely and makes for
a more complete oil change.
2. After 5 minutes, stop the motor. Remove the spark
plug cap. Drain the oil by unscrewing the sump plug.
Remember to drain the oil into a container of
sufficient capacity. NB: The motor must not be
tipped backwards more than 45 degrees.
3. Screw the sump plug back in and pour new oil into
the motor. Do this by removing the dipstick and
pouring in the recommended quantity of oil.
4. Refit the spark plug cap.
Alternatively, use an oil change pump kit.
1. Suck the oil up through the oil filler hole using the
syringe. Use the hose to reach the sump.
2. Transfer the used oil to the container.
3. Fill the engine with new SAE-30 oil.
4. Check the oil level using the dipstick.
Remember to dispose of used oil in an ecologically sound
manner .Oil and oil pump kit is not included.