You are recommended to use the
Full
screen mode.
Do not use the display mode with black bands on both
sides of the picture (such as
Standard
) for long time,
otherwise the TV screen may be damaged permanently.
Notes:
When
Zoom
is selected, you can press the left / right
direction button to zoom out / in the picture after exiting
from menu.
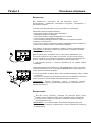
80
Standard
Full
50
50
50
50
0
Normal
Off
Off
BackLight
Picture Mode
Scale
Brightness
Contrast
Saturation
Sharpness
Color Temp
Natural Light
Dynamic Contrast
Tint
Picture
9
Swapping Two Channels
1. select
the
Current Channel
option and press the left or right
the
Target Channel
option and press the left or right
the
Swap
option and press the left, right
Press the up or down direction button to
direction button to select a channel number.
2. Press the up or down direction button to select
direction button to select the channel number to be
swapped.
3. Press the up or down direction button to select
direction or
OK
button to swap.
Skipping a Channel
Advanced Functions
Chapter 3
General Operation
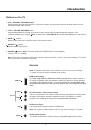
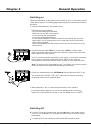
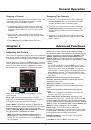
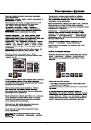
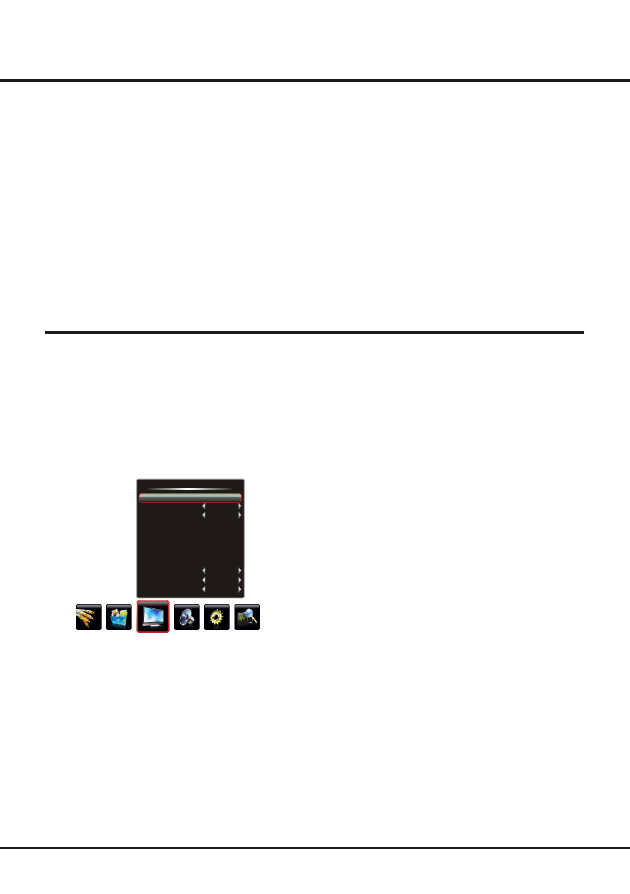
Adjusting the Picture
The menus for adjusting the picture are used to obtain the
best picture setting according to your preference, the type
of programme you are watching and the ambient lighting.
Display the menu by pressing the
Menu
button. Press the
left or right direction button to select the
Picture
icon and
press the
or down direction or
OK
button to enter
the
Picture
menu. The
Picture
options are as below:
Back Light
:
Picture Mode:
use the
direction or
OK
through the picture preset
settings:
Standard
,
Bright
,
Soft
or
,
up
this option can be used to adjust the
brightness of the backlight, depending on room lighting.
Use the left or right direction button to adjust.
right
button
to
display the selectable options, then press the up or down
direction button to scroll
Personal
and press
the right direction or
OK
button to confirm.
Note:
When selecting
Standard
,
Bright
,
Soft
, the
Back Light
will restore to the defaulted setting in
factory. You are recommended to use the
Bright
mode
for vivid palette.
If a channel was stored twice or its reception is poor, you
can simply skip it. The skipped channels can not be
selected by pressing the
CH +/-
buttons.
1. select
the
Current Channel
option and press the left or right
the
Skip
option and press the left or right
Press the up or down direction button to
direction button to select the channel number to be
skipped.
2. Press the up or down direction button to select
direction button
to select
Yes
.
3.
Press
Menu
to return or
Exit
to close the menu.
Note:
Some options may be not available for certain
signal sources.
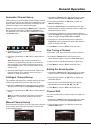
Scale:
use the
direction or
OK
through the picture size:
Standard
,
Full
,
,
Wide Screen
,
Zoom
,
Expand
button to display
the selectable options, then press the up or down direction
button to scroll
Subtitle
(
Note
: some options may be not selectable for
certain signal sources.)
And press the right direction or
OK
button to confirm.
right
Original
and
Natural
.
Press
Menu
to return or
Exit
to close the menu.
Note:
Tint is available to be adjusted only when the
system of the video signal is NTSC.
Brightness:
adjusts the brightness of the picture.
Contrast:
adjusts the difference between the light and
dark areas of the picture.
Saturation:
adjusts the richness of color.
Sharpness:
adjusts the crispness of the edges in the
picture.
Tint
adjusts the balance between the red and green
levels.
:
Color Temp (Color Temperature):
adjusts the color
temperature of the picture. Use the
direction or
OK
through
.
right
button to display the selectable options, then press the up
or down direction button to scroll
the color settings:
Cool
for a more blue palette of picture colors;
Normal
; and
Warm
for a more red palette of picture colors
Natural Light
:
turns on this option to adjust the
brightness of the backlight according to the content of the
inputted signal automatically, so as to optimize the picture
quality and decrease the power consumption.
Dynamic Contrast
:
turns on this option to adjust the
contrast automatically.