Инструкция для TIMBERK AC TIM 09H S20

(скачивание инструкции бесплатно)
Формат файла: PDF
Доступность: Бесплатно как и все руководства на сайте. Без регистрации и SMS.
Дополнительно: Чтение инструкции онлайн
background image

www.timberk.com • Electric air conditioner

www.timberk.com • Electric air conditioner

12

13

When selecting «no display» on the remote controller, the temperature 

indicator which on the indoor units will display the set temperature.
When selecting «    » with remote controller, temperature indicator on indoor 

unit displays indoor ambient temperature.
When selecting «    » with remote controller, temperature indicator on indoor 

unit displays outdoor ambient temperature.

CLEAN button

The Clean mode can not be set in the state of power-on; if the air 

conditioner ran Cooling and Dry mode before turning off. Press «CLEAN» 

button and show «     » then the Clean mode is turned on; Press «CLEAN» 

button again, «     » disappeared, then the Clean mode is turned off, or 

running 10 mins in Clean mode then turn off automatically.
In hte first power on, the Clean mode is turned off acquiescent.
The Clean mode can not be set and displayed when the air conditioner was 

in auto, Fan and Heat mode before turned off.

CLOCK button

Press this button to set clock time. «    » and «        » icon on remote 

controller will blink. Press «    » or «    » button within 5s to set clock time. 

Each pressing of «   » or «   » button, clock time will increase or decrease 1 

hour. Press this button again, «     » and «           » icon on remote controller 

will blink. Press «    » or «    » button within 5s to set clock time. Press this 

button another time, «      » and «           » icon on remote controller will blink. 

Press «    » or «    » button within 5s to set clock time. If hold «    » or «    » 

button, clock time will change quickly.
Release when reaching your required time. Press «CLOCK» button to 

confirm the time, «    » icon stops blinking.

TIMER ON button

This button can set the time for timer on. After pressing this button, «    » 

icon disappears, «ON» and «            » icon on remote controller blinks. Press 

«    » or «   » button within 5s to set «TIMER ON» time. Each pressing of 

«     » or «    » button, the time will increase or decrease 1 hour. Press this 

button again, «ON» and «            » icon on remote controller will blink. Press 

«     » or «    » button within 5s to set the time. Press this button another 

time, «ON» and «           » icon on remote controller will blink. Press «      » 

or «     » button within 5s to set the time. Hold «    » or «    » button, the time 

will change quickly until reaching your required time. Press «Timer ON» to 

confirm it. The word «ON» will stop blinking. «     » icon resumes displaying.

Cancel TIMER ON

Under the condition that TIMER ON is started up, press «TIMER ON» 

button to cancel it.

TIMER OFF button

This button can set the time for timer on. After pressing this button, «     » 

icon disappears, «ON» and «             » icon on remote controller blinks. Press 

«     » or «    » button within 5s to set «TIMER ON» time. Each pressing of 

«     » or «     » button, the time will increase or decrease 1 hour. Press this 

button again, «ON» and «            » icon on remote controller will blink. Press 

«      » or «     » button within 5s to set the time. Press this button another 

time, «ON» and «         » icon on remote controller will blink. Press «     » or 

«      » button within 5s to set the time. Hold «     » or «     » button, the time 

will change quickly until reaching your required time. Press «Timer ON» to 

confirm it. The word «ON» will stop blinking. «     » icon resumes displaying.

Cancel TIMER OFF

Under the condition that TIMER OFF is started up, press “TIMER OFF” 

button to cancel it.

NOTE:

Outdoor temperature display is not available for some 
models. At that time, indoor unit receives « « signal, it 
displays indoor set temperature.

NOTE:

Clock time adopts 24-hour mode.
The interval between two operation can’t exceeds 5s. 
Otherwise, remote controller will quit setting status. 
Operation for TIMER ON/TIMER OFF is the same.

QUIET button

Press this button to turn on or turn off the QUIET function in cool heat auto 

mode.

ECO button

In cool mode, press «ECO» button and the unit will operate under ECO 

mode.

ECO button

Press this button can turn off the light for indoor unit’s display. «     » icon on 

remote controller will disappear.Press this button again to turn on the light 

for indoor unit’s display. «    » icon on remote controller will be displayed.

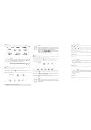
Function introduction for combination buttons 

Child lock function

Press «    » and «    » simultaneously to turn on or turn off child lock function. 

When child lock function is on, «     » icon is displayed on remote controller. 

If you operate the remote controller, the «     » icon will blink three times 

without sending signal to the unit.

Temperature display switchover function

In the off mode, press «     » and «MODE» buttons simultaneously to switch 

temperature display between 

0

C and °F.

The minimum cooling temperature setting

IIn the off mode,pressing «TEMP» and «    » button at the same time,the 

LCD will display the minimum cooling temperature.The default temperature 

is 16

0

C and you can adjust the temperature with «    » or «    » from 16

0

to 31

0

C . After pressing the «TEMP» and «    » button with 3 seconds it will 

return to the standby mode.

The maximum heating temperature setting

In the off mode,pressing «TEMP» and «     » button at the same time,the LCD 

will display the maximum heating temperature.The default temperature is 

31 

0

C and you can modulate the temperature with «    » or «    » from 16 

0

to 31 

0

C . After pressing the «TEMP» and «    » button with 3 seconds it will 

return to the standby mode.

Timing defrost

In the heating mode, press «SLEEP» and «TURBO» buttons together for 3s 

would start or cancel the Timing defrost.

Low temperature heating function setting

In heating mode, pressing «Mode» and «   » button at the same time will 

enter/exit the low temperature heating function.
«LA» would be showed on the remote controller after entered into the low 

temperature heating funtion.
When switching from one mode to another mode, low temperature heating 

function was canceled. Turn off and then turn on air conditioner that will 

remain the low temperature heating function. After powered on, the low 

temperature heating mode was default to off status.
In the low temperature heating mode, «SLEEP» and «Low temperature heating» 

function cannot start at same time. When low temperature heating mode has 

already started,meanwhile you press the «sleep» button, the air conditioner will 

exit low temperature heating mode and enter the sleep mode. Vice versa.

NOTE:

Press «TURBO» or «FAN» button the unit will quit this 
function.
This function is no use in fan mode or dry mode.

NOTE:

Remote controller displays «ECO».
Air conditioner will operate at auto fan speed. Set 
temperature can’t be adjusted.
Under cool mode, sleep function can not work with 
ECO mode together at the same time.
Change mode will exit the ECO mode.

1
2
3
4
5
6
7
8
9
10
11
12
13
14
15
16
17
18
19
20
21
22
23
Оглавление инструкции
  • Страница 1 из 24
    Instruction manual Руководство по эксплуатации Сплит-система on-off / Инверторная сплит-система Split system on-off / DC Inverter split system Модели/Models: Сплит-система on-off / Инверторная сплит-система (внутренний блок) Split system on-off / DC Inverter split system (indoor unit) • AC TIM 07H
  • Страница 2 из 24
    CONTENTS 1. Important information........................................................................2 2. Safeguards........................................................................................3 3.
  • Страница 3 из 24
    3. SPECIFICATIONS Модель AC TIM 07H S20 AC TIM 09H S20 AC TIM 12H S20 AC TIM 18H S20 AC TIM 24H S20 Модель AC TIM 07H S20 AC TIM 09H S20 AC TIM 12H S20 AC TIM 18H S20 AC TIM 24H S20 Внутренний блок AC TIM 07H S20 AC TIM 09H S20 AC TIM 12H S20 AC TIM 18H S20 AC TIM 24H S20 Внутренний блок AC TIM 07H
  • Страница 4 из 24
    Модель AC TIM 09HDN S20 AC TIM 12HDN S20 AC TIM 18HDN S20 AC TIM 24HDN S20 Модель AC TIM 09HDN S20 AC TIM 12HDN S20 AC TIM 18HDN S20 AC TIM 24HDN S20 Внутренний блок AC TIM 09HDN S20 AC TIM 12HDN S20 AC TIM 18H S20 AC TIM 24HDN S20 Внутренний блок AC TIM 09HDN S20 AC TIM 12HDN S20 AC TIM 18H S20 AC
  • Страница 5 из 24
    Auto Set fan speed I feel Turbo mode Auto mode ● Send signal Quiet mode Clean mode ● ● ● ● Dual-8 nixietube ● ● Cool mode ● ● Dry mode ● ● ECO mode Fan mode ● ● Sleep mode Heat mode Left&right swing Temp. display type ● ● ● ● Child lock Clock display Light Up&down swing ● ● ● Indoor ambient temp. ●
  • Страница 6 из 24
    FAN button Pressing this button can set fan speed circularly as: auto (AUTO), fan1( ), fan2 ( ), fan3 ( ), fan4( ), fan5 ( ), infinite fan. NOTE: When selecting « » with remote controller, it’s auto swing. Horizontal louver of air conditioner will swing up&down automatically at the maximum angle.
  • Страница 7 из 24
    When selecting «no display» on the remote controller, the temperature indicator which on the indoor units will display the set temperature. When selecting « » with remote controller, temperature indicator on indoor unit displays indoor ambient temperature. When selecting « » with remote controller,
  • Страница 8 из 24
    NOTE: 1.In the low temperature heating mode, the fan speed was default to Auto and nonajusatable. 2.In the low temperature heating mode, «TURBO» and «QUIET» can’t be set. If enter the low temperature heating mode,the turbo and quiet function that started before will be canceled. As well as when
  • Страница 9 из 24
    Содержание* 1. Важная информация.......................................................................16 2. Меры предосторожности................................................................17 3. Технические характеристики..........................................................18 4. Описание
  • Страница 10 из 24
    3. ТЕХНИЧЕСКИЕ ХАРАКТЕРИСТИКИ Модель AC TIM 07H S20 AC TIM 09H S20 AC TIM 12H S20 AC TIM 18H S20 AC TIM 24H S20 Модель AC TIM 07H S20 AC TIM 09H S20 AC TIM 12H S20 AC TIM 18H S20 AC TIM 24H S20 Внутренний блок AC TIM 07H S20 AC TIM 09H S20 AC TIM 12H S20 AC TIM 18H S20 AC TIM 24H S20 Внутренний
  • Страница 11 из 24
    Модель AC TIM 09HDN S20 AC TIM 12HDN S20 AC TIM 18HDN S20 AC TIM 24HDN S20 Модель AC TIM 09HDN S20 AC TIM 12HDN S20 AC TIM 18HDN S20 AC TIM 24HDN S20 Внутренний блок AC TIM 09HDN S20 AC TIM 12HDN S20 AC TIM 18H S20 AC TIM 24HDN S20 Внутренний блок AC TIM 09HDN S20 AC TIM 12HDN S20 AC TIM 18H S20 AC
  • Страница 12 из 24
    4. ОПИСАНИЕ ПРИБОРА Кондиционер состоит из внутреннего и наружного блоков, соединенных трубопроводами. Управление кондиционером осуществляется с пульта дистанционного управления или с панели управления внутреннего блока. лицевая панель воздухозаборник 7. УПРАВЛЕНИЕ ПРИБОРОМ 5. КОМПЛЕКТ ПОСТАВКИ ● ●
  • Страница 13 из 24
    «ВКЛ/ВЫКЛ» – кнопка включения/выключения. С помощью данной кнопки можно включить или выключить кондиционер. Кнопки « » / « » (увеличение/уменьшение). С помощью данных кнопок задается необходимая пользователю температура воздуха в помещении. При нажатии и удержании данных кнопок одновременно в
  • Страница 14 из 24
    ПРИМЕЧАНИЕ Пожалуйста, не оставляйте пульт дистанционного управления вблизи объектов с высокой или низкой температурой, чтобы избежать неточных показаний температуры окружающей среды. Кнопка «Темп» (Temp) При нажатии на эту кнопку, вы можете увидеть установленную температуру , текущую температуру в
  • Страница 15 из 24
    Комбинации клавиш Функция блокировки от детей Нажмите « » и « » одновременно, чтобы включить или выключить функцию защиты от детей. Когда функция блокировки от детей включена, символ « » отображается на пульте дистанционного управления. Если вы будете использовать пульт дистанционного управления,
  • Страница 16 из 24
    ГАРАНТИЙНЫЙ ТАЛОН Гарантийные обязательства Гарантийное обслуживание и ремонт электрического кондиционера воздуха TIMBERK с соблюдением требований и норм Изготовителя (TIMBERK) производится на территории РФ только в авторизованных сервисных центрах Изготовителя или мастерских, уполномоченных
  • Страница 17 из 24
    Увеличенный гарантийный срок* Увеличенный гарантийный срок для компрессора кондиционера воздуха TIMBERK составляет 3 года*, со дня передачи изделия потребителю. Гарантийные обязательства дополняют и уточняют оговоренные законом обязательства, предполагающие соглашение сторон либо договор; выдаются
  • Страница 18 из 24
    ВНИМАНИЕ! Если маркировочная (идентификационная) наклейка на изделие Timberk (Timberk ID) закреплена на изделии не плотно и существует риск ее утери, то вклейте ее в гарантийный талон на последней странице. Таблица 1. Рекомендуемые профилактические работы для увеличения срока гарантии на компрессор
  • Страница 19 из 24
    Заполняется сервисным центром ВНИМАНИЕ! «А» Дата приема Дата выдачи Печать сервисного центра Срок проведения экспертизы и гарантийного ремонта - не более 45 дней с момента приемки дефектного изделия авторизованным сервисным центром Timberk. Особые отметки Дата выдачи Печать сервисного центра «В»
  • Страница 20 из 24
    Профилактическое обслуживание изделия. (Заполняется специалистом авторизованного сервисного центра) Дата приема №№ Дата выдачи Номер заказа-наряда Дата выполнения работ Перечень выполненных работ Наименование СЦ Ф.И.О. Исполнителя подпись печать Печать сервисного центра Проявление дефекта Мастер
  • Страница 21 из 24
    Профилактическое обслуживание изделия. (Заполняется специалистом авторизованного сервисного центра) №№ Дата выполнения работ Перечень выполненных работ Наименование СЦ Ф.И.О. Исполнителя подпись печать www.btpart.ru Все расходные материалы для продукции Timberk вы можете приобрести на сайте
  • Страница 22 из 24
    В целях информирования покупателей техники Timberk, мы дополнительно сообщаем, что русский является государственным языком в следующих государствах: • в Российской Федерации • в Республике Беларусь наряду с белорусским языком • в частично признанной Южной Осетии наряду с осетинским языком Русский
  • Страница 23 из 24
    www.timberk.com
  • Страница 24 из 24